Have you ever wondered how to control LED strips with Arduino to create mesmerizing light displays? This question sparks curiosity and opens the door to a world of creative possibilities. Many enthusiasts face challenges when starting with Arduino, often overwhelmed by technical jargon and complex setups.
Common misconceptions include the belief that controlling LED strips requires advanced programming skills or expensive equipment. In reality, with the right guidance, anyone can master this skill and unlock a new dimension of creativity. The benefits are vast, from enhancing home decor to developing a deeper understanding of electronics.
In this article, we’ll explore the simplicity and power of Arduino, demystifying the process of controlling LED strips. We’ll cover essential topics such as selecting the right components, writing basic code, and troubleshooting common issues. By the end, you’ll be equipped with the knowledge to create stunning light displays effortlessly.
So, are you ready to transform your space and expand your technical prowess? Join us as we delve into the fascinating world of Arduino and LED strips, where innovation meets inspiration.
Understanding LED Strips
In the enchanting world of LEDs, light-emitting diodes, commonly known as LED strips, offer vibrant, efficient lighting solutions adaptable for myriad applications. Their flexible design is nothing short of revolutionary.
LED strips generally consist of light-emitting diodes mounted on a flexible circuit board.
These captivating strips are distinguished by their brightness and versatility, typically powered by low-voltage sources.
With the rise of smart, connected technology, their popularity has surged in industries such as entertainment and architecture.
Modern LED strips can feature RGB (Red, Green, Blue) or individually addressable RGB systems, allowing complex displays and effects.
Ultimately, the real marvel of LED strips lies in their simplicity and power. Understanding them unveils a realm of vibrant possibilities waiting to be explored.
Introduction to Arduino
Arduino stands as a groundbreaking open-source electronics platform that has democratized the world of microcontroller programming and embedded systems for hobbyists, students, and professionals alike.
Designed to be user-friendly, its versatility empowers users to craft innovative projects.
The essence of Arduino lies in its ability to bridge digital and physical realms by interfacing seamlessly with sensors, motors, LED strips, and more. This dynamic, user-centric platform serves as an incubator for inventiveness, experimentation, and the realization of spectacular projects.
With its robust community, Arduino has become more than just a tool; it is a catalyst for innovation and inspiration. Whether you are a novice looking to dip your toes into the water or a seasoned maker seeking to refine your skills, the world of Arduino offers an exciting landscape of possibilities. Its fundamental ethos is “education through doing”—a motto that resonates deeply as it invites you to embark on a journey of discovery.
Tools Needed for LED Strip Control
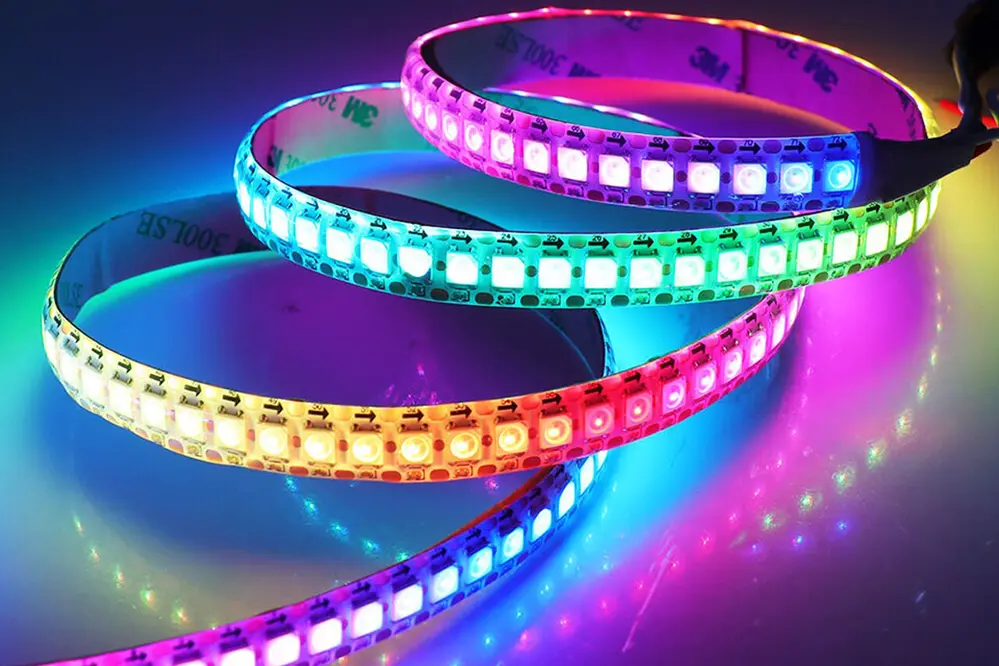
Harnessing the power of Arduino for color control with LED strips using PWM requires a few fundamental components, each playing a vital role in executing a vibrant and personalized light display.
Essentially, you will need an Arduino board, LED strips, and connecting wires to begin the project.
These components act as the building blocks to control dynamic light arrangements using Arduino, forming a platform for endless creativity and expression. The Arduino board serves as the brain, processing commands and interfacing with other hardware components, while the LED strips, available in numerous forms, translate these commands into dazzling visual effects.
The magic truly begins with a power supply adequate to support your LED strip’s demand, ensuring that they shine brightly without a hitch. Coupling these elements with a bit of code ingenuity unlocks a realm of personalized lighting masterpieces, limited only by your imagination. Furthermore, resources like online communities and endless tutorials offer a treasure trove of insights to elevate your project from “amazing” to “unforgettable.”
Choosing the Right LED Strip
Selecting the ideal LED strip can significantly impact the success and flexibility of your lighting project.
Firstly, it’s crucial to understand whether you need a single-color, RGB, or addressable strip, influencing your design choices. Single-color strips are excellent for straightforward applications, while RGB and addressable options allow for more dynamic light patterns. Understanding these different capabilities helps tailor your approach to suit your artistic vision, providing the technical foundation needed for truly creative lighting solutions.
Additionally, think about the intensity of illumination your project demands. To achieve specific ambiance levels, ensure the chosen strips align with your desired brightness and color rendering. Parameters like the strip’s density and power consumption also play a vital role, requiring close attention to match with your power supply for optimal operation.
Finally, make informed decisions by considering installation aspects such as flexibility, adhesive strength, and environmental durability. Such considerations ensure that the LED strip complements your project’s environment without compromising on performance and longevity. Whether envisioning an indoor display or an outdoor spectacle, these factors harmonize functionality with artistic intent, transforming your aspirations into a radiant experience.
Setting Up Your Arduino Board
Select the right Arduino model.
The initial step in controlling LED strips with Arduino is choosing the appropriate board. There are various models to pick from, like the Arduino UNO or the Mega, each with distinct capabilities and specifications. Importantly, evaluate the number of channels your LED strip requires and the power demands to ensure compatibility with your chosen board.
Gather necessary components.
Once you’ve selected the Arduino, acquire the components needed: USB cable, power supply.
Begin by connecting the Arduino to your computer via the USB cable to upload your sketches. This basic connection also powers the board during setup. Ensure the board receives adequate power, especially when using a led controller to manage power-hungry LED strips. Check the datasheet for voltage and current requirements to avoid issues.
It’s important to remember that the core of your project is programming the Arduino with the correct sketches to control your LED strip. Familiarize yourself with Arduino’s integrated development environment (IDE) and take advantage of its robust library support. Mastery of this setup will lay a solid foundation, enabling the seamless control of your vibrant LED landscapes, limited only by your imagination.
Connecting LED Strips to Arduino
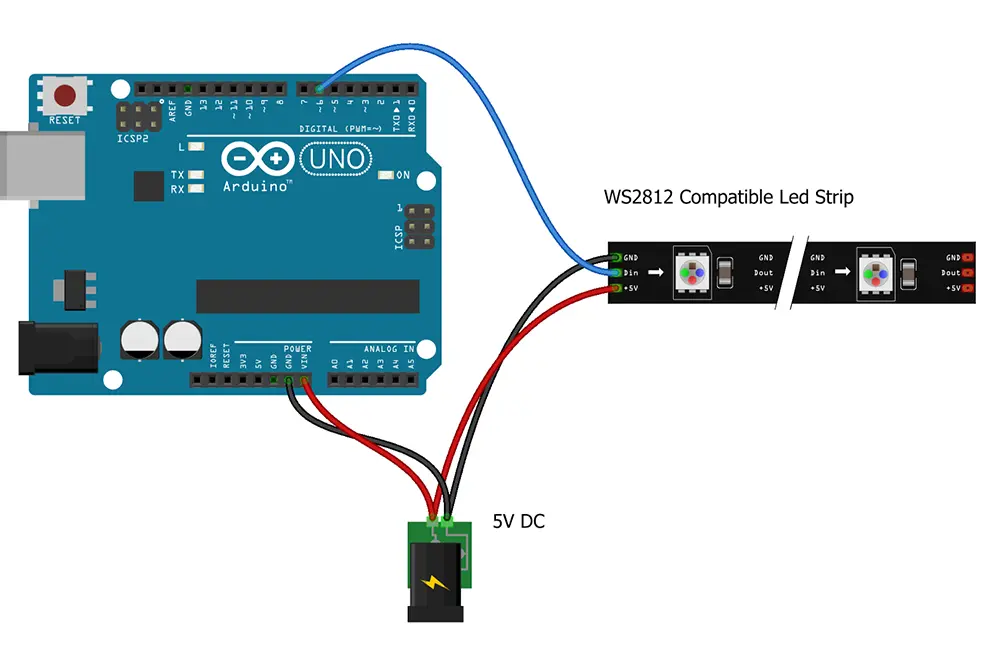
Embarking on the journey of connecting LED strips to Arduino is an exhilarating endeavor, poised to unleash a dazzling spectrum of light-based creativity. The integration process, though intricate, becomes a gratifying venture with a structured approach. With a blend of technical knowledge and creativity, you are stepping into a world where technology and art intertwine effortlessly.
Begin by identifying the specific type of LED strip you plan to use, such as the SK6812. This ensures you use compatible components.
Next, gather all necessary materials such as jumper wires, breadboard, resistors, and the appropriate power supply (often a 12V or 24V DC power adapter).
Connect the data pin of the LED strip to one of the digital pins on the Arduino, ensuring a firm and secure connection.
Power the LED strip either directly from the Arduino board for low-power strips, or use an external power source for more demanding setups. Take care to connect the ground wire of both the power source and the Arduino to maintain circuit continuity and avoid potential damage to components.
Finally, remember that this initial wiring step is crucial for future project success. Establishing reliable electrical connections lays the groundwork for your LED strip project, allowing your technical imagination to shine uninhibited.
Programming Basics for LED Control
Mastering the programming basics for LED control, like Arduino coding, is a thrilling venture into the world of creative technology. The primary language used is C++, a versatile choice for microcontroller applications.
Each programming sketch begins with setup() and loop() functions, providing the fundamental structure. Setup() runs once, while loop() repeats endlessly, executing your LED lighting sequences.
Include the essential library in your Arduino sketch, typically by using . This library is vital for controlling RGB LED strips effectively.
Declare a object specifying parameters like pin number and number of LEDs. These declarations tailor the behavior of your LED strip to your project’s demands.
Employ functions like and to manipulate individual LEDs or entire strips. Harness these tools to unleash rich color patterns that captivate and mesmerize.
Remember, the joy of code lies in its power to transform ideas into tangible experiences. Coding resiliency and creativity are your allies in sculpting radiant lightscapes.
Writing Your First Arduino Code
Begin by launching the Arduino IDE on your computer, ensuring you’ve connected your Arduino board properly. Once confirmed, initiate your new sketch by defining the setup() and loop() functions, the heart of your code. In the setup(), initialize communication with your LED strip using the chosen library, setting the stage for vibrant displays.
In the loop(), implement logic to cycle through colors or patterns, keeping your design lively and engaging. Test, tweak, and refine your code to reflect your vision brilliantly.
Uploading Code to Arduino
Uploading code to Arduino is fundamental—ensuring programs execute smoothly and responsibly on your device.
Over 30 million Arduino boards have been sold, a testament to thriving innovation and creativity.
To begin, connect your Arduino board to your computer using a USB cable. Open the Arduino IDE and select your board and port from the tools menu to establish a connection successfully.
After confirming the connection, click the upload icon. The IDE will compile and transfer your code to the board, making it ready to bring your LED strip to life.
Testing LED Strip Functionality
Once your code is uploaded, begin by verifying that your LED strips respond as expected and illuminate with the desired patterns.
First, witness the thrilling moment as the programmed colors dance across the LED strip, creating an awe-inspiring display. Confirm that the colors transition smoothly and as desired, ensuring each segment responds correctly. Listen for any irregularities that might indicate connectivity issues. If everything appears operational, it’s a sign of success; otherwise, adjustments may be necessary to achieve perfection.
Subsequently, test the entire spectrum of your intended sequences to ensure functionality across all modes. In this critical phase, visualize how your project will capture attention and enhance its environment. Refine the timing and intensity of each display to maximize the impact of your creation.
By meticulously covering each aspect of your configuration, testing LED strip functionality becomes an empowering step towards realizing your creative ambitions. The satisfaction of bringing complex electronics to life is both exhilarating and inspiring, underlining the boundless possibilities of merging technology with imagination. With careful testing, foster a robust and reliable LED strip setup that not only meets but exceeds expectations, transforming your ideas into stunning visual realities.
Troubleshooting Common Issues
With an Arduino-controlled LED strip project, occasional obstacles are expected, but they’re stepping stones to mastery.
Firstly, if the LED strip doesn’t light up, ensure all connections are secure and wires are properly aligned. This basic verification can often resolve initial concerns quickly.
Another common issue is flickering lights, which may result from inadequate power supply. Make sure the power source matches the strip’s requirements, delivering consistent voltage and current.
If LEDs display unexpected colors, it might stem from incorrect wiring of the data and ground lines. Double-check the wiring diagram and ensure pins are mapped accurately in code.
Approach any challenge with a confident mindset—troubleshooting is an opportunity to deepen understanding and refine your technical prowess.
Exploring Advanced Lighting Patterns
Dive into the art of dynamic lighting design.
With Arduino, the possibilities for creating mesmerizing light shows are boundless. You have the power to unlock the full spectrum of complex lighting sequences, allowing you to replicate the dazzling displays often seen in professional settings. Furthermore, taking time to experiment with programming techniques can unleash a new world of interaction as your LEDs dance along to meticulously crafted rhythms and patterns.
The magic of advanced programming can bring your vision to life.
Utilize libraries such as FastLED or Neopixel for seamless control – providing you the right tools to masterfully synchronize your LED displays to any given stimulus – from sensor inputs to audio feedback.
The beauty lies in crafting sequences that communicate thought-provoking narratives through visually compelling designs, impressing anyone who encounters them. Challenge yourself to push creative boundaries, as 2023 offers advanced resources and community support to enhance your journey. Each project completed builds confidence and brings you closer to harnessing the full potential of LED strip artistry.
Integrating Sensors with LED Strips
Incorporating sensors into your LED strip projects elevates the interactivity and responsiveness, opening new horizons of creativity and functionality. This sophisticated integration can transform your designs.
Sensors like motion detectors or temperature sensors bring LED displays to life dynamically. They are capable tools.
Imagine a lighting installation that changes color in response to room temperature shifts or one that pulses with the rhythm of nearby sounds. By connecting sensors to your Arduino, you unlock a rich array of dazzling displays that not only look stunning but respond intuitively.
This seamless integration is a marvel of modern innovation, offering an interactive experience that transcends traditional lighting. Take the leap into this realm of interactive artistry, and watch as your environment comes alive with a symphony of color and motion. Sensors and LEDs, when synergized with Arduino, create visual spectacles that are as functional as they are enchanting.
Tips for Efficient Power Management
Mastering power management not only extends the lifespan of your LED strips but also optimizes the overall performance of your Arduino-driven projects, presenting a remarkable energy-saving approach.
Always calculate the total power requirements of your LED strips to ensure your power supply meets the demand.
Lightweight, efficient power supplies are best for both performance and longevity, especially when (inevitably) scaling your projects.
Consider implementing pulse-width modulation to dynamically control brightness and save energy, aligning power usage with real-time needs.
Using resistors or voltage regulators effectively assists in preventing overheating, encouraging efficient functionality, and prolonging device life, which leads to sustainable project development and thriving outcomes.
Ultimately, the art of power management lies in precision and foresight. Thoughtful configurations reap rich rewards in both longevity and illuminating brilliance.
Expanding Your Arduino Projects
Dive into new possibilities.
Arduino isn’t just a tool; it’s your bridge to limitless innovation. The sheer breadth of projects you can create is only matched by the joy of experimentation, pushing you to expand your technical prowess every step of the way. So, why not venture beyond the basics by exploring novel applications?
Unleash your creativity with dynamic displays.
When considering new avenues, think big – or even think twice! LED strips can provide astounding visual effects, allowing you to create breathtaking installations tailored to any space.
Additionally, advanced coding techniques and strategic hardware utilization can broaden the reach of your projects, integrating them into emerging tech trends 2023. By staying ahead, you ensure your skills adapt seamlessly to the future. Seek collaborations with other passionate innovators, and together, explore uncharted realms where creativity and technology merge.
Conclusion
Mastering how to control an LED strip with Arduino opens doors to endless creativity.
You’ve embarked on a journey merging artistry with technology.
Your newfound expertise allows you to craft stunning visual artistry, while gaining a deeper understanding of electronics. This journey ensures that your skills not only remain relevant but thrive in an ever-evolving technological landscape, empowering you to tackle future projects with confidence and flair.
As you continue to explore the expansive world of Arduino, let your innovations illuminate your path forward. Remember, the only limit is your imagination, and with Arduino’s flexibility, you’ve joined a vibrant community ready to support and fuel your ambitions. So step forward, create, and let brilliance be the legacy you carve with every project.

