
Imagine being in the midst of a home renovation project. Can you cut LED light strips to fit your custom designs?
LED light strips are increasingly popular, providing adaptable and stylish lighting solutions for various spaces. Many enthusiasts might feel initially daunted by the thought of modifying these flexible illuminators.
Learning to cut LED light strips not only unleashes endless design possibilities but also ensures perfect fits for unique layouts. This ability can transform ordinary rooms into extraordinary, personalized spaces.
Yes, you can!
Understanding LED Light Strips
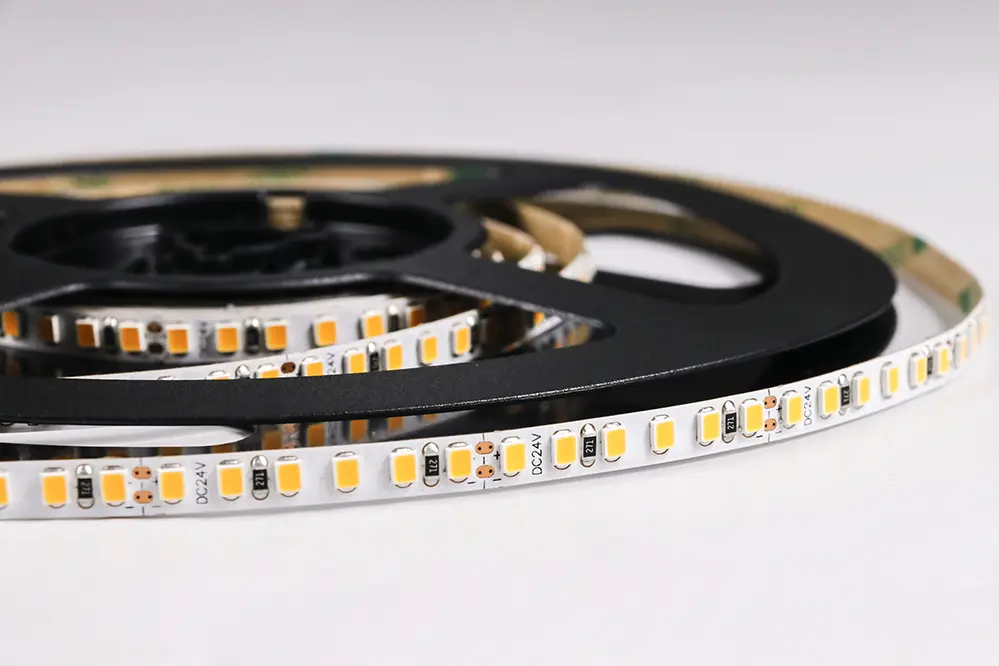
Their flexibility, combined with strong adhesive backing, allows for creative installations, contouring around furniture and architectural features, making them ideal to install in various spaces.
Moreover, advanced options include waterproof strips for outdoor applications, ensuring durability and range of use.
These strips typically operate on low voltage, enhancing energy efficiency and safety during installation and use.
Choosing the right LED light strip requires consideration of factors like intended use, power source, and required length, ensuring a seamless and effective lighting solution.
Ultimately, the true artistry lies in how one leverages these prismatic potentials. With proper understanding and execution, LED light strips become not just lights but expressions of innovation and style.
Can You Cut LED Light Strips?
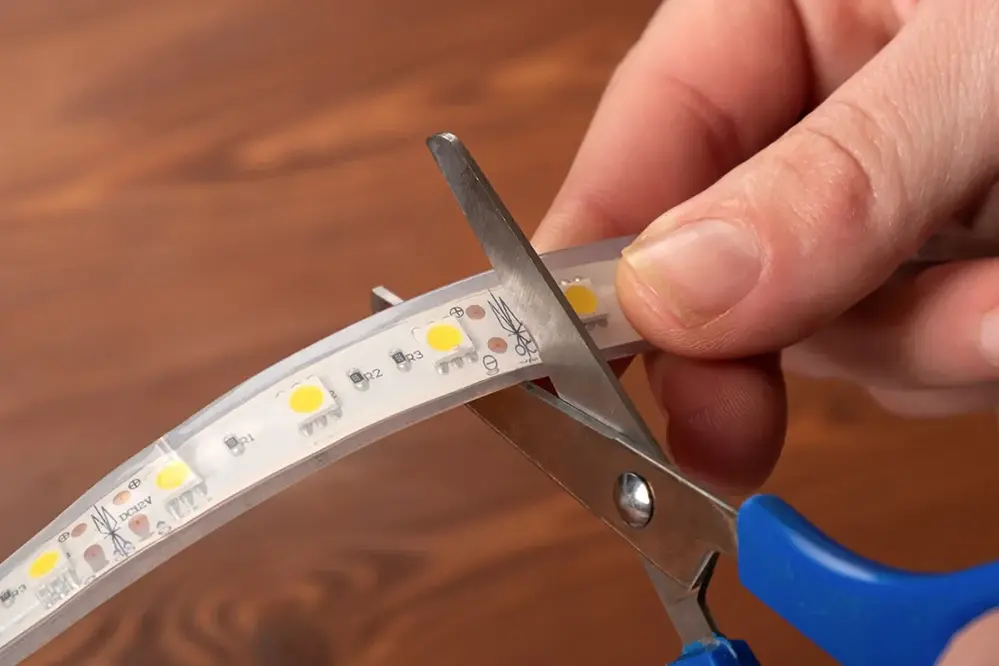
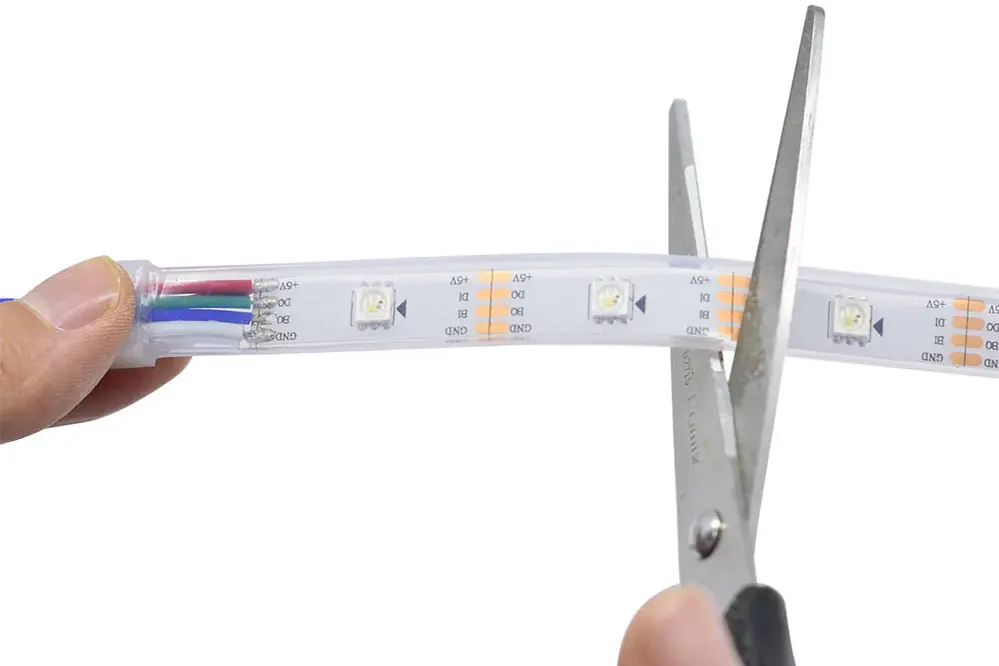
Yes, you can absolutely cut LED light strips to fit your space. However, it must be done with precision.
LED light strips are designed with designated cut points between sections of diodes. These cut points are usually marked on the strip.
Using scissors, one needs to carefully slice through the strip at these marked points. Cutting outside these points can damage the circuit.
It’s advisable to disconnect the strip from its power source before making any cuts. This ensures safety and preserves the integrity of the electric current within the strip.
Precision and care will ensure the viability and functionality of the LED light strip.
Safety Precautions Before Cutting
Before cutting LED light strips, ensuring safety precautions is crucial to avoid hazards and maintain functionality.
Firstly, it is highly recommended to work in a well-lit environment with dimming capabilities, allowing for precise visibility and accurate execution. This reduces the risk of cutting outside the designated points, which could damage the circuit and render the strip useless.
Additionally, make sure to use a proper cutting tool, such as sharp scissors or a precision knife. This minimizes the chance of frayed or uneven cuts, ensuring a clean and precise slice through the strip.
Lastly, consider employing personal protective equipment, such as safety glasses, to shield your eyes from any small debris. These proactive measures foster a safer working environment and safeguard your investment in LED light strips, encouraging a successful and worry-free DIY project.
Tools Needed for Cutting LED Strips
To accurately and safely cut LED light strips, specific tools are essential. First and foremost, sharp scissors or a precision knife is indispensable.
A cutting mat is useful for stabilizing the strip while cutting. This ensures a consistent, clean cut.
Wire strippers will facilitate necessary electrical connections. Employing these tools guarantees a flawless and functional outcome for the project.
Additionally, a magnifying glass can assist in identifying precise cutting points. These tools collectively empower anyone to achieve professional-level results in their LED light strip projects, underscoring an optimistic yet meticulous approach to DIY creativity.
How to Measure the Desired Length
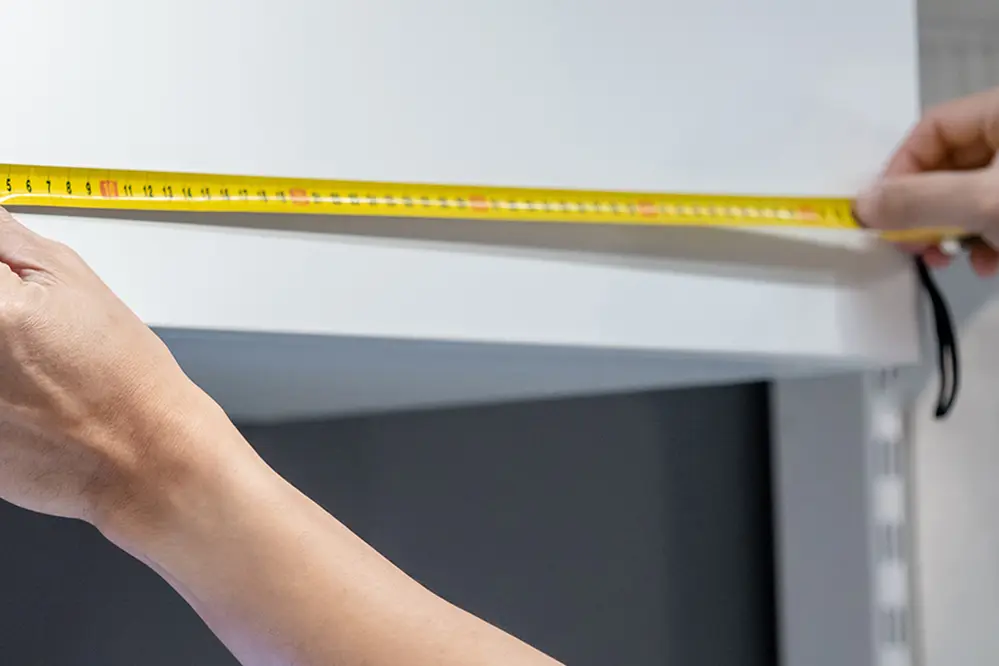
Before cutting LED light strips, measure the desired length to ensure accuracy and avoid mistakes.
Start by using a tape measure or ruler to obtain exact measurements of the space where the LED strip will be installed.
Write down these measurements, making a clear note of both the total length and any specific segments. Ensure you carefully match these lengths to the cutting points indicated on the strip.
LED light strips have designated cutting points, usually marked by a small line or scissors icon. These cut lines should be carefully aligned with your measurements to both preserve functionality and maintain uniformity.
Precise measurement is essential for a seamless installation and maximizes the efficacy and aesthetics of the LED light strips.
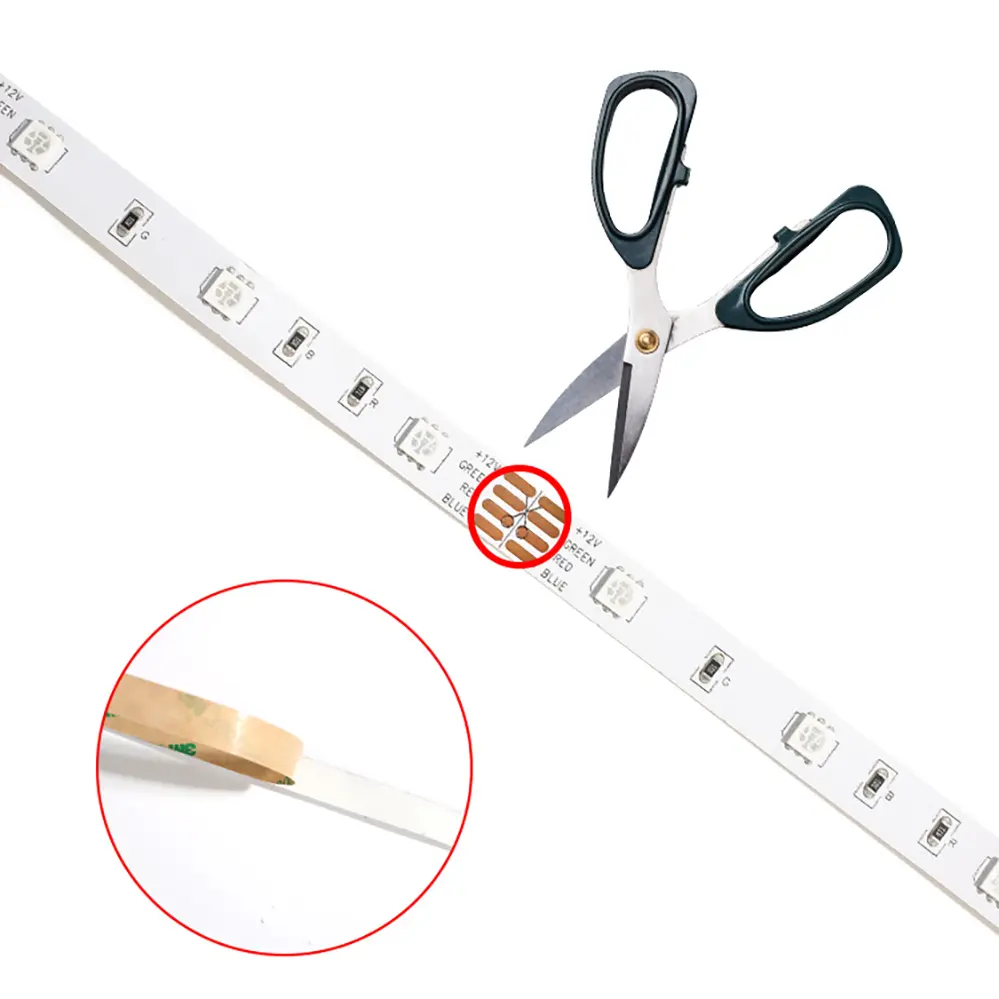
Identifying the Cut Marks
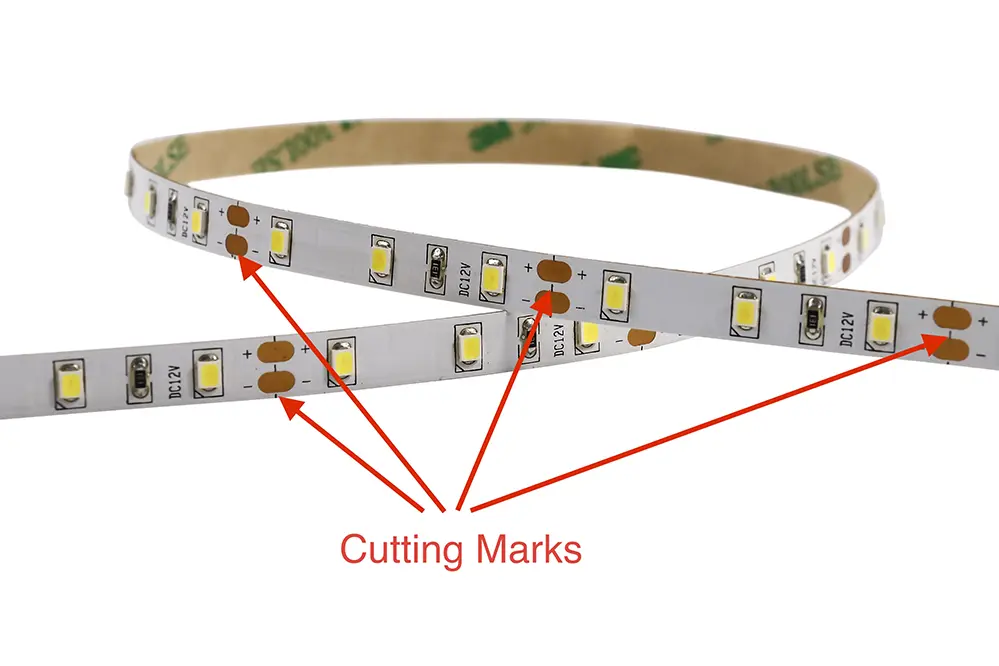
Identifying the cut marks on LED light strips is crucial. These marks guide users on where to cut without damaging the circuitry.
Typically, LED light strips feature clearly defined cut marks at regular intervals, marked by a small scissors icon or a distinct line. These marks are strategically placed to ensure that the remaining sections of the strip still function correctly after being cut. By identifying these precise locations, users can confidently divide their LED strips without fear of malfunction, ensuring optimal performance and visual continuity.
Each cut mark is also accompanied by designated copper pads for soldering, ensuring easy reattachment or connection to power sources. It is essential to cut exactly at these points to maintain the integrity of the circuitry. Doing so preserves the strip’s overall functionality and prevents electrical issues that could arise from misaligned or improper cuts.
Approaching the task with meticulous attention to these indicators bolsters confidence, knowing each modification will sustain the LED strip’s operational and aesthetic qualities. This strategic precision underscores one’s capability to tackle sophisticated DIY lighting projects with successful, professional results.
How to Cut LED Light Strips Safely
LED light strips can be cut safely by following certain guidelines.
First, users should begin by powering down the LED strip to avoid any electrical hazards. This measure not only ensures personal safety but also protects the strip from potential damage during handling. Additionally, turning the strip off and unplugging it from any power source mitigates risks associated with short circuits or electrical shock.
Using the appropriate tools is equally essential.
A pair of sharp scissors or a precision knife, specifically designed for electronics, should be employed to make clean and accurate cuts. These tools facilitate precise modifications, enhancing the overall functionality and appearance of the LED strips.
Lastly, ensuring a clean and well-lit workspace is beneficial. This environment enables better visibility and control over the cutting process, thereby reducing errors and enhancing the quality of the results. By adhering to these practices, anyone can confidently and safely modify their LED light strips for any application.
Fixing LED Strip Lights After Cutting
Once the LED strip lights have been cut, a reliable method of reattaching connectors is necessary to maintain electrical continuity. Connecting the sections with suitable clips or soldering can restore their functionality. Expert craftsmanship in this regard not only ensures seamless reconnection but also preserves the aesthetic quality of the installation. Thus, proficiency in these techniques can transform a potentially daunting task into a straightforward and successful endeavor.
Choosing the Right Connectors
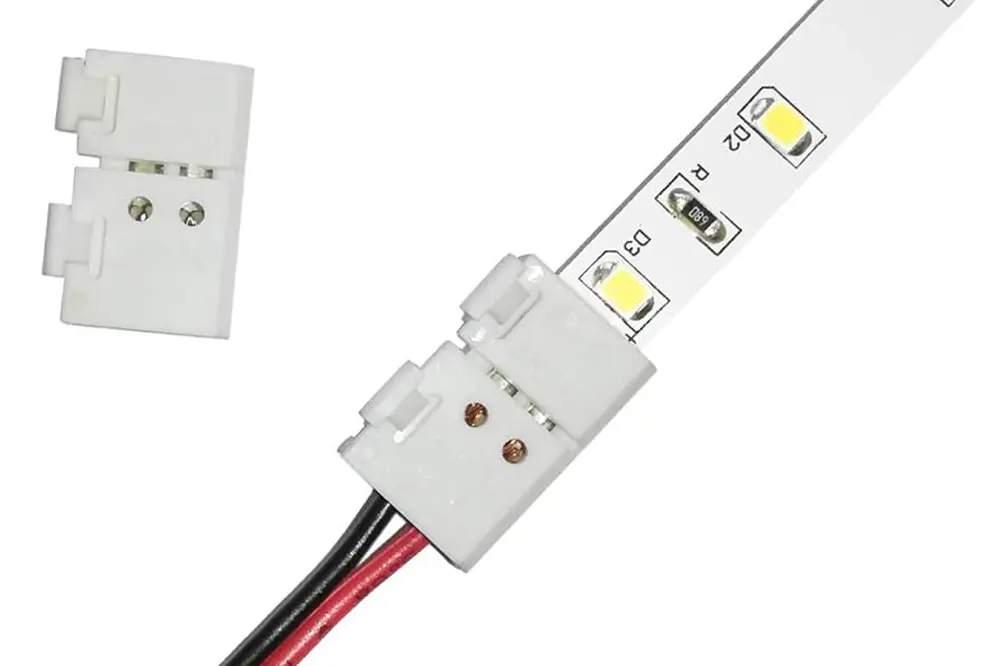
Selecting the appropriate connectors is crucial for maintaining optimal performance. Different connectors serve specific purposes, ensuring that the final setup is both efficient and reliable.
In terms of practicality, connectors like “quick connectors” simplify the process. They are an excellent choice for non-soldering setups, providing consistent and secure connections.
Quick connectors allow for easier installation without needing additional specialty tools.
For projects demanding durability, opting for higher-grade connectors can be advantageous. These connectors often benefit from materials like silicone or PVC, ensuring longevity and resistance to wear. Projects thus remain robust and aesthetically pleasing with minimal maintenance required.
Step-by-Step Reconnection Guide
Reconnecting cut LED light strips is straightforward with the right approach and tools. Follow these steps to ensure a seamless reconnection.
- Turn Off Power: Ensure the LED light strip is disconnected from any power source to avoid hazards.
- Prepare Connector: Select an appropriate connector – quick connectors are recommended for non-soldering reconnections.
- Align Strips: Carefully align the cut ends of the LED strips with the connector’s slots.
- Insert Strips: Gently insert the LED strips into the connector, ensuring each strip is securely fastened.
- Secure Connection: Close the connector latch, guaranteeing a firm attachment.
- Test Connection: Reconnect to the power source and test to confirm the LED lights function correctly.
If they follow these steps, they will achieve a reliable reconnection with minimal effort.
This guide ensures they can proceed with confidence.
Using LED Strips After Cutting
Once cut, LED light strips remain highly functional, a testament to their versatile engineering. Properly reconnecting the cut segments can extend the strip’s usable length, allowing creative use in various lighting projects, ensuring their potential is fully realized.
After cutting and reconnecting via a suitable connector, those segments become as effective as their original form. It permits one to experiment with unique illuminative designs without the fear of compromising functionality. Whether utilized in accentuating a room’s ambiance or outlining architectural details, these adaptable features of LED strips deliver both form and function impeccably.
Preparing the Surface and Strip
Before cutting or attaching LED light strips, properly preparing the surface and strip ensures optimal adhesion and performance.
- Clean the Surface: Thoroughly clean the surface where the LED strip will be mounted. Use a cloth with rubbing alcohol to remove dust, dirt, and oils.
- Dry the Surface: Allow the cleaned surface to dry completely to ensure maximum adhesion of the LED strip.
- Inspect the Strip: Examine the LED light strip for any damage or irregularities. Verify the strip is in good condition before making any cuts or attachments.
- Measure and Mark: Measure the strip against the intended mounting area and mark the cutting points carefully. Use a ruler for precise measurements.
Proper surface preparation prolongs the lifespan of the LED adhesion and maintains consistent illumination.
Ensuring the strip is clean and undamaged prevents future issues and keeps the setup process smooth.
Proper Attachment Techniques
Attaching LED light strips correctly is pivotal for ensuring their longevity and optimal performance while augmenting the aesthetics of the area.
They should take care to align the strip precisely along the marked points.
Connect the strip to the power supply before pressing it onto the surface to confirm proper alignment and function. Once verified, gently press to adhere the strip, making sure to avoid any creases.
For added security, especially in areas prone to moisture or movement, users should consider using mounting clips or brackets. These provide additional support and prevent the strip from detaching over time. This extra step ensures a steadfast attachment, contributing to a durable and dazzling lighting solution.
You can read our other article on Top Mistakes to Avoid When Cutting LED Light Strips.
Conclusion
The versatility of LED light strips is unparalleled.
By knowing where and how to cut them, one can tailor these strips to fit any space perfectly, blending function with elegance. Following these guidelines ensures a seamless and durable installation.
Anyone can transform a space with LED light strips by being precise and adaptable. Embrace this journey with confidence and creativity, knowing the impressive results will be worth the effort. The future is bright; make sure it shines perfectly.
For those seeking expert assistance, consider reaching out to Unitop, a professional Chinese manufacturer of LED strip lights and LED neon strips. With their extensive experience and high-quality products, Unitop can provide the perfect solutions tailored to your specific needs. Their commitment to excellence ensures that your lighting projects will achieve the desired aesthetic and functional outcomes. Contact Unitop today to elevate your space with precision and brilliance.


