

Have you ever wondered how to connect LED strip lights to a power supply without any hassle? This seemingly simple task can often turn into a daunting challenge, especially for those new to DIY projects. Many people struggle with understanding the technical aspects, leading to frustration and subpar results.
Common misconceptions about LED strip light installation include the belief that it’s overly complicated or requires professional help. However, with the right guidance, anyone can master this skill. The key lies in breaking down the process into manageable steps and debunking myths that often deter beginners.
The benefits of learning how to connect LED strip lights to a power supply are immense. Not only does it allow for creative freedom in designing your space, but it also offers practical advantages such as energy efficiency and cost savings. By understanding this process, you can enhance the ambiance of any room while also contributing to a more sustainable lifestyle.
In this guide, we will cover essential topics such as selecting the right power supply, preparing your LED strips, making secure connections, and troubleshooting common issues, all while explaining how to connect LED strip lights to power supply efficiently and effectively. Each section is designed to provide clear, actionable insights that will make your installation process smooth and successful.
So, are you ready to transform your space with stunning LED lighting? Continue reading to unlock the secrets of connecting LED strip lights to a power supply and take your DIY skills to the next level.
Gather Necessary Materials
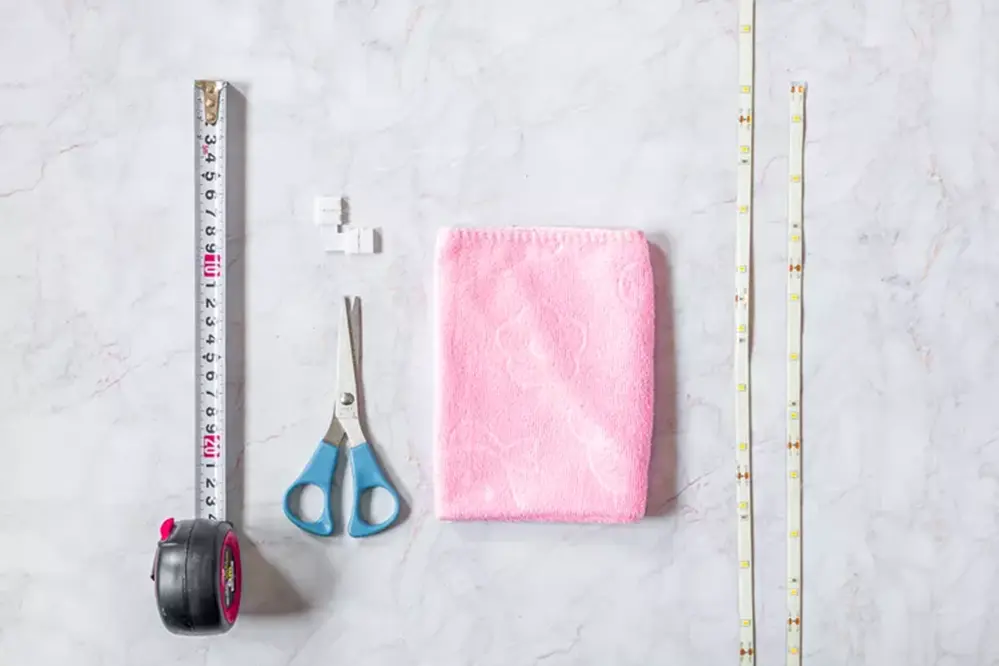
First, determine what materials are essential for the project.
To successfully connect LED strip lights to a power supply, several tools and components are required. These elements ensure the connections are secure and efficient.
One will need an LED strip light, a compatible power supply, and connection accessories like connectors and wires. It’s important to match the voltage rating of the power supply with that of the LED strip lights.
Additionally, a pair of wire strippers, a screwdriver, and possibly heat shrink tubing could prove beneficial. These tools facilitate clean and professional connections.
Thoroughly gather all these materials before beginning, ensuring the process is smooth and efficient.
Choose the Right Power Supply
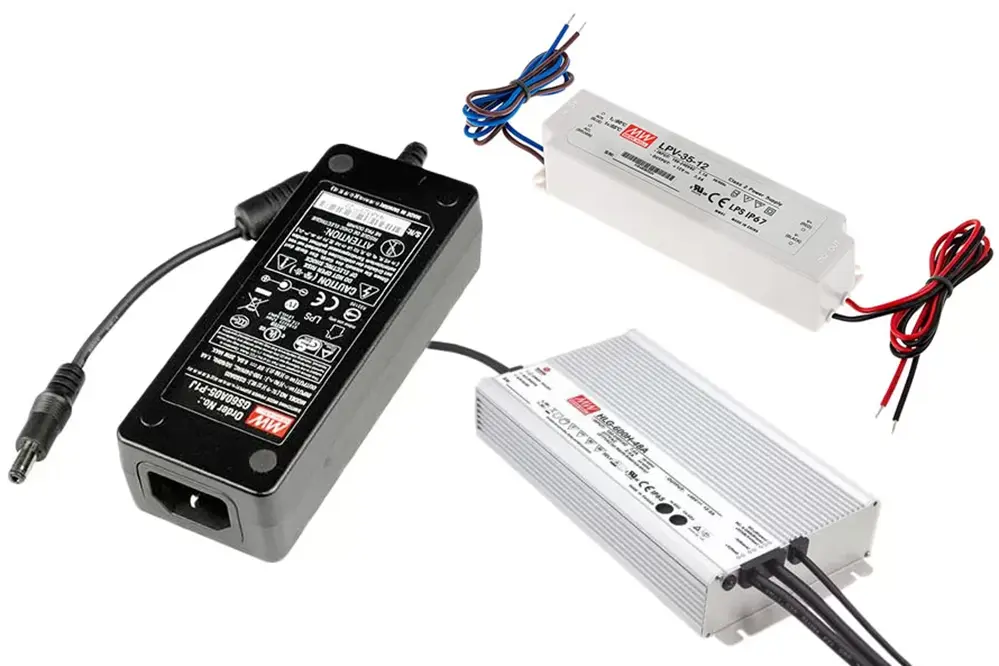
Selecting the correct power supply is paramount; otherwise, the LED strip lights may not perform efficiently. Longevity and performance are directly influenced by this choice.
Electricians deem it essential to match the power supply’s voltage with the LED strip lights’ rating.
Importantly, verify the wattage requirements of the LED strip lights. Optimally, the power supply should be able to handle at least 20% more wattage than the lights.
This buffer ensures that the lights operate without overloading the power supply. It also prolongs the lifespan of both the power supply and the lights.
While doing so, consider whether a dimmable power supply is necessary. A dimmable supply provides greater control over the lighting atmosphere and can save energy.
In summary, the correct power supply choice is crucial for efficiency and durability. Investing in a quality power supply guarantees consistent optimal performance.
Confirm Voltage Requirements
Confirming the voltage requirements is a crucial step in ensuring the optimal functionality of LED strip lights.
First and foremost, it is imperative to identify the voltage rating of the LED strip lights. Most commonly, these lights operate on either 12V or 24V, but variations do exist. This information should be clearly stated in the product’s specifications or on the manufacturer’s label.
Next, ensure that the power supply matches this voltage rating exactly. Utilizing a power supply with incorrect voltage can lead to severe damage to the LED strip lights or even pose a safety hazard. Therefore, adherence to the manufacturer’s voltage guidelines is of utmost importance.
Finally, err on the side of caution by double-checking all connections and voltage ratings before powering on the LED strip lights. By diligently confirming the voltage requirements, one can achieve a safer, more efficient, and longer-lasting lighting setup, thereby enhancing both functionality and peace of mind.
Measure and Cut the LED Strips
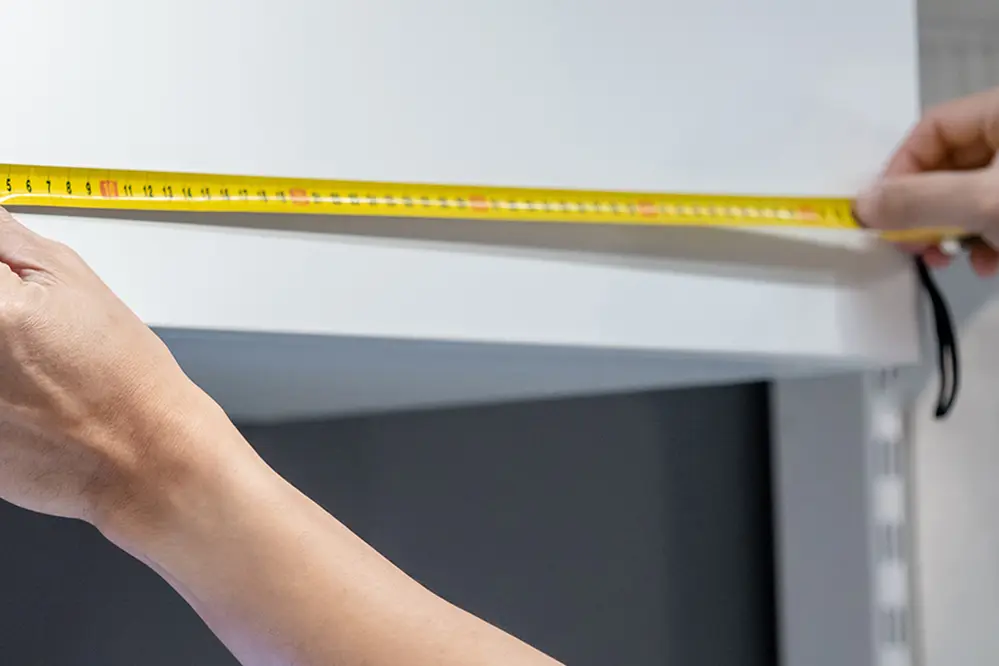
Before embarking on the task of connecting LED strip lights to a power supply, it is essential to measure and cut the strips accurately. This step ensures a tailored fit for the intended space.
Begin by measuring the area where the LED strips will be installed. Use a measuring tape.
Once the length is determined, prepare to cut the LED strip according to the marked measurement. Refer to (or locate) the designated cut points on the strip.
These points are clearly marked to avoid damaging the internal circuitry. Using a sharp pair of scissors or a craft knife, cut precisely on these marks.
It is advisable to double-check the measurements before making any cuts. Aligning the strips correctly can significantly impact the final outcome and the overall aesthetic appeal.
Remember, the goal is to cut the LED strips at appropriate places to maintain both functionality and safety. Accurate measurement and cutting contribute to a seamless installation process and optimal lighting effect.
Prepare the Connection Points
Preparing the connection points is a crucial step.
Ensuring that the connection points are clean and free of debris will facilitate a smooth connection. The first task is to determine the exact points where the LED strip lights will be connected to the power supply. Generally, these are found at specific intervals marked on the strips themselves.
Use a small brush to clear away debris.
Next, strip a small portion of the insulation from the wires. This step helps to expose the copper wiring, enabling a better connection to the power supply terminals.
Finally, it is wise to use a multimeter to test the exposed wires for continuity and proper voltage flow. This not only guarantees a safe and reliable connection but also preemptively addresses any potential issues, paving the way for a successful LED lighting setup.
Attach Connectors to LED Strips
Attaching connectors to the LED strips is an essential step in ensuring a stable connection. Make sure to have all the necessary components ready, such as connectors, a soldering iron, and heat shrink tubing.
Clear and precise connections are crucial.
To begin, align the connector with the exposed copper pads on the LED strip. Secure the connection firmly but avoid excessive pressure that could damage the LED strip or connectors.
Using heat shrink tubing around the connections protects them from potential shorts and environmental factors. This approach ensures long-lasting durability and optimal performance of the LED strip lights, giving one peace of mind and confidence in their lighting system.
Connect LED Strips to Power Supply
Now, it’s time to connect the LED strips to the power supply. Start by identifying the positive and negative terminals on both the LED strip and the power supply. Ensuring proper polarity is crucial for optimal functionality, longevity, and maintaining the specified lumens output. Gently connect the wires from the LED strip to the corresponding terminals on the power supply, usually marked with a “+” for positive and a “-” for negative. Once securely connected, double-check all connections to make sure they are tight and free from loose strands that could cause short circuits. Finally, plug in and switch on the power supply to bask in the serene glow of your newly connected LED strip lights.
Use Plug-in Adapter
They can effortlessly connect LED strip lights to a plug-in adapter, ensuring an uncomplicated installation process. Making this connection streamlines the overall setup, allowing for a quick and efficient lighting upgrade.
Using a plug-in adapter reduces the intricacies of direct wiring, creating a “plug-and-play” system. This route is ideal for those seeking immediate, hassle-free illumination, contributing to a clean and orderly space.
Plug-in adapters offer remarkable convenience and are especially useful for non-electricians.
By following these steps, one can have their LED strip lights shining brightly in no time. The process involves plugging the adapter into a power outlet, connecting the LED strip to the adapter’s output, and securing any excess wiring. They should experience instant elegance and enhanced atmosphere as soon as everything is plugged in.
Wire Directly to Power Source
Connecting LED strip lights directly to a power source ensures a robust, stable connection that can support higher power loads, enhancing your lighting experience significantly.
This method eliminates the need for intermediary devices, creating a direct pathway for energy flow.
First, identify the power requirements of the LED strip and ensure the power source matches these specifications.
Next, prepare the LED strip by stripping a small portion of the wire coating to expose the conductive material inside.
Then, connect the exposed wires from the LED strip to the corresponding terminals of the power source, usually marked with positive (+) and negative (-) symbols. Secure these connections firmly to prevent any electrical faults.
Finally, activate the power source and revel in the vibrant, uninterrupted illumination of your customized lighting setup. Properly connected, the LED strip lights will operate smoothly and efficiently.
Secure the LED Strips in Place
Adhering to the correct placement of LED strips ensures stability and safety for your lighting project.
Before securing the strips, meticulously clean the surface where the installation will occur. Dust and grease can impede adhesion.
Many LED strips come with an adhesive backing, making installation straightforward. Simply peel off the protective liner and press the strip firmly onto the clean surface.
For added security, particularly in areas where the strip may experience disturbances, consider using mounting brackets or channels. These accessories provide extra support and longevity.
Take care to ensure that the strips are straight and evenly spaced for an aesthetically pleasing result.
Test the LED Strip Lights
Carefully test the LED strip lights to ensure their performance before finalizing the setup.
Begin by connecting the strip lights to the power supply.
This initial connection allows one to verify that the lights are functioning correctly and there are no immediate issues. Turn on the power supply and observe the LED strip lights for consistent illumination and uniform color.
If inconsistencies or problems are observed, check all connections and settings. Rectify any faults to guarantee optimal performance and longevity. Testing is essential, as it ensures a flawless finish and enhances the durability of the LED strip lighting system.
Troubleshoot Common Issues
Experiencing problems with LED strip lights can be discouraging. However, many common issues can be straightforwardly addressed with simple troubleshooting steps.
First, if the lights do not turn on, check the power supply. Ensure it is properly connected and functioning by using a different device to test the outlet or power source.
Second, inconsistent color or brightness often suggests a poor connection or power supply issue. Inspect the connectors and ensure each one is securely in place, making sure there are no damaged or loose elements.
Third, if only some sections of the strip light up, this could be due to a break in the circuit or damaged LEDs. Examine the strip for visible damage, ensuring no wires are detached or severed.
In sum, diligent troubleshooting can resolve most common issues, ensuring the LED strip lights perform brilliantly.
Maintain and Protect Your LED Strips
Proper maintenance of LED strip lights ensures longevity, peak performance, and a flawless appearance. Regularly inspecting the strips and connections significantly extends their lifespan.
Dust accumulation is one of the main adversaries of LED lighting. Routine cleaning is essential.
Carefully detach the strips and wipe them with a microfiber cloth. Ensure gentle handling to avoid damage.
Outdoor installations demand special attention to weatherproofing. Seal any connections and exposed areas to prevent moisture ingress.
Additionally, avoid overloading the power supply. Overloading can cause overheating and eventual failure of the LED strips and the power source.
Ultimately, their dedication to maintenance will safeguard their investment and help maintain the enchanting ambiance created by the LED strips.
Conclusion
Understanding how to connect LED strip lights to a power supply empowers individuals to creatively and confidently illuminate their spaces. Each installation enhances their skills, turning challenges into learning opportunities and fostering a practical approach to DIY projects. This guide promises a bright future for their endeavors, ensuring a well-lit path ahead.
For those seeking professional assistance or high-quality products, Unitop, a renowned Chinese manufacturer of LED strip lights and LED neon strips, is highly recommended. Their expertise and commitment to excellence ensure that every project is executed with precision and reliability. By partnering with Unitop, you can elevate your lighting projects to new heights, benefiting from top-tier products and professional guidance.


