

How many times have you faced the challenge of learning how to remove LED strip lights without damaging your walls? This common dilemma can be frustrating, especially when you’re eager to redecorate or move your lighting to a new location.
Addressing this issue is crucial for maintaining the aesthetic and structural integrity of your home. Improper removal can lead to unsightly wall damage and additional repair costs, making it essential to approach the task with care.
Fortunately, there are several effective solutions to this problem. From using a hairdryer for gentle heat application to employing specialized adhesive removers, these techniques can simplify the process and protect your surfaces.
Curious to learn more? In this blog post, we’ll delve into these methods and provide you with step-by-step guidance to ensure a smooth and damage-free removal of your LED strip lights. Stay tuned for valuable insights and practical tips.
Gather Necessary Tools
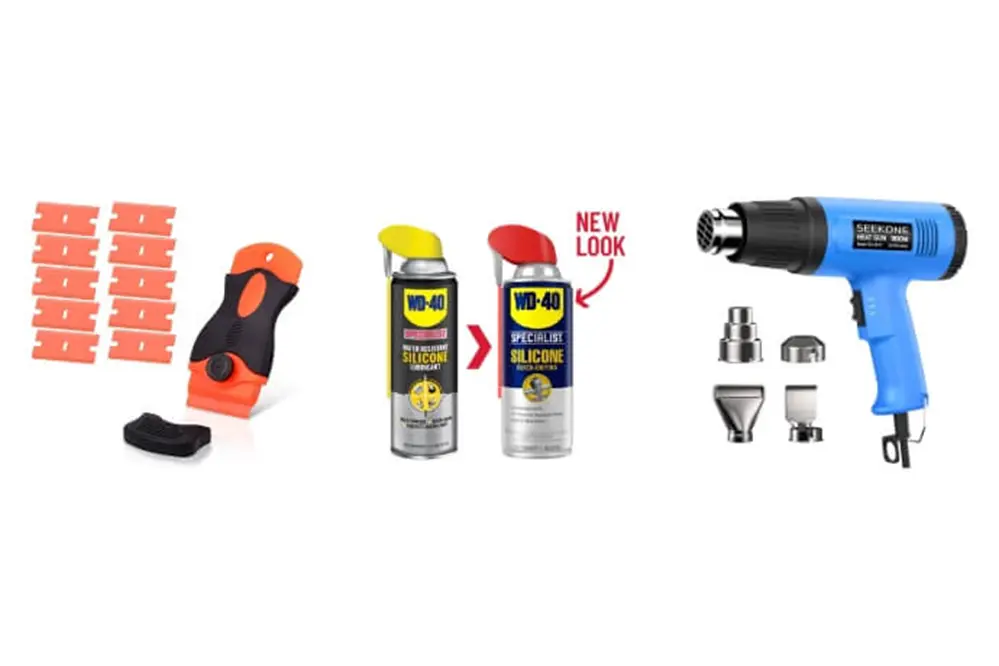
First, get your materials ready.
The essential tools you will need include a pair of pliers, a putty knife, and some adhesive remover. These items will help you safely detach the LED strip lights without causing damage to your surfaces. Additionally, make sure to have a clean, soft cloth handy for the final cleanup.
Do not skip these steps.
By using the right tools, you’ll ensure that the process runs smoothly, minimizing the risk of damaging your wall or the LED strips themselves.
Confidence in your equipment translates to confidence in the task at hand.
Great results come from meticulous preparation. With these tools within reach, you’ll be well on your way to expertly removing your LED strip lights while preserving the versatility of your spaces for future endeavors.
Turn Off Power
Before embarking on the task of removing LED strip lights, first and foremost, ensure safety by turning off the power. This fundamental step is crucial to preventing any electrical accidents.
Disconnecting the power eliminates the risk of electric shock.
Typically, you can accomplish this by flipping the switch on your circuit breaker or unplugging the unit directly from the outlet.
Safety first, make sure no power is flowing to the LED strips.
Always confirm that the power is truly off by using a voltage tester, if available. This simple yet effective tool provides an added layer of safety, giving you peace of mind.
With the power safely turned off, you’re now primed and ready to continue with the removal process. Safety precautions like these demonstrate a high level of professionalism and ensure a smooth and hazard-free experience.
Test Removal in Small Area
Start by selecting a discrete section of the LED strip light, preferably a one-foot segment, to test your removal technique without affecting the entire installation.
This will allow you to gauge the adhesive strength.
Carefully peel back the strip from one corner, observing how the adhesive reacts to being lifted.
If the strip resists or leaves a residue, you can decide whether to use additional tools.
Utilize a hairdryer to gently heat the adhesive, which will soften the glue and make removal easier.
Practicing on a small area provides the opportunity to refine your technique, ensuring flawless removal with minimal damage or mess. This ensures that when it comes time to remove the entire strip, you’ll be equipped with knowledge and confidence.
Gently Peel Off the LED Strip
With confidence and care, begin peeling the LED strip away from the wall. This process demands a delicate yet assertive touch for optimal results.
Apply steady, even pressure as you lift the strip. The goal is to maintain the integrity of both the LED strip and the mounting surface. Remember to go slow.
A key method is to start from one end and methodically work your way to the other. Observing the strip as you peel will provide real-time feedback on how the adhesive is responding.
Utilize your other hand to gently stabilize the portion of the strip already removed. This tactic prevents unnecessary strain on the adhesive, helping to avoid tearing or snapping.
By following these steps, you can ensure a clean removal process that leaves the surface pristine and the LED strip intact for future use.
Use Heat to Loosen Adhesive
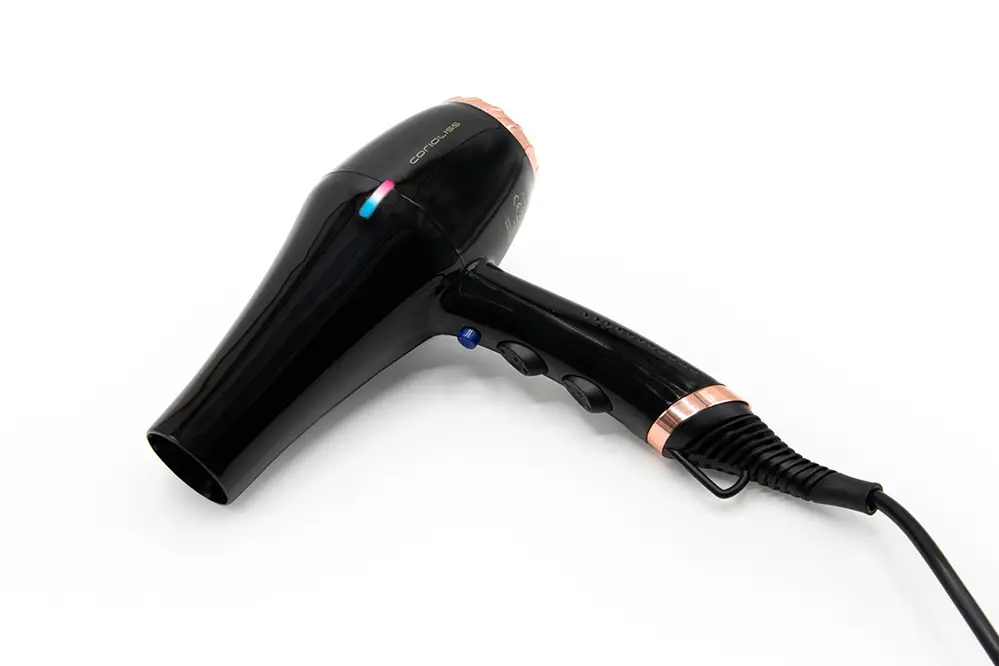
Harnessing controlled heat offers an effective, safe method for softening adhesive, aiding in the seamless removal of LED strip lights. Employing a hairdryer or heat gun at a moderate temperature, gently warm the strip. This technique reduces the adhesive’s grip and facilitates a smoother disengagement, minimizing both potential damage to surfaces and the strip itself. Just ensure to maintain a cautious distance and keep the heat source moving to prevent overheating, guaranteeing an effortless and clean detachment process.
Applying Low Heat
Applying low heat to your LED strips is a strategic way to facilitate their smooth and seamless removal.
Controlled low heat can reduce adhesive grip, minimizing potential surface and LED strip damage.
Use a household hairdryer, set to its lowest heat setting, to gently warm the adhesive backing of the LED strip. Ensure to keep the device moving steadily along the strip to prevent heat concentration in one spot, which could cause over-softening or accidental damage.
This method not only helps in preserving the integrity of both the LED strips and the surface but also reduces the effort required in the removal process, ensuring a clean, hassle-free experience.
Using a Hairdryer or Heat Gun
A highly effective removal technique.
Consider using a hairdryer or heat gun for this task. The controlled application of heat serves to soften the adhesive, making it much easier to peel off the LED strip without causing damage. It is critical, however, to maintain a certain distance to avoid inadvertently melting the strip or causing damage to the surface.
Increasing the ease of removal can be significantly achieved by focusing on gentle removal techniques.
Set the hairdryer or heat gun to a low-heat setting. This helps to manage the temperature and prevent any unintended consequences from overheating, ensuring a smooth detachment process.
Remember, patience is a virtue during this process. Carefully moving the heat source along the length of the strip allows the adhesive to soften evenly without any undue stress on the strip or the mounting surface. This measured approach ensures a pristine, undamaged outcome and facilitates a seamless and effective removal of your LED strip lights.
Remove Residual Adhesive
Once the LED strip lights have been removed, residual adhesive may remain on the surface. Employ a gentle rubbing motion with isopropyl alcohol, using a clean, soft cloth, to dissolve and lift the leftover adhesive.
This should effectively clean the area while preserving the underlying material. For tougher spots, repeated applications may be required.
Use Adhesive Remover
Using an adhesive remover can simplify the removal of stubborn residue.
Opt for an adhesive remover that is safe for the surface you’re working on. Test in a small, inconspicuous area first.
Ensure the room is well-ventilated while applying the adhesive remover, as fumes can be potent.
Apply the remover directly to the adhesive residue, allowing it to penetrate for the recommended duration to maximize effectiveness.
Gently wipe away the softened adhesive, revealing a clean, residue-free surface beneath.
Using Rubbing Alcohol
When using rubbing alcohol, ensure you are working in a well-ventilated area to avoid inhaling fumes.
To proceed, dip a clean microfiber cloth in a moderate amount of rubbing alcohol, taking care not to saturate it. Gently rub the cloth over the area where the LED strip lights were attached. This will help dissolve and lift the adhesive without damaging the surface.
Repeat this process for any stubborn sections that resist initial efforts. If necessary, you may apply a bit more rubbing alcohol and continue to rub gently until the adhesive is completely removed.
By employing rubbing alcohol for adhesive removal, you harness a powerful yet gentle solution that achieves cleanliness without compromising the underlying material. This method also ensures a swift and efficient removal process, leaving your surface pristine and ready for its next endeavor.
Clean the Surface
After removing the LED strip lights, it’s crucial to thoroughly clean the area to maintain a spotless appearance and to check for any signs of paint peeling. Residual adhesive can accumulate dust and grime, detracting from the surface’s aesthetics and cleanliness.
To clean the surface, begin by using a mild household cleaner or a dedicated adhesive remover. Ensure the product is suitable for the specific surface material to prevent any potential damage. Apply the cleaner to a microfiber cloth and gently wipe the area, focusing on any stubborn adhesive spots until they are entirely removed.
A well-cleaned surface not only enhances the look but also prepares it for any future installations.
Wipe with a Damp Cloth
Wiping with a damp cloth is a straightforward yet essential step to ensure a clean surface post-LED strip removal.
- Moisten the Cloth: Lightly moisten a microfiber cloth with water.
- Wipe the Area: Gently wipe the surface to clear any residual adhesive.
- Rinse the Cloth: Rinse and wring out the cloth to remove collected residue.
- Repeat the Wipe: Go over the adhesive spots again for thorough cleaning.
- Dry the Surface: Use a dry cloth to eliminate any moisture, ensuring no streaks remain.
This process efficiently removes minor residues and prepares the surface for future use.
Quickly wiping down the surface guarantees that no sticky remnants are left behind.
Always ensure the cloth is merely damp, not wet, to avoid potential water damage.
Dry the Surface Thoroughly
Ensuring the surface is completely dry is paramount before proceeding with any new installations.
- Use a Dry Cloth: Employ a clean, dry microfiber cloth to absorb any remaining moisture.
- Wipe Gently: Carefully wipe over the surface until it is dry.
- Air Dry: Allow the surface to air dry for a few minutes to ensure any residual dampness evaporates.
- Check for Moisture: Conduct a final check for any lingering moisture before moving on.
This step ensures that the surface is in optimal condition for new applications.
A meticulously dried surface prevents future installations from failing due to residual moisture.
Drying the surface thoroughly not only promotes adhesion but also safeguards against potential water damage.
Inspect for Damage
Once your LED strip lights are removed, it’s crucial to inspect for any surface damage. Examining the area ensures a smooth transition to future installations.
Carefully check for any peeling paint, scratches, or residue.
Look for signs of adhesive remnants or any discoloration.
These indicators can compromise the bond of new installations.
If you detect residue or damage, address it promptly. Proper surface repair can involve filling, sanding, or repainting as required.
Overall, taking time to inspect and remedy surface issues now will save significant effort later. A well-prepared surface guarantees optimal results for any future LED strip installations.
Dispose of Strips Properly
Proper disposal of LED strips is essential.
Recycling facilities often accept LED strip lights. These components contain valuable materials that can be repurposed, making it an eco-friendly choice. Additionally, many communities offer specific e-waste collection events, ensuring that electronic items like LED strips are processed responsibly.
Never toss them in regular trash.
Incorrect disposal can lead to harmful environmental impacts. LED strips contain electronic parts that can contaminate landfills, leaching toxins over time.
Stay informed about local regulations and e-waste initiatives. By engaging in conscientious disposal practices, you play a significant role in preserving our planet and its resources. Your diligence sets a positive example for others to follow.
Reuse or Repurpose Old Strips
Old LED strips still have potential value.
Many creative projects can benefit from old LED strips. Even if they are no longer suitable for their original purpose, the potential for repurposing remains, enabling you to unleash your innovative spirit. Additionally, hobbyists can find great use in transforming old strips for experimental layouts.
Consider using them for visual art.
Old LED strips can breathe new life into – and around – your living space. By integrating them into household items or furniture, you can create stunning backlighting effects.
For the sustainability-conscious, upcycling projects utilizing old LED strips offer an eco-friendly way to reduce waste and repurpose materials. Such projects align with a growing movement toward 2023’s goals of sustainability and creativity. Old strips can be transformed into various functional or decorative pieces, demonstrating that innovation and environmental responsibility can coexist harmoniously.
Prepare for New Installation
Once you’ve successfully removed your old LED strip lights, it’s time to prepare for a fresh installation and a new lighting experience.
First and foremost, it’s essential to examine the condition of the surfaces where the new lights will be installed. Ensure that they are clean, smooth, and free from any residue left by the previous installation. By doing this, you will not only bolster the adhesive strength of the new lights but also ensure a seamless, sleek finish. This step is critical for achieving optimal results, reflecting your dedication to excellence.
Subsequently, make sure to measure the installation area accurately. By verifying your dimensions, you mitigate the risk of running into issues with insufficient or excess LED strip lengths. Proper measurement will also help you customize the placement and functionality of the lights, tailoring the ambiance to your exact specifications.
Finally, gather all necessary tools and materials before commencing with the new installation. This involves securing the new LED strips, appropriate adhesives, connectors, and any pertinent mounting accessories. With everything meticulously prepared, the process of installing your new LED strip lights will be straightforward, ensuring a flawless outcome that radiates professionalism and creativity.
How to Remove LED Strip Lights Safely
Removing LED strip lights thoughtfully ensures not only the longevity of the wall surface but also the potential reuse of the strips themselves.
Begin by gently lifting a corner of the strip using a plastic card.
Carefully peel the strip off the surface, taking your time to avoid damaging the paint or wallpaper.
If resistance is felt, use a hairdryer on low heat to soften the adhesive.
As you proceed, ensure the heat is evenly distributed to prevent any surface damage.
Once removed, clean any residual adhesive with a mild solvent to restore the pristine condition of your wall.
This careful, step-by-step approach ensures a smooth removal process, preserving both your walls and your LED strips.
Troubleshooting Common Issues
During the removal of LED strip lights, unforeseen challenges may arise. Tackling these issues requires patience and a meticulous approach to preserve both your surface and LEDs.
For instance, if you encounter stubborn adhesive or patches that won’t budge, using a slightly higher heat setting on your hairdryer may help. The elevated temperature can loosen the adhesive grip, easing the removal process without compromising your walls. Patience is key here; gradual heating provides the best results.
Additionally, sticky residues can be a persistent adversary. If standard mild solvents fail, a specialized adhesive remover designed for delicate surfaces might be your solution. These products are formulated to effectively dissolve adhesive remnants while being gentle on your wall finishes.
In some cases, you may notice minor wall damage upon strip removal. Don’t worry; simple patching and repainting techniques can restore your wall’s pristine condition. Preparation and precision in this step ensure that your walls return to their original state, maintaining the integrity and aesthetics of your space.
Conclusion
Removing LED strip lights is simple with the right approach. Use a hairdryer for gentle heat and specialized adhesive removers for stubborn residues. Prioritize slow, methodical removal to avoid damage. Minor wall damage can be easily patched and repainted. With careful preparation, you can preserve both your LED strips and wall surfaces, ensuring a seamless removal and setting the stage for future projects.
For those seeking expert assistance, consider reaching out to Unitop, a professional Chinese manufacturer of LED strip lights and LED neon strips. With their extensive experience and high-quality products, Unitop can provide valuable guidance and support for all your LED strip light needs. Whether you require further advice on removal techniques or are looking to explore new lighting solutions, Unitop is here to help. Contact us today to ensure your LED projects are handled with the utmost care and professionalism.


