
LED strip lights are becoming increasingly popular, yet improper voltage can lead to premature failure and suboptimal performance.
Ensuring the correct voltage is applied to LED strips is a fundamental step in installation and maintenance, serving as a preventative measure against potential electrical issues.
Understanding LED Strip Voltage
LED strip voltage refers to the electric potential required to power an LED strip effectively. Each strip is designed to operate within a specific voltage range, typically labeled on the strip or accompanying documentation. Exceeding the stated voltage can result in overheating and potential damage to the LEDs, while underpowering could lead to dim performance or flickering.
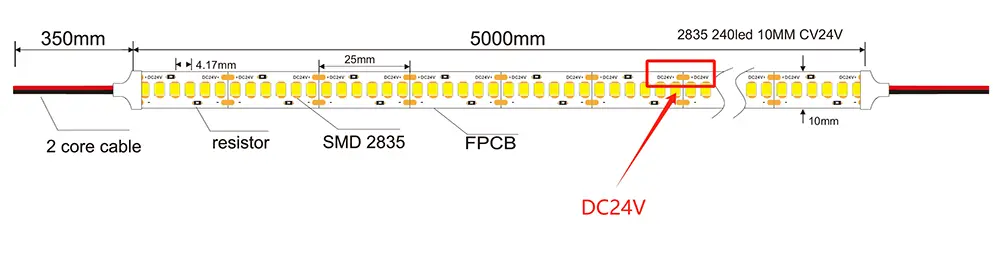
In the context of LED strip applications, voltage is not a one-size-fits-all parameter. Rather, it varies dependent on the LED configuration, length, and type. For instance, a strip designed for 12 volts will not perform optimally if supplied with 24 volts; conversely, providing only 5 volts to a 12-volt strip would be insufficient. Hence, identifying and supplying the correct voltage is critical to ensuring the longevity and efficacy of the LED strip in question.
Identify Your LED Strip Requirements
Before proceeding with testing, it’s imperative to establish the precise voltage specification of your LED strip. This foundational knowledge acts as a safeguard against mismatches that could damage the LED strip or impair its performance.
It is the electric potential, not wattage or lumens, that dictates a strip’s compatibility with your power supply. Ascertain this “voltage signature” to ensure that the energy imparted to the strip is neither deficient nor excessive.
Each LED strip has an optimum operating voltage to maintain its luminous efficacy.
After discerning the required voltage, one must consider the strip’s length and how it may influence the voltage it encounters. Extraneous length can induce voltage drop across the strip, which merits careful calibration of the supply voltage to mitigate against any inconsistent illumination or operational defects.
Voltage Ratings and Significance
Understanding the voltage rating of an LED strip is crucial for its compatibility with a power supply and proper functioning.
- Rated Voltage: The optimal voltage that an LED strip requires for efficient operation without risk of under or overvoltage.
- Overvoltage and Undervoltage: Exceeding or not meeting the rated voltage can lead to inefficient operation, reduced lifespan, and potential safety hazards.
- Manufacturers’ Recommendations: Always adhere to the guidelines provided by the LED strip manufacturer for the best results and safety.
Being cognizant of the LED strip’s voltage requirements is pivotal to prevent malfunctions.
Proper voltage application ensures you maximize the LED strip’s lifespan while maintaining luminous efficacy and safety benchmarks.
Preparing for Voltage Testing
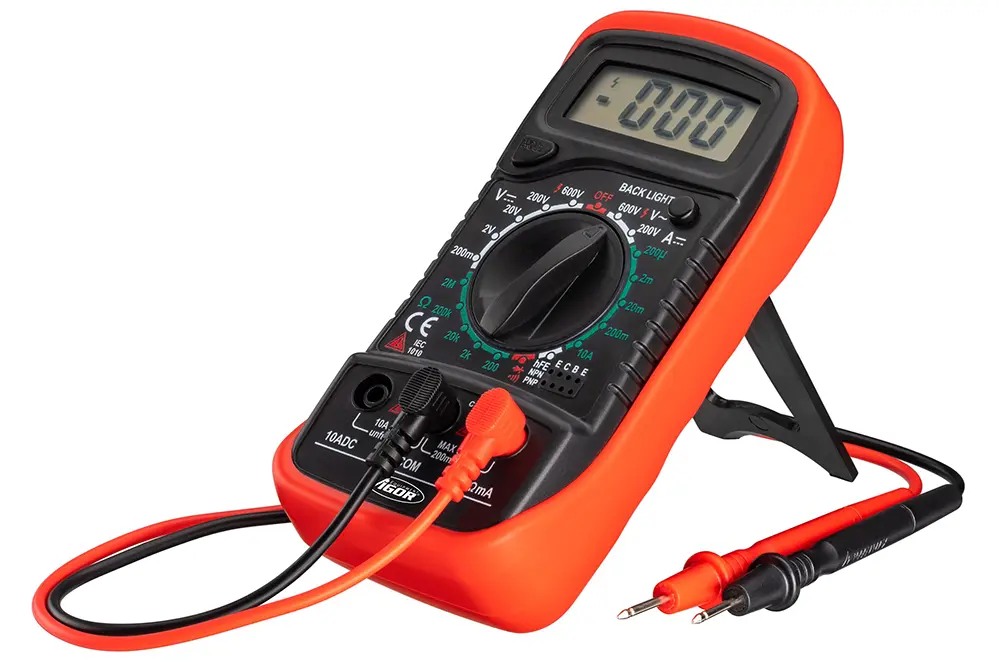
Prior to initiating voltage testing on LED strips, it is imperative to procure a multimeter, an instrument fundamental for measuring electrical properties. Ascertain that the multimeter is appropriately configured for voltage measurement. Additionally, ensure that your workspace is devoid of conductive materials and that the power supply is disconnected from the LED strip to eliminate the risk of electrical shock.
In preparation for a precise evaluation, familiarize yourself with the LED strip’s power specifications, often delineated as “rated voltage”. Cross-reference this with the power supply’s output characteristics. It’s also advisable to review the manufacturer’s voltage tolerances to understand the permissible range of voltage variation. After these preparatory steps, connect the LED strip to a power source that adheres to its voltage requirements, ensuring you are poised to initiate the voltage testing under optimal conditions.
Required Tools and Materials
To effectively measure the voltage across LED strips, one must possess a reliable digital multimeter, which serves as the cornerstone for such diagnostic procedures. Precision in reading voltage levels is contingent upon the quality of this instrument, thus selecting a multimeter of reputable manufacture is crucial.
Additionally, ensure the availability of a stable power source that matches the LED strip’s voltage rating. This is essential to obtain accurate voltage measurements across the strip.
For enhanced safety, it is recommended to have insulated gloves at hand. These gloves (preferably dielectric with voltage rating certification) safeguard against potential electrical hazards during the testing process.
It is also prudent to have a well-illuminated workspace. Accurate readings are often predicated on visual clarity, and ample lighting minimizes the possibility of erroneous readings linked to poor visibility.
Possessing a comprehensive knowledge of the LED strip’s wiring diagram is paramount. This information often provides insight into the correct points of contact for the multimeter probes, which is indispensable for obtaining true voltage values.
Lastly, having a steady hand is necessary when testing an LED strip’s voltage. Subtle deviations in probe placement can lead to false readings, thus precision and attentiveness are indispensable qualities for the task at hand.
Ensuring Safety Before Testing
Safety must be the paramount concern when preparing to test LED strip voltage to prevent accidents and ensure accurate readings.
- Disconnect Power: Ensure the LED strip and power supply are disconnected from any electrical source.
- Inspect Equipment: Examine your multimeter and test leads for any signs of damage or exposed wiring.
- Wear Protective Gear: Don appropriate safety equipment such as insulated gloves and goggles.
- Check for Flammables: Clear the area of any flammable materials to mitigate fire hazards during testing.
- Review LED Specifications: Familiarize yourself with the LED strip specifications and voltage requirements.
Prior to engaging in the voltage testing, a thorough review of the equipment and your surroundings is crucial.
Always adhere to the manufacturer’s guidelines and use a reliable multimeter rated for the voltage you intend to measure.
Safety protocols are not mere formalities; they are critical steps that protect both the individual conducting the test and the integrity of the LED strip itself.
Step-by-Step Voltage Testing
Set the Multimeter: Adjust your multimeter to the voltage (DC) setting appropriate for your LED strip’s specifications.
Establish a Connection: Connect the multimeter probes to the positive and negative pads of the LED strip, ensuring a secure and proper contact.
Record Measurements: Carefully observe and document the voltage reading displayed on the multimeter, comparing it to the expected voltage.
Connecting the Multimeter
Before connecting the multimeter, ensure it is turned off to prevent any electrical surges or mishaps. Select the Direct Current Voltage (DCV) setting on your multimeter, which is typically denoted by a straight line with dashed lines underneath or the letters DC, along with a V for voltage. This ensures the multimeter is configured to measure the voltage output of the LED strip, which commonly operates on direct current.
Attach the multimeter probes to their corresponding ports – usually, the black probe connects to the common (COM) port, and the red probe to the voltage port, often marked with a ‘V’. This aids in creating a safe circuit for testing, where the multimeter becomes part of the electrical path, allowing for the flow of current from the LED power source through the meter.
Next, power on the multimeter and set it to the voltage range that exceeds the LED strip’s rated input if it’s not auto-ranging. For LED strips operating at 12V or 24V, select the voltage range just above these values on your multimeter. This selection is essential to capture accurate readings without damaging the device or creating hazardous situations due to incorrect range settings.
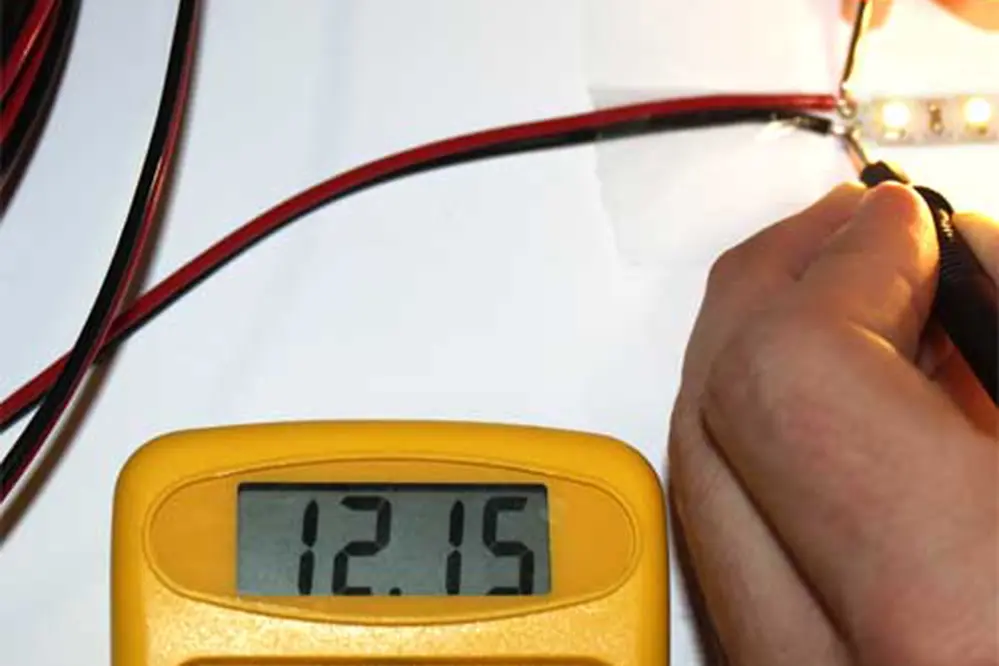
Gently touch the tip of the red probe to the positive (+) terminal and the black probe to the negative (-) terminal of the LED strip. Ensure that the probes have good contact with the terminals. If your LED strip has a specific testing point or pads, use those to establish the connection. A stable and correct connection is imperative for obtaining accurate voltage readings.
Now, carefully observe the reading on the multimeter’s display. A stable voltage reading within the LED strip’s rated voltage signifies a properly functioning strip. If the reading fluctuates or is significantly different from the expected value, it may indicate an issue with the power supply or the LED strip itself.
Reading and Interpreting Results
Upon receiving a stable reading, carefully scrutinize the value displayed. It should align closely with the LED strip’s specified operating voltage. A discrepancy here might point to potential problems or inaccuracies in your measurement.
For instance, if the meter reveals a lower voltage than anticipated, it could be a sign of excessive resistance within the circuit, or it might suggest that the power supply is insufficient or deteriorating. On the other hand, a higher-than-expected reading can imply overvoltage conditions—which could lead to premature failure of the LED strip. It is, therefore, crucial to address such issues promptly to prevent any potential damage.
Conversely, if the reading fluctuates significantly, this hint at an unstable power supply or a poor connection within the circuitry. Constantly changing readings make it challenging to ascertain the true voltage, which necessitates troubleshooting to identify and resolve the source of variability.
Ultimately, an accurate and consistent voltage reading reflects a healthy LED strip and power setup. Should the measured voltage fall within a tight margin of the specified range, your strip should operate correctly. However, any persistent anomalies necessitate further inspection, potentially involving other diagnostic tools or techniques, to ensure the longevity and performance of your LED strip installation.
Troubleshooting Common Issues
When encountering inconsistent voltage readings, it is paramount to meticulously examine the LED strip’s connections and power supply. Loose connections, corroded terminals, or damaged wires can be culprits of irregular voltage. It’s vital to ensure all contacts are secure and free from corrosion or damage, as this can lead to poor electrical conductivity and unstable performance.
If the problem persists after checking the connections, one should consider the possibility of a faulty power supply. Power units can degrade over time, affecting their ability to deliver a steady voltage output. Replacing the power supply with one that matches the LED strip’s voltage and current specifications is often necessary to restore proper functionality.
Addressing Incorrect Voltage
Incorrect voltage can pose a significant threat to the integrity and functionality of an LED strip. Anomaly in voltage levels could irreparably damage the LEDs, resulting in diminished luminosity or an outright failure of the strip.
Deficiencies in voltage require immediate rectification to prevent lasting damage. Consider the voltage specifications of your LED strip and verify that your power source complies with these requirements.
If your assessment reveals a voltage supply that is either too low or too high, you must take remedial action to reconcile this discrepancy. A lower voltage can cause dimming or flickering, while an excessively high voltage might lead to overheating, rapid degradation of the LEDs, or even a risk of fire. Utilizing a multimeter to measure the output can be invaluable in these circumstances to ensure precision.
In instances where the prescribed voltage is not met, adjustments to the power supply may be imperative. Utilizing a voltage regulator or a power adapter with the correct specifications can be effective solutions to achieve the optimal voltage. If necessary, consulting with an electrician or a lighting professional can provide significant expertise in rectifying the situation. It is paramount to address voltage inconsistencies promptly to maintain the LED strip’s performance and longevity.
Fixing Voltage Fluctuations
Voltage fluctuations in LED strips can manifest in inconsistent brightness, flickering, or premature failure of the LED components. To mitigate such issues, harmonizing the voltage input with the strip’s specifications is essential. Precise voltage regulation is imperative to ensure optimal function and prolong the lifespan of the lights. Employing a voltage regulator or stabilizer can standardize the voltage supply, preserving the integrity of the LED strip.
To identify the cause of voltage fluctuations, it’s crucial to inspect the power source. Sudden changes in voltage may stem from an inadequate or unstable power supply, which can be resolved with proper equipment upgrades or adjustments. Continuous monitoring of the power source is recommended to preempt potential voltage instability.
Accordingly, steady and clean power delivery is vital for maintaining voltage consistency. This may involve replacing substandard wiring (which can cause resistance and voltage drops) or integrating a more sophisticated power management system. Consistent voltage delivery upholds the integrity and functionality of LED strips.
When implementing fixes for voltage fluctuations, recalibrating the entire lighting system’s electrical infrastructure can be necessary. This recalibration may include assessing power supply units, wiring quality, and connections to ensure even voltage distribution across the entire strip. Precise electrical adjustments can resolve these fluctuations and enhance the user experience.
Beyond hardware adjustments, checking for compatibility between the LED strip and the power supply unit is critical. Not all power sources are suited for the delicate nature of LED technology; hence, ensuring they are matched in terms of voltage and current can prevent many fluctuation issues. A compatible power source that consistently delivers the appropriate voltage will optimize LED strip performance and longevity.
Lastly, one must remain vigilant to manufacturers’ specifications regarding the LED strip’s voltage requirements. Staying informed about these parameters and implementing corrective measures when needed ensures the extended durability and reliability of the lighting solution. Sometimes, consulting with lighting professionals can provide additional guidance on maintaining the proper voltage levels.
FAQs
Why is it important to check LED strip voltage?
Performing a voltage check on LED strips is of utmost importance. This step ensures that the LED strip is receiving the correct amount of electrical voltage to operate efficiently and safely.
Incorrect voltage supply to LED strips can result in various issues such as dim or flickering lights, shortened lifespan of the LEDs, or even damage to the strip itself. Therefore, it is essential to check and verify the incoming voltage to ensure proper functioning of the LED strip.
By conducting a voltage check, professionals can identify any discrepancies in the voltage levels and take appropriate measures to rectify the problem. This may involve adjusting the voltage supply or using voltage regulators to ensure a stable and consistent power supply.
In addition, a voltage check is crucial for maintaining the safety of the LED strip installation. Incorrect voltage levels can lead to overheating or potential electrical hazards. By regularly monitoring the voltage, professionals can prevent such risks and ensure the longevity and performance of the LED strip system.
In conclusion, a thorough LED strip voltage check is an essential step in the installation and maintenance process. It guarantees optimal performance, prevents potential damages, and ensures the safety of the lighting system.
What voltage should LED strips be?
LED strips should typically be operated at a voltage of 12V or 24V, depending on the specific type of strip. This is because most LED strips are designed to work with these common voltage levels, and using the correct voltage ensures optimal performance and longevity of the LEDs.
When it comes to LED strips, it’s important to match the voltage of the strip with the voltage output of the power supply being used. Using a lower voltage than what the LED strip is designed for may result in dim or inconsistent lighting, while using a higher voltage can potentially damage the LEDs.
For 12V LED strips, a 12V power supply is the most commonly used option. This voltage is commonly available and easily accessible, making it a convenient choice for many lighting applications. 24V LED strips, on the other hand, require a 24V power supply to achieve their full brightness. These strips are often used in larger installations or when longer lengths of strip are required.
It’s important to note that there are also LED strips available that can operate at different voltages, such as 5V or even 48V. These strips are less common and may have specific uses or requirements that are different from the standard 12V or 24V strips. Always refer to the manufacturer’s specifications and guidelines to ensure the correct voltage is used for a particular LED strip.
In conclusion, when deciding on the voltage for LED strips, it is crucial to match the strip’s voltage requirements with the appropriate power supply. This will ensure optimal performance, longevity, and most importantly, safety in your lighting projects.
What is the safe way to check LED strip voltage?
When it comes to checking the voltage of an LED strip, it is important to prioritize safety.
First and foremost, ensure that the power supply to the LED strip is turned off before attempting any measurements. This will help prevent any accidental contact with live wires and reduce the risk of electrical shock.
To measure the voltage accurately, use a multimeter, which is a versatile electrical measuring device. Set the multimeter to the appropriate voltage range, usually DC (direct current) for LED strips. Carefully connect the multimeter’s probes to the positive and negative terminals of the LED strip. Take note of the voltage displayed on the multimeter’s screen.
It is crucial to handle the multimeter and probes properly to avoid any mishaps. Hold the probes by the insulated handles and ensure that your hands are dry to prevent any unintended contact with live wires.
Always double-check the connections and measurement settings to ensure accuracy. If you are unsure about the process or lack experience, it is recommended to consult a professional electrician or lighting expert for assistance.
Remember, safety should always be a top priority when working with electrical components, including LED strips. Taking these precautions will help ensure a safe and accurate voltage check.
What should I check before testing LED strip voltage?
Before testing LED strip voltage, ensure that your multimeter is in proper working condition and set to the correct measurement type (DC voltage). Verify that the LED strip and the power supply unit are compatible in terms of voltage and current specifications.
How can I ensure accurate voltage readings for my LED strips?
To secure accurate voltage readings, connect your multimeter probes to the positive and negative terminals of the LED strip, ensuring a stable and firm connection. The environment should be free from electrical interference and the power supply should be turned on without any load other than the LED strip. This consistency will provide a true reflection of the voltage being supplied.
Can voltage fluctuations damage LED strips over time?
Yes, voltage fluctuations can be detrimental to LED strips, potentially leading to premature failure or inconsistent lighting. LEDs are designed to operate within a specific voltage range, and deviations from this can compromise their longevity and performance.
What precautions should be taken when adjusting voltage for LED strips?
When adjusting voltage, one must adhere to the manufacturer’s specifications and engage power modulation cautiously. Overvolting can result in irreversible damage, while undervolting may cause suboptimal performance. Professional-grade voltage-regulating devices should be used to fine-tune the power supply, and proper insulation should prevent any short circuits or electrical hazards.
How do I know if my LED strip is 12V or 5v?
To determine if your LED strip is 12V or 5V, there are a few ways you can check.
Firstly, you can refer to the product specifications or packaging of the LED strip. The voltage requirement should be clearly indicated. Look for any labels or markings that mention the voltage, such as “12V” or “5V”.
If you don’t have access to the packaging or specifications, you can also examine the strip itself. Look for any text or symbols printed on the strip itself. Manufacturers often print relevant information, including the voltage, directly on the LED strip.
Another method is to check the power supply or driver that is connected to the LED strip. The power supply should have an output voltage rating, which should match the voltage requirement of the LED strip.
If you are still uncertain about the voltage of your LED strip, it is recommended to consult a professional or reach out to the manufacturer for assistance. They will be able to provide you with accurate information and guidance to ensure proper usage of your LED strip.
Conclusion
Testing LED strip voltage is paramount.
It ensures that the installation will exhibit optimal performance and longevity. Accurate voltage readings help identify any potential issues early on, mitigating risks related to overvoltages or undervoltages, which can ultimately safeguard against costly repairs or replacements. Consequently, it’s paramount to adhere to the protocols of voltage testing.
Voltage consistency is critical for LED strip longevity.
The process is straightforward yet requires precision. Implementing meticulous voltage testing as part of routine maintenance or during initial installation is indispensable. Knowing how to effectively measure the voltage across an LED strip circuit is a fundamental skill for lighting professionals and enthusiasts alike.
Remember to always prioritize safety.
Through accurate voltage testing protocols, we protect the integrity of our lighting systems. By adhering to detailed guidelines, including appropriate calibration of multimeters and observing safety protocols, we can extend the operational life of our LED strips well into the future. This article is provided as a guideline informed by the best practices of 2024, ensuring that installations achieve maximum efficiency, reliability, and safety.


