

Have you ever wondered how to wire RGB LED strips without a controller? This seemingly daunting task is more accessible than you might think. Many people assume that complex controllers are necessary for vibrant LED lighting, but that’s not always the case.
One common challenge is the misconception that wiring RGB LED strips without a controller is too complicated for the average person. This belief often deters individuals from exploring the creative potential of LED lighting. However, with the right guidance, anyone can master this skill.
The benefits of learning how to wire RGB LED strips without a controller are numerous. Not only does it offer greater control over your lighting setup, but it also allows for more personalized and innovative designs. Imagine the satisfaction of creating a custom lighting solution that perfectly suits your needs.
In this guide, we will cover the essential components, step-by-step instructions, and tips for troubleshooting common issues. By the end of this article, you’ll be equipped with the knowledge to confidently wire RGB LED strips without a controller.
So, are you ready to embark on this illuminating journey? Let’s dive in and discover how you can transform your space with stunning, customized LED lighting.
Understanding RGB LED Strips

RGB LED strips are revolutionary in bringing dynamic lighting effects into various environments and applications, transforming any space with vibrant, customizable illumination.
These strips possess three primary colors: red, green, and blue.
By adjusting the intensity of each of these basic colors through separate circuits, you can create an array of hues, significantly expanding your creative potential for lighting designs.
Harnessing this technology does not necessitate complicated controllers; a simple understanding of wiring principles can suffice. With the right approach, integrating and manipulating RGB LED strips opens up endless possibilities for personalized interior designs, immersive installations, and unforgettable atmospheres.
Tools and Materials You’ll Need
The essential tools required include a soldering iron, wire cutters, electrical tape, and a multimeter. Checking for functionality is easy with a multimeter, and it ensures your connections are spot-on.
Apart from these, you will additionally need a 12V power supply/adapter.
Wires are indispensable, those specifically designed for RGB LEDs work best. Choosing high-quality gauge wires and connectors will support stable and efficient current flow, essential for the longevity and performance of your LED strips.
Lastly, gather any safety gear relevant to working with electronics, such as goggles and heat-resistant gloves. A safe work environment is crucial for any home project. Complement these with a well-ventilated workspace to avoid inhaling any fumes from the soldering process, and you are set to embark on this illuminating adventure.
Preparing Your RGB LED Strip
Before diving in, ensure your workspace is well-lit and clear of any obstructions to avoid mishaps.
To be thorough, start by inspecting the LED strip’s adhesive backing and connectors to ascertain they are in pristine condition and free from any damage that might hinder effective adhesion and connectivity.
Use a blade “dedicated” to “electronics” for clean, precise cuts when trimming the ‘LED strip lengths’.
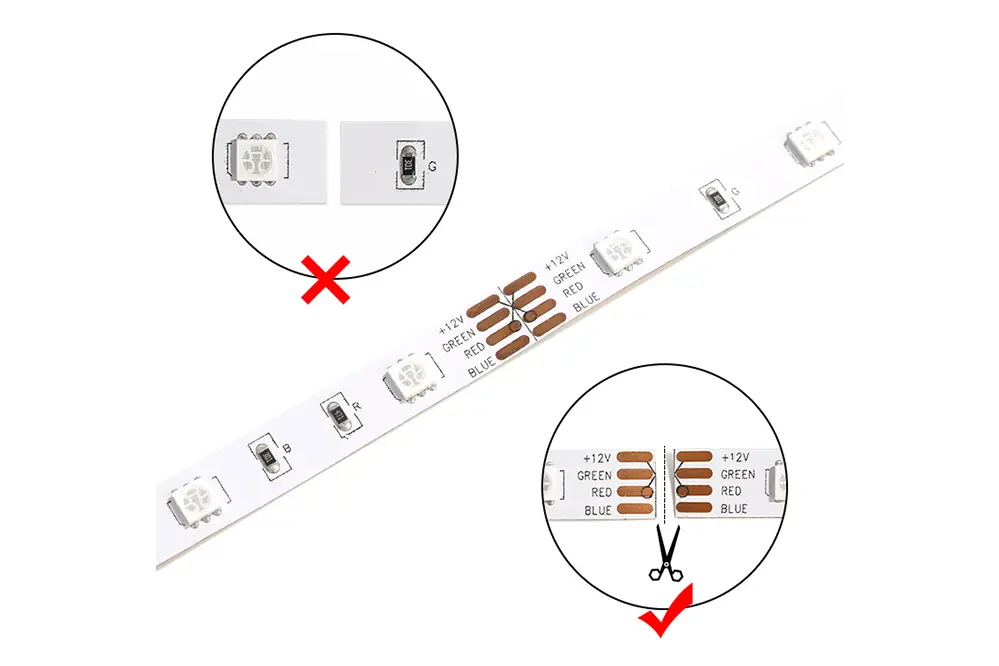
How to Cut RGB LED Strips
Cutting an RGB strip requires precision, a steady hand, and optimal tools. Ensure the strip is powered off to avoid any accidental shorts or damage.
Identify the designated cutting lines, usually marked by a scissors icon. These ensure that the RGB LEDs maintain functionality post-cutting.
Cuts made outside the marked lines may result in non-functional sections of the strip.
Secure the strip on a flat, stable surface before making your cut. Use sharp scissors or a precision knife for a clean and accurate incision, ensuring a smooth, ready-to-use end. Always measure twice and cut once to avoid any mishaps.
Soldering Techniques
Mastering the art of soldering is pivotal, especially when wiring RGB LED strips without a controller. It provides a seamless electric connection that ensures long-lasting and reliable performance, significantly enhancing your lighting project’s success.
First, collect your soldering tools, including a soldering iron, solder, and third-hand tool.
Pre-tin both the LED strip and the connecting wires. This step, often regarded as essential, primes the surfaces for maximum conductivity.
Next, align the tinned wire ends with corresponding pads on the pre-tinned LED strip. Practice patience and precision here.
Simultaneously heat the wire and pad with the soldering iron, allowing the solder to meld for a second. Remove the iron and let the weld cool naturally.
While it may seem daunting initially, with practice and persistence, soldering becomes an easy, integral part of your skillset. Embrace this vital aspect to ensure your RGB LED strip projects shine brightly.
Series Wiring Method
When opting for the series wiring method, a cascade of electrical connections, whereby each RGB LED strip is connected end-to-end, should be employed. This method ensures an even distribution of electrical current throughout the entire setup, resulting in consistent brightness across all the connected strips.
In executing this wiring layout, begin by connecting the positive (+) terminal of the power source to the positive terminal of the first LED strip. Then, connect the negative (-) terminal of the first strip to the positive terminal of the next. Continue this pattern until the last strip’s negative terminal is finally linked back to the power source. This series circuit approach is both effective and reliable, ensuring your project radiates uniform brilliance.
Benefits of Series Wiring
Series wiring offers numerous advantages for electric and electronic projects, particularly for RGB LED strips, ensuring optimal performance and efficiency.
- Uniform Current Distribution: Ensures the same current flows through each strip, resulting in consistent brightness across all LEDs.
- Simplified Troubleshooting: Identifying and resolving issues becomes more straightforward, as each component is part of a single continuous loop.
- Reduced Voltage Drop: Voltage drop is minimal compared to parallel wiring, enhancing voltage consistency throughout the entire circuit.
- Cost-Effective Setup: Utilizing fewer wires and connectors can lower installation costs and simplify the overall design.
This method is particularly beneficial for large installations where maintaining uniform brightness is crucial.
Adopting series wiring not only optimizes electrical performance but also facilitates a more organized and aesthetically pleasing arrangement.
Drawbacks of Series Wiring
While series wiring provides numerous advantages, it also comes with a unique set of challenges that must be considered. These drawbacks may impact the efficiency and overall functionality of your RGB LED strip setup.
First, a single point of failure can compromise the entire system. This means that if one LED fails, it interrupts the current flow, causing all connected LEDs to go out.
Additionally, issues with voltage drop become more pronounced. Over longer distances, the LEDs farthest from the power source may experience diminished brightness.
Moreover, series wiring can limit expandability. Adding new components becomes more complex, as each addition may further affect the voltage distribution.
Flexibility is another concern. Altering the configuration or making adjustments requires a rework of the entire circuit, potentially resulting in more downtime and effort.
Lastly, higher resistance in series circuits can lead to heat buildup. This increased load might cause higher temperatures within the wiring, affecting longevity and safety.
Therefore, while series wiring offers notable benefits, its drawbacks necessitate careful consideration. Balancing these challenges against the advantages is critical for an optimal setup.
Step-by-Step Guide for Series Wiring
Wiring RGB LED strips in series can provide substantial benefits in certain installations. Understanding the process ensures you achieve optimal functionality and performance without a controller.
First, gather your tools and materials, including the LED strips, power supply, and connecting wires. Each step must be followed precisely for the best results.
Start by identifying the positive and negative terminals on your LEDs. Connect the negative terminal of the power source to the negative terminal of the first LED strip, ensuring a secure attachment.
Then, proceed to connect the positive terminal of the first LED strip to the negative terminal of the next strip in the series. Repeat until all strips are connected. This meticulous approach will ensure continuous current flow, unlocking the full potential of your RGB LED strips with remarkable efficiency and brilliance.
Parallel Wiring Method
When employing the parallel wiring method, a balanced and synchronized illumination, across each strip, is delivered. Instead of connecting in a consecutive sequence, parallel wiring routes each strip directly to a central power source. This method assures consistent brightness since every strip receives the same voltage directly. It is ideal for extensive installations, enhancing both reliability and visual consistency.
Advantages of Parallel Wiring
Parallel wiring offers several pivotal advantages that can significantly enhance your LED strip installation, amplifying both aesthetic outcomes and operational dependability.
First, parallel wiring ensures uniform brightness. Every LED strip receives the same voltage.
Consequently, individual strips can perform optimally without the brightness degradation often seen in series wiring systems.
Moreover, parallel connections can reduce the risk of voltage drop, which is significant in longer installations.
This benefit facilitates a more reliable setup, potentially extending the operational lifespan of your LED strips.
In addition, parallel wiring allows for straightforward troubleshooting and maintenance, empowering you to diagnose and resolve issues efficiently without disrupting the entire system’s functionality.
Finally, the scalability of this method is unmatched, enabling seamless expansion of your LED network without compromising performance. This is ideal for future modifications or upgrades.
Disadvantages of Parallel Wiring
While parallel wiring offers many advantages, it also has its drawbacks that must be taken into consideration for a holistic view.
Firstly, the primary disadvantage lies in the complexity of the wiring process. Unlike series wiring, which typically involves just a single path, parallel wiring requires multiple connections that can become cumbersome and labor-intensive. This complexity can make the installation more time-consuming and may necessitate a higher level of technical expertise.
Additionally, parallel wiring can lead to an increased risk of short circuits. With multiple pathways for electricity to flow, any fault in the wiring can result in a short, potentially causing damage to the LED strips and posing a fire hazard. This increases the importance of meticulous wiring practices to ensure safety and reliability.
Finally, there is often a greater financial cost associated with parallel wiring. More materials are usually needed, such as additional wire and connectors, which can add to the overall expense. This factor, combined with the potential necessity for professional installation, can make parallel wiring a less economical choice for some projects. Despite these disadvantages, careful planning and execution can mitigate many of these concerns, allowing you to harness the benefits of this wiring method.
How to Wire RGB LED Strips in Parallel
Wiring RGB LED strips in parallel is effective.
First, you’ll need to gather all the necessary supplies. This includes your RGB LED strips, a sufficient length of wire for your connection needs, and appropriate connectors to ensure secure attachment. Importantly, make sure you have a power supply capable of handling the combined load of all the strips. Additionally, you’ll want to prepare a soldering iron and some solder for secure electrical connections.
Begin by measuring and cutting your wires.
Afterward, connect the positive terminals (often labeled as “+12V” or “+24V” based on your strip specification) from each LED strip to a common positive wire. Then, do the same for each color channel (R, G, B), connecting their respective terminals to a shared wire per color.
Finally, it’s crucial to double-check all connections before powering up. Ensuring all joints are secure and insulated will help prevent short circuits and maintain safe operation. Properly wired RGB LED strips can offer vibrant and synchronized lighting, enhancing any environment with their dynamic colors.
Using Resistors for Safety
When wiring RGB LED strips without a controller, it’s imperative to consider the safety aspects, especially considering the potential for electrical hazards and component damage.
Resistors are vital components in this regard, acting as current limiters.
Specifically, resistors help protect the LEDs from excessive current, which can lead to overheating and eventual failure.
By incorporating appropriate resistors into the circuit, you ensure the LED strips operate within their safe current ratings, prolonging their lifespan.
To determine the correct resistor values, calculate the required current for each color (R, G, B) based on the LED strip’s specifications. Use Ohm’s Law to find the appropriate resistor values to keep current within safe limits.
Ultimately, taking the time to incorporate resistors isn’t just about safeguarding equipment. The enhanced reliability and performance achieved with proper current regulation translate into a more enjoyable and dependable lighting experience.
Customized Lighting with Arduino
Embrace a world of boundless creativity by utilizing Arduino to customize your RGB LED strips.
Recent years, Arduino programming, a robust open-source electronics platform, has empowered hobbyists and professionals alike to create mesmerizing lighting projects with RGB LED strips, even without a traditional controller.
Indeed, it’s incredible how Arduino’s flexibility can propound a plethora of customized lighting solutions tailored to your desired aesthetics and functionality. Just imagine orchestrating light sequences that dance to the rhythm of your favorite tunes!
Integrating RGB LED strips with Arduino merely involves connecting three PWM pins to the respective Red, Green, and Blue channels, modifying your code to animate colors. Effortlessly orchestrate dynamic lighting by writing simple, yet powerful programs.
The exhilarating journey of customized lighting with Arduino is not just about technology; it’s about transforming spaces and enhancing experiences, encapsulating the magic of light through innovation.
Advanced Brightness Control with MOSFETs
Achieving advanced brightness control without a conventional controller is a remarkable feat, which involves employing a robust method using MOSFETs. MOSFETs (Metal Oxide Semiconductor Field Effect Transistors) govern substantial current levels effortlessly.
They provide the gateway to achieve PWM (Pulse Width Modulation) control for RGB LED strips. PWM is essential for dimming each color channel seamlessly.
By integrating MOSFETs into your circuit, you effectively replace the need for traditional controllers. This method provides fine-tuned energy efficiency.
Furthermore, connecting an Arduino or similar microcontroller to MOSFETs facilitates precise brightness control. This ensures the longevity and consistent performance of your LED strips.
Incorporating MOSFETs enhances your project by maintaining bright and stable lighting. This implementation showcases the power of modern electronics in creating adaptable lighting solutions tailored to your needs.
Ultimately, the key to success lies in carefully selecting and wiring the MOSFETs. This combination provides a revolutionary approach to mastering RGB LED brightness without a conventional controller.
Power Distribution Boards
A robust power distribution board is essential for ensuring consistent power delivery to your RGB LED strips.
First, select a power distribution board with multiple output terminals to suit your project’s requirements. This component ensures that power is evenly distributed across all LED segments, providing uniform brightness and avoiding any potential overloading issues. Properly rated terminals and high conductivity materials are critical for efficient power transfer and long-lasting performance.
Additionally, ensure that your power distribution board can handle your power supply’s voltage and current ratings. By meticulously choosing components, you make sure that even at high loads, your RGB LED strips perform flawlessly without any risk of damage. This consideration is particularly vital to avoid power drops along the strips.
Strategically mounting the power distribution board close to your LED setup minimizes voltage drop and potential interference. Keep all connections secure and insulated to maintain a safe and reliable operation environment and to prevent short circuits or power loss.
Ultimately, incorporating a high-quality power distribution board in your project demonstrates a commitment to excellence. It highlights the importance of meticulous planning and execution in achieving superior lighting solutions. This method inspires confidence in the system’s reliability, paving the way for remarkable and reliable lighting innovation.
Managing Voltage Drop with Power Injection
Voltage drop can significantly affect the brightness and performance of your RGB LED strip. By using power injection, you can enhance the voltage consistency across the entire strip.
Power injection involves supplying additional power at intervals along the strip. This method counteracts the natural voltage drop that can occur over long distances.
To implement power injection, connect supplementary power wires to points along the RGB LED strip. This ensures a stable voltage supply, promoting uniform brightness and consistent performance, irrespective of the strip’s length.
The process of power injection is critical, especially for longer strips. It allows you to evenly distribute power, ensuring each segment receives adequate voltage. It’s essential to use appropriate gauges of wire, maintain secure connections, and employ quality power supplies to ensure safety and effectiveness. By mastering power injection, you pave the way for creating exceptional lighting displays that truly shine.
Creating a Portable Setup with Battery Packs
Imagine being able to take your vibrant RGB LED light display anywhere, unshackled from traditional power sources and bulky adapters.
To achieve this, you need to focus on designing a portable setup powered by battery packs. The flexibility, ease of transport, and convenience offered by battery packs enable you to wire your RGB LED strip for a dynamic lighting solution fit for any location. Adopting this setup ensures you can maintain your creative freedom without being tethered to an electrical outlet.
First, select suitable battery packs that match the voltage requirements of your RGB LED strip. For most strips, a 12-volt battery pack is ideal. Carefully connect the positive and negative terminals of the battery pack to the corresponding terminals on the RGB LED strip, ensuring a secure and stable connection.
Before you finalize your setup, consider incorporating a switch to your battery pack circuit for easy power control. This addition not only enhances convenience but also prolongs battery life by allowing you to switch off the lights when not in use. By embracing a battery-powered solution, you unlock unparalleled mobility and versatility for your RGB LED projects.
Conclusion
Wiring an RGB LED strip without a controller is achievable with the right components and approach. This guide demonstrates the simplicity of the process, empowering you to create stunning lighting effects independently. By following this method, you can bring vibrant illumination to any space, unlocking endless possibilities for innovation and enjoyment. Venture forth confidently, knowing you have the knowledge to light up your world without limits.
For those seeking professional assistance or high-quality products, consider reaching out to Unitop, a leading Chinese manufacturer of LED strip lights and LED neon strips, including RGB strips. With their expertise and top-notch products, you can ensure your lighting projects are executed flawlessly. If you have any questions about wiring RGB LED strips or need further guidance, please do not hesitate to contact us. Unitop is committed to helping you achieve your lighting goals with confidence and precision.


