

Transforming your car interior with LED strip lights can elevate your driving experience, making it more vibrant and enjoyable. This comprehensive guide will walk you through the entire process of installing LED strip lights in your car, ensuring a seamless and professional finish. Whether you’re a seasoned DIY enthusiast or a beginner, this tutorial will provide you with all the necessary steps and tips to achieve a stunning result.
Gather Necessary Tools and Materials

Before diving into the installation process, it’s crucial to gather all the tools and materials you’ll need. Having everything on hand will make the process smoother and more efficient. Here’s a list of essential items:
- LED strip lights
- Power supply (car battery or fuse box)
- Wire connectors
- Electrical tape
- Wire cutters and strippers
- Soldering iron (optional)
- Adhesive promoter
- Cleaning supplies (alcohol wipes or soapy water)
- Measuring tape
- Scissors
- Zip ties or cable clips
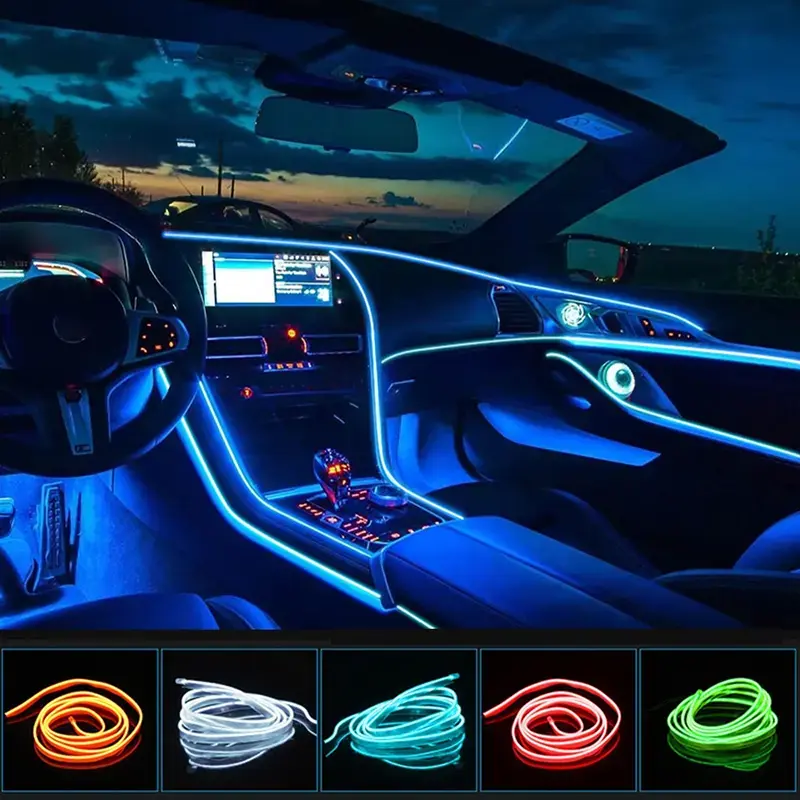
Choose the Right LED Strip Lights
Selecting the right LED strip lights is paramount to achieving the desired effect. Consider the following factors when choosing your LED strips:
- Brightness: Measured in lumens, the brightness of the LED strips should match your preference and the ambiance you want to create.
- Color: Opt for single-color or multi-color (RGB) LED strips depending on your style. RGB strips offer more versatility with color-changing options.
- Waterproofing: If you plan to install the lights in areas exposed to moisture, ensure the LED strips are waterproof (IP65 or higher).
- Length: Measure the areas where you intend to install the lights to determine the required length of the LED strips.
Plan the Installation Layout
Planning the layout is a critical step that ensures a clean and organized installation, making it easier to install the LED strips in the desired locations. Take the time to visualize where you want the LED strips to be placed. Common areas include:
- Under the dashboard
- Along the footwells
- Under the seats
- Around the center console
Sketch a rough diagram of your car’s interior and mark the locations where the LED strips will be installed. This will help you determine the length of the strips and the wiring routes.
Prepare the Car Interior
Preparation is key to a successful installation. Start by cleaning the areas where the LED strips will be mounted. Use alcohol wipes or soapy water to remove any dirt, dust, or grease. A clean surface ensures better adhesion and longevity of the LED strips.
Clean the Surface for Adhesion
For optimal adhesion, it’s essential to thoroughly clean the surfaces where the LED strips will be attached. Follow these steps:
- Wipe down the surface: Use alcohol wipes or a cloth dampened with soapy water to clean the area.
- Dry the surface: Ensure the surface is completely dry before proceeding.
- Apply adhesive promoter: For extra adhesion, apply an adhesive promoter to the cleaned surface. This step is optional but recommended for a more secure bond.
Measure and Cut the LED Strips
Accurate measurements are crucial to avoid any gaps or overlaps. Use a measuring tape to determine the exact length needed for each section. Most LED strips have designated cutting points, usually marked with a scissor icon. Carefully cut the strips at these points to avoid damaging the circuitry.
Attach the LED Strip Lights
Now that you have your LED strips cut to the desired lengths, it’s time to attach them to the car’s interior. Follow these steps:
- Peel off the backing: Remove the adhesive backing from the LED strip.
- Position the strip: Carefully position the strip along the planned layout.
- Press firmly: Press the strip firmly onto the surface to ensure a secure bond. Use a flat tool to smooth out any air bubbles.
Connect the Wires to Power Source
Connecting the LED strips to a power source is a critical step. You have two main options: wiring to the car battery or using a cigarette lighter adapter to connect to the fuse box. Each method has its advantages and considerations.
Wiring to the Car Battery
Wiring directly to the car battery provides a constant power supply, allowing the LED strips to operate independently of the car’s ignition. Here’s how to do it:
- Locate the battery: Find the car battery, usually located under the hood.
- Connect the positive wire: Attach the positive wire from the LED strip to the positive terminal of the battery.
- Connect the negative wire: Attach the negative wire to the negative terminal of the battery.
- Secure the connections: Use wire connectors and electrical tape to secure the connections and prevent any short circuits.
Wiring to the Fuse Box
Wiring to the fuse box allows the LED strips to turn on and off with the car’s ignition, providing a more integrated solution. Follow these steps:
- Locate the fuse box: Find the fuse box, usually located under the dashboard or in the engine compartment.
- Identify a suitable fuse: Choose a fuse that corresponds to a circuit you want the LED strips to be connected to (e.g., interior lights).
- Use a fuse tap: Use a fuse tap to connect the positive wire from the LED strip to the chosen fuse.
- Ground the negative wire: Attach the negative wire to a suitable grounding point in the car.
Secure the Wires and LED Strips
To ensure a tidy and professional installation, secure the wires and LED strips using zip ties or cable clips. This will prevent any loose wires from interfering with the car’s operation and maintain a clean appearance.
Test the LED Strip Lights
Before finalizing the installation, test the LED strip lights to ensure they are working correctly. Turn on the power source and check for any issues such as flickering or uneven lighting. If everything looks good, proceed to the next step.
Adjust Brightness and Colors
If you opted for RGB LED strips, take the time to adjust the brightness and colors to your liking using the controller. Most LED strips come with a remote control or a mobile app that allows you to customize the settings. Experiment with different colors and brightness levels to create the perfect ambiance.
Troubleshooting Common Issues
Encountering issues during the installation process is not uncommon. Here are some common problems and their solutions:
- LED strips not turning on: Check the power connections and ensure the wires are securely attached.
- Flickering lights: This could be due to a loose connection or insufficient power supply. Double-check the connections and consider using a different power source.
- Uneven lighting: Ensure the LED strips are evenly spaced and securely attached to the surface.
Tips for Maintenance and Longevity
To keep your LED strip lights in top condition, follow these maintenance tips:
- Regular cleaning: Dust and dirt can accumulate on the LED strips, affecting their brightness. Clean them regularly with a soft cloth.
- Avoid excessive bending: Bending the LED strips too much can damage the circuitry. Handle them with care during installation and maintenance.
- Check connections: Periodically check the power connections to ensure they are secure and free from corrosion.
Enhancing Your Car’s Interior with LED Strip Lights
LED strip lights offer endless possibilities for customizing your car’s interior. Here are some creative ideas to inspire you:
- Ambient Lighting: Create a relaxing atmosphere by installing LED strips under the seats and along the footwells. Choose soft, warm colors for a cozy feel.
- Accent Lighting: Highlight specific areas of your car, such as the dashboard, center console, or door panels, with accent lighting. Use contrasting colors to make these features stand out.
- Music Sync: Some LED strips come with a music sync feature that allows the lights to change color and intensity with the beat of the music. This can add an exciting dynamic to your car’s interior, perfect for parties or road trips.
- Custom Patterns: Experiment with different lighting patterns and effects. Some LED strips offer programmable options, allowing you to create custom light shows that reflect your personality and style.
Legal Considerations and Regulations
While LED strip lights can enhance your car’s interior, it’s essential to be aware of legal considerations and regulations. Different states and countries have varying laws regarding the use of interior and exterior lighting in vehicles. Here are some general guidelines:
- Avoid Distracting Colors: Colors like red and blue are often reserved for emergency vehicles. Using these colors inside your car may attract unwanted attention from law enforcement.
- Visibility: Ensure that the LED lights do not impair your visibility or distract other drivers. Avoid placing lights in areas that can cause glare or reflections on the windshield.
- Check Local Laws: Research and comply with local regulations regarding vehicle lighting. Some areas may have specific rules about the brightness, color, and placement of interior lights.
Additional Tips for a Seamless Installation
To ensure your LED strip lights installation goes off without a hitch, consider these additional tips:
- Test Before Final Installation: Before securing the LED strips permanently, temporarily connect them to the power source and test their functionality. This will save you time and effort if any adjustments are needed.
- Use a Multimeter: A multimeter can be a handy tool to check the voltage and ensure that the power supply is consistent. This can help diagnose any issues with the LED strips not lighting up properly.
- Heat Shrink Tubing: For added protection, use heat shrink tubing over the wire connections. This will provide a more durable and professional finish, protecting the connections from moisture and wear.
- Plan for Future Upgrades: If you plan to add more LED strips or other electronic accessories in the future, consider leaving some extra wire length and space in your layout. This will make future installations easier and more convenient.
Safety Precautions
Safety should always be a priority when working with electrical components. Keep these safety tips in mind:
- Disconnect the battery: Before starting the installation, disconnect the car battery to prevent any accidental short circuits.
- Use proper tools: Use insulated tools to avoid electrical shocks.
- Follow manufacturer instructions: Always follow the instructions provided by the LED strip manufacturer for safe and effective installation.
Conclusion
Installing LED strip lights in your car is a rewarding DIY project that can significantly enhance your driving experience. By following this comprehensive guide, you’ll be able to achieve a professional and stylish result. Remember to plan your layout, choose the right LED strips, and take your time with the installation process. With the right tools and a bit of patience, your car’s interior will be transformed into a vibrant and inviting space. Enjoy the journey and the stunning results!
LED strip lights are a fantastic way to personalize your car and make it truly your own. Whether you’re looking to create a relaxing ambiance, highlight specific features, or add a touch of excitement, LED strips offer endless possibilities. With careful planning and attention to detail, you can achieve a professional and seamless installation that will impress anyone who steps into your car. So, gather your tools, select your LED strips, and embark on the exciting journey of transforming your car’s interior today. The road to a more vibrant and enjoyable driving experience awaits!


