

Have you ever wondered how to install LED strip lights on a boat to transform it into a nighttime spectacle? This task might seem daunting, but with the right guidance, it can be a straightforward and rewarding project. Many boat owners shy away from this upgrade due to misconceptions about its complexity and cost.
One common challenge is the fear of improper installation leading to electrical issues or water damage. However, with advancements in LED technology and waterproofing, these concerns are easily mitigated. Another misconception is that LED lighting is purely decorative, overlooking its significant safety benefits.
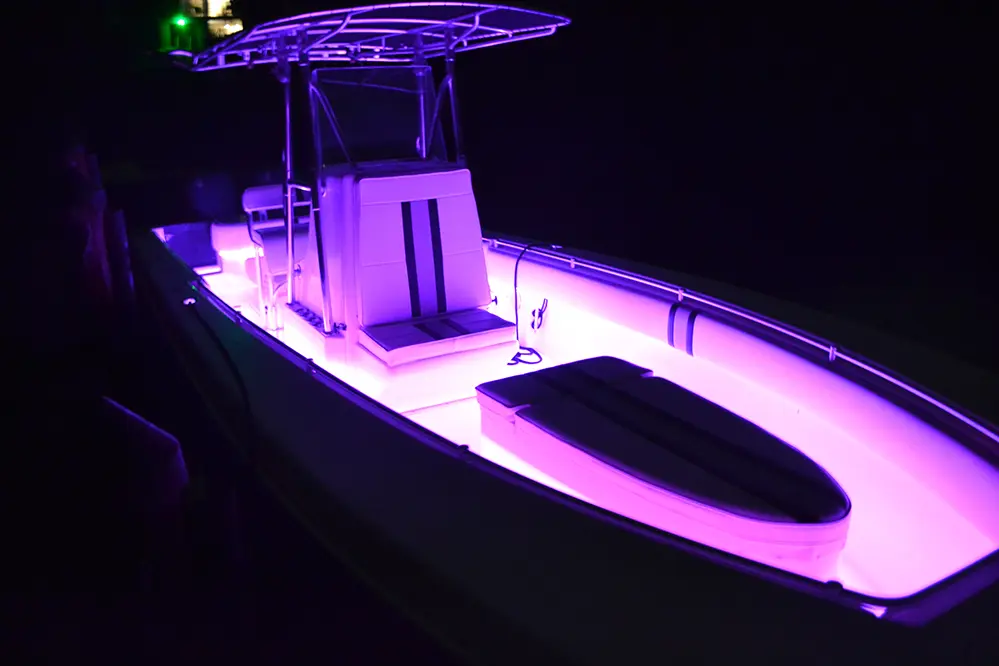
Installing LED strip lights on a boat not only enhances its visual appeal but also improves onboard safety by providing better illumination. This upgrade can make nighttime navigation easier and more secure, ensuring a safer boating experience for everyone.
In this article, we will cover essential tips and tricks for selecting the right LED lights, preparing your boat for installation, and ensuring a safe and effective setup. By following these guidelines, you can achieve a professional-quality installation that will elevate your boating experience.
Ready to transform your boat with LED strip lights? Continue reading to unlock the secrets to a successful installation and enjoy the myriad benefits that come with it.
Choosing the Right LED Strip Lights
Selecting the appropriate LED strip lights for a boat requires careful consideration of several factors.
Firstly, it is essential to opt for a waterproof variant that can withstand exposure to water and high humidity, ensuring the longevity of the lights. These lights should also offer the right color temperature, brightness, and lumens to provide both practical illumination and an appealing aesthetic.
Additionally, pay close attention to the flexibility of the strips, as marine environments often present irregular surfaces. This adaptability ensures that the lights can be installed uniformly, highlighting the boat’s structure and adding to its visual charm.
Ultimately, choosing high-quality LED strip lights tailored to withstand marine conditions, combined with proper boat lighting, will result in a safe and visually stunning boating experience. These considerations will significantly enhance any journey, transforming every outing into an unforgettable adventure set against the backdrop of radiant illumination.
Tools and Supplies You’ll Need
Before embarking on your installation journey, gather the necessary tools and supplies to ensure a seamless process.
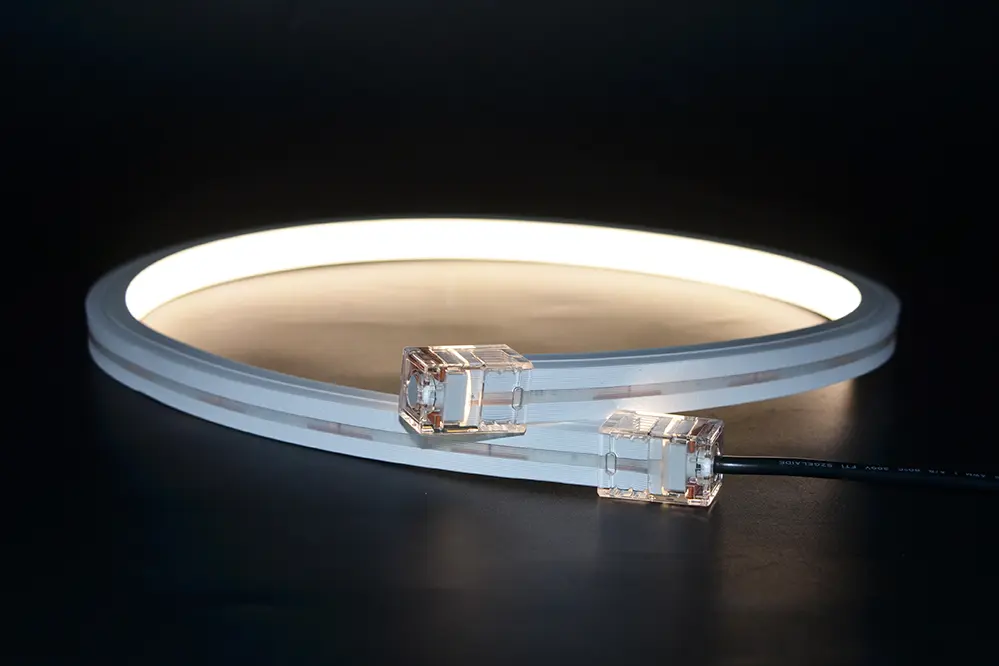
Foremost, an LED strip light kit with a waterproof rating is indispensable. This kit usually includes the LED strips, a power supply, and a remote control. Additionally, marine-grade adhesive or mounting brackets are paramount to secure the strips effectively.
Moreover, having a soldering iron and solder wire on hand is incredibly beneficial. For cutting and customizing the strips, ensure you have a pair of sharp scissors designed for electronics, as well as wire strippers to handle the wiring effortlessly.
Finally, a multi-meter is a pivotal tool for verifying electrical connections and ensuring proper voltage. With these tools and supplies, one is well-equipped to tackle the task of installing LED strip lights, highlighting their vessel with professional precision and creating an enchanting ambiance on the water.
Planning the Layout
A well-planned layout ensures that the LED strip lights are both functional and aesthetically pleasing, enhancing the boating experience while providing essential illumination.
When planning the layout, first consider the specific areas that will benefit most from improved lighting.
Bow, stern, and cockpit are key areas to prioritize, illuminating steps (enhancing safety significantly while navigating) and highlighting features.
Additionally, think about deck spaces where visibility might improve not only aesthetics but also overall functionality and comfort.
It’s essential to determine the length of LED strips required for each area, measuring your boat and considering the placement of power sources.
Furthermore, take note of areas where direct lighting might be disruptive and instead plan for indirect placements to maintain ambiance and effectiveness.
Ultimately, the goal is to plan a layout that’s both practical and stylish. Careful consideration ensures the LED lights enhance nighttime boating experiences seamlessly.
Preparing the Surface
Before installing the LED strip lights, ensure the surface is clean, dry, and free of any debris.
First and foremost, it is vital to gather appropriate cleaning supplies such as a mild detergent, soft cloths, and a non-abrasive scrub, which will ensure the surface is adequately prepared to hold the adhesive backing of the LED strips securely. This step cannot be overstated, as any impurities can undermine the longevity and adherence of the lights.
Additionally, inspect the surface for any signs of damage or wear. If there are any imperfections, address them promptly to create a smooth installation area. Sanding down rough spots and filling cracks will prevent future issues and promote optimal adhesion for the strips.
Finally, an extra step of using a high-quality primer or prep solvent designed for marine applications can significantly enhance the adhesion of the LED strips, ensuring they withstand the challenging marine environment. Investing time and effort in this preparatory phase is essential, as it lays the groundwork for a flawless and durable lighting installation, ultimately resulting in a transformative and reliable upgrade for the vessel.
Measuring and Cutting the LED Strips
He should start by carefully measuring the areas where he plans to install the LED strips.
With precision, he finds the total length of each section needing illumination, ensuring the measurements align with his lighting design. Accurate measurement avoids wastage and guarantees the optimal distribution of light across the desired areas. He should mark these measurements with a pencil to maintain clarity throughout the process.
Next, she must cut the LED strips to match her measurements. It’s important to only cut the strips at the designated cutting points, which are usually marked by a small scissor icon. This step prevents damaging the electrical layout and ensures the LEDs will function correctly.
Using a sharp, clean pair of scissors, they make precise cuts, following the marked cutting points exactly. This careful approach prevents any misalignment or potential malfunction that could otherwise compromise the functionality and aesthetics of the final installation. Taking time to cut and measure accurately right from the start is a vital investment in their project’s success.
Connecting the LED Strips
Once the strips are cut to the appropriate lengths, he needs to connect them by using the correct connectors, which come in various types. Leveraging waterproof connectors is advisable for a marine environment, ensuring durability and longevity. Each connector should be secured firmly to avoid any disconnections due to boat vibrations, providing a seamless and uninterrupted lighting experience throughout their vessel. Potential gaps should be handled meticulously, as proper connections are crucial for maintaining the integrity and functionality of the LED system, creating an ambiance that is both reliable and aesthetically pleasing.
Understanding Connectors and Adapters
Understanding connectors and adapters, a crucial for successful installation, ensures that each component works harmoniously. Investing time in selecting the right ones makes a significant difference.
For seamless connections, opt for “quick connectors”. These are not only easy to install but offer a robust connection, essential for a boat’s unique environment.
Quick connectors secure connections quickly, crucial for withstanding sea conditions that challenge electrical integrity.
Additionally, waterproof connectors and marine-grade adapters are important in maintaining a reliable and secure LED system. These components prevent water ingress and corrosion, preserving the efficiency and longevity of the lighting setup. Choosing the right connectors and adapters not only simplifies the installation process but also enhances the overall durability, making every voyage beautifully illuminated and worry-free.
Waterproofing the LED Strips
Ensuring your LED strip lights are properly waterproofed is crucial when installing them on a boat. This not only extends their lifespan but also protects them from water damage, corrosion, and various marine hazards.
Select LED strips that are specifically designed for waterproof use. Waterproof LEDs typically come with an IP65 rating.
It’s important to encapsulate the LED strips in a waterproof casing, typically made of silicone. These casings provide a perfect seal, safeguarding the strips from moisture, saltwater, and harsh weather conditions.
Furthermore, apply marine-grade sealants or adhesive-backed solutions to secure the waterproof casing. This additional layer of protection keeps the LED strips firmly in place while ensuring maximum resistance to water ingress, thus enhancing their durability and performance. Always prioritize products labeled as “marine” to guarantee compatibility with boating requirements.
Mounting the LED Strips
Mounting the LED strips on your boat requires careful planning to achieve optimum illumination without compromising safety. Begin by choosing the right placement, prioritizing areas where effective visibility and ambiance are crucial, such as the deck, cabin, or railings.
Use marine-grade clips or strong adhesive backing to secure the LED strips. Ensure that the surface is clean and dry to guarantee a firm attachment.
Adhesive vs. Mounting Clips
Choosing between adhesive and mounting clips is crucial for securing LED strip lights effectively on a boat.
- Adhesive: Easier to apply, especially on smooth surfaces.
- Mounting Clips: Offer a more robust solution, particularly in high-movement areas.
- Combination: Using both can provide added security, especially in turbulent waters.
- Durability: Clips tend to last longer than adhesive under harsh conditions.
- Flexibility: Adhesives allow for more versatile placement.
Both methods have their advantages, but selecting the right one depends on the boat’s environment.
Adhesive solutions are quick and convenient but may wear out faster.
Mounting clips, on the other hand, offer superior durability and reliability.
Wiring and Power Supply
Wiring and connecting the power supply for LED strip lights on a boat require careful attention to detail. Ensure that the wiring is marine-grade, corrosion-resistant, and sealed adequately to avoid water infiltration.
Secure all connections tightly and add protective measures, such as heat shrink tubing, to prevent short circuits.
Selecting the Correct Voltage
Choosing the correct voltage is crucial for the safe and efficient operation of LED strip lights on a boat.
- Voltage Compatibility: Ensure the LED strip lights match the boat’s electrical system, typically 12V or 24V.
- Power Supply: Select a power supply that can handle the total wattage of the LED strips.
- Voltage Drops: Consider potential voltage drops over longer runs, which may require thicker wiring.
- Marine-Grade Equipment: Use electrical components rated for marine use to withstand harsh conditions.
Matching the system voltage with the LED strips avoids electrical inefficiency and potential damage.
An appropriate power supply ensures the LEDs receive consistent power without strain.
Investing in marine-grade materials safeguards the system’s integrity and longevity.
Installing a Dimmer or Controller
Incorporating a dimmer or controller into an LED strip lighting system enhances both functionality and ambiance on a boat. These devices introduce a level of customization that allows for the perfect lighting to match any occasion.
Dimmers adjust the brightness of the LEDs.
Controllers can manage colors, set patterns, and vary the lighting’s intensity at will.
Both options require careful planning and selection to complement the existing electrical system.
Choose a marine-grade dimmer or controller specifically designed to withstand the boat’s environmental conditions. Robust and resilient components ensure long-lasting performance even in saltwater conditions.
Wire the dimmer or controller according to the manufacturer’s instructions, paying extra attention to proper insulation and waterproofing. This attention to detail prevents malfunctions and preserves the integrity of the electrical system.
Ultimately, the addition of a dimmer or controller elevates the overall lighting experience on a boat. Craft a stunning, adaptable atmosphere that remains reliable, contributing to memorable and safe marine adventures.
Securing the Wiring
Careful attention to securing wiring ensures longevity, stability, and safety in LED strip light installations. One must utilize appropriate tools and techniques to achieve a professional result.
Begin by mapping the wiring route along the boat.
Secure wires using marine-grade cable ties, not only to minimize movement but also to prevent abrasion.
Avoid tight bends and excessive pulling on the wiring to maintain the integrity of the electrical system.
Use marine-grade adhesive-backed clips to keep wiring neatly attached to surfaces, enhancing both aesthetics and durability.
Finally, consider enclosing wires in waterproof conduit to provide an additional layer of protection against marine elements.
Achieving a clean and secure wiring setup isn’t just about functionality. It ensures seamless performance while contributing to a well-maintained and attractive installation.
Testing the Installation
Before setting sail, ensure each connection of the LED strip lights functions correctly. Begin by powering up the system and observing the lights for any inconsistencies or flickering.
Check for uniform brightness across all sections during this initial test.
This evaluation phase is crucial for identifying any loose connections, damages, or issues before they become problems out on the water. Rectifying these early helps maintain the integrity and safety of the installation.
Final adjustments can be made to guarantee that all LED strips are operating at optimal performance. By diligently testing the setup, you can be confident that the lights will enhance the boating experience, adding vibrant illumination in a reliable manner.
Troubleshooting Common Issues
Despite careful preparation, some issues may arise that require troubleshooting tips and practical solutions to resolve.
Start by checking all wire connections for firm attachments.
Loose connections often cause flickering or sections of lights not illuminating. Carefully inspect each point of contact to ensure it is secure, clean, and free of corrosion, which can impede electrical flow.
Another potential issue might be caused by an inadequate power supply. Ensure the boat’s electrical system delivers adequate current to support the LED strips. If problems persist, consulting the product’s manual or seeking assistance from a marine electrician might offer advanced troubleshooting that ensures lasting performance.
Enhancing the Aesthetic

Lighting transforms the visual appeal significantly.
When installed thoughtfully, LED strip lights can bring new life to a boat’s ambiance. The soft glow of these lights accents the curves and contours of the boat’s architecture, making it an inviting space. Further, they are ideal for highlighting specific features such as the railing or deck.
Elegant placement is crucial.
One must consider areas that will both benefit from illumination and enhance the overall design. By strategically positioning LED strips underneath benches or along the gunwales, they create an atmosphere that speaks of sophistication and style.
Lastly, choosing the right color and brightness will set the perfect mood. For those seeking a serene and tranquil ambiance, opting for cool blues and greens can evoke a relaxing oceanic feel. On the other hand, warmer tones are perfect for creating a cozy, intimate space.
Maintenance and Care
Proper maintenance ensures the longevity and performance of your LED strip lights, allowing them to consistently enhance your boat’s aesthetic.
Regular checks are essential to identify any potential issues early.
Inspect the LED strips for any signs of wear or damage, paying special attention to connectors and power sources. Keeping them clean from salt, moisture, and debris is paramount to prevent any potential short circuits or corrosion.
To clean the LED strip lights, use a soft cloth moistened with a gentle cleaner. Avoid harsh chemicals, which can damage the waterproof coating of the lights. Adopting a routine cleaning schedule will not only preserve their functionality but also maintain their vibrant glow, ensuring your boat looks impeccable.
Safety Tips
Ensuring safety is paramount when installing LED strip lights on a boat.
First and foremost, it is crucial to disconnect the power supply before beginning any installation. This simple yet vital step prevents potential electric shocks and ensures a safer working environment.
When selecting LED strip lights, opt for those that are specifically designed for marine use. These products are crafted to withstand harsh marine conditions, such as exposure to saltwater and extreme temperatures.
Furthermore, it is advisable to use waterproof connectors and seals to safeguard electrical components. This added layer of protection contributes significantly to maintaining the safety and integrity of the installation.
Finally, verify the correct voltage rating for your LED lights, as improper voltage can cause overheating or damage. Safety should never be compromised.
Conclusion
Installing LED strip lights on a boat enhances both its aesthetics and functionality. Mastering this skill demonstrates technical expertise and dedication to boat maintenance. By following expert tips and safety measures, enthusiasts can successfully complete the project, improving both the boat’s appearance and onboard safety. The process is rewarding, providing a sense of pride and satisfaction.


