
LED light strips have revolutionized the way we illuminate our spaces, offering unparalleled flexibility, energy efficiency, and a touch of modern sophistication. Whether you’re looking to enhance your home decor, create an ambient atmosphere, or add functional lighting to your workspace, LED strips provide a versatile solution that can be tailored to your specific needs.
However, cutting these strips to fit your unique requirements can be a daunting task if not done correctly. Mistakes can lead to malfunctioning lights, electrical hazards, and wasted resources. In this comprehensive guide, we will explore the top mistakes to avoid when cutting LED light strips, ensuring your project is both successful and visually stunning.
Let’s dive right in.
Importance of Proper Cutting
Cutting LED light strips properly is crucial for maintaining their functionality and longevity. Incorrect cuts can lead to malfunctioning lights, electrical hazards, and a waste of resources. By understanding the importance of precise cutting, you can avoid these pitfalls and ensure your LED strips perform optimally.
Choosing the Right Tools
The first step in cutting LED light strips is selecting the appropriate tools. Using the wrong tools can result in jagged edges, damaged LEDs, and poor electrical connections. Here are the essential tools you need:
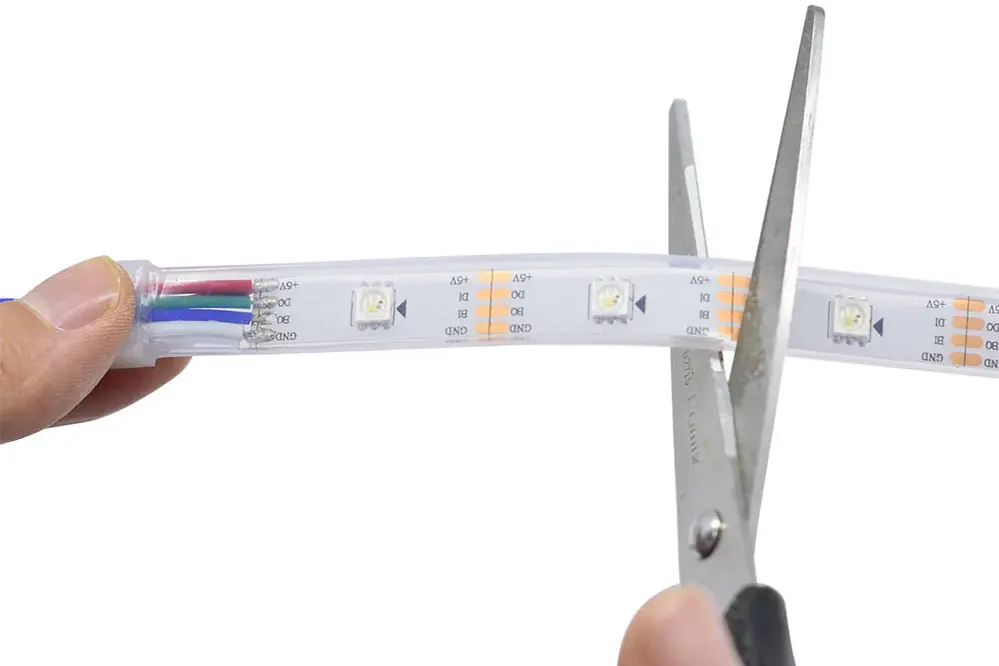
- Sharp Scissors or Utility Knife: For clean and precise cuts.
- Soldering Iron and Solder: For reconnecting cut strips.
- Wire Cutters and Strippers: For handling electrical connections.
- Heat Shrink Tubing: For insulating exposed wires.
Investing in high-quality tools will make the cutting process smoother and more efficient.
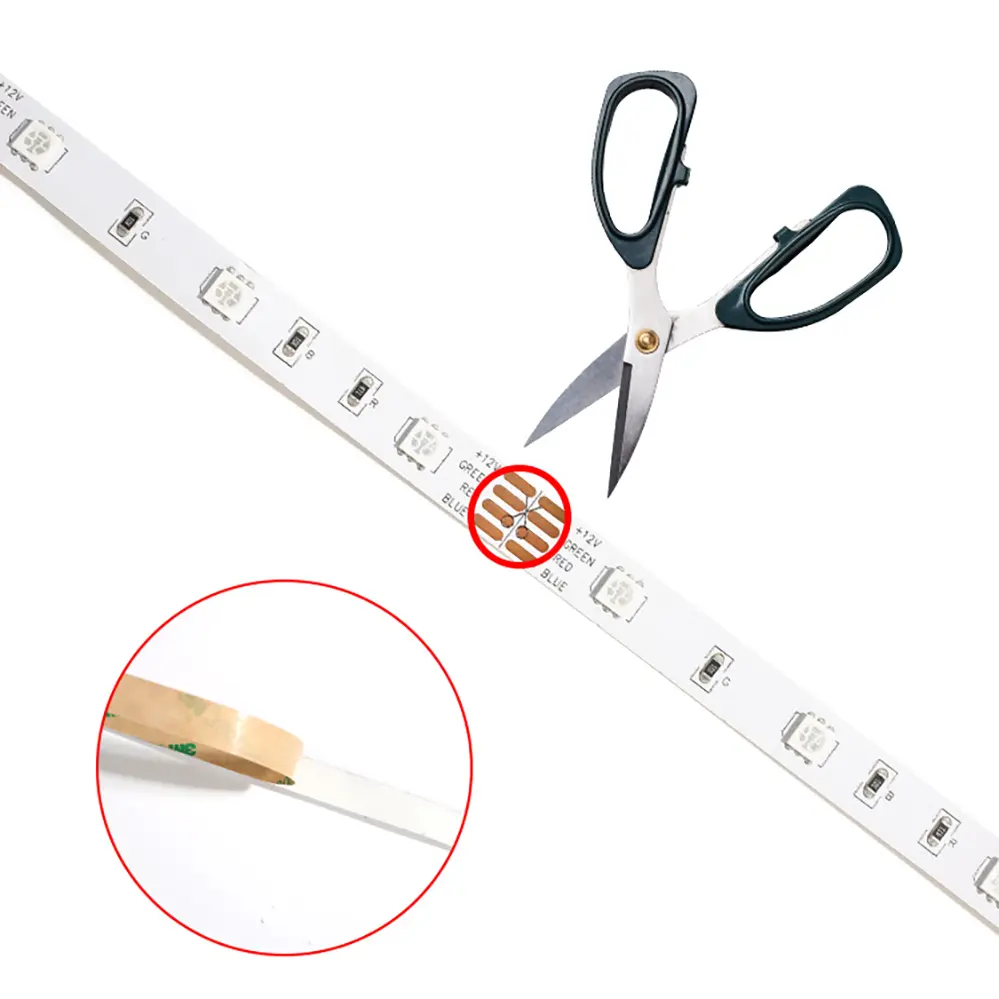
Avoid Cutting at the Wrong Spot
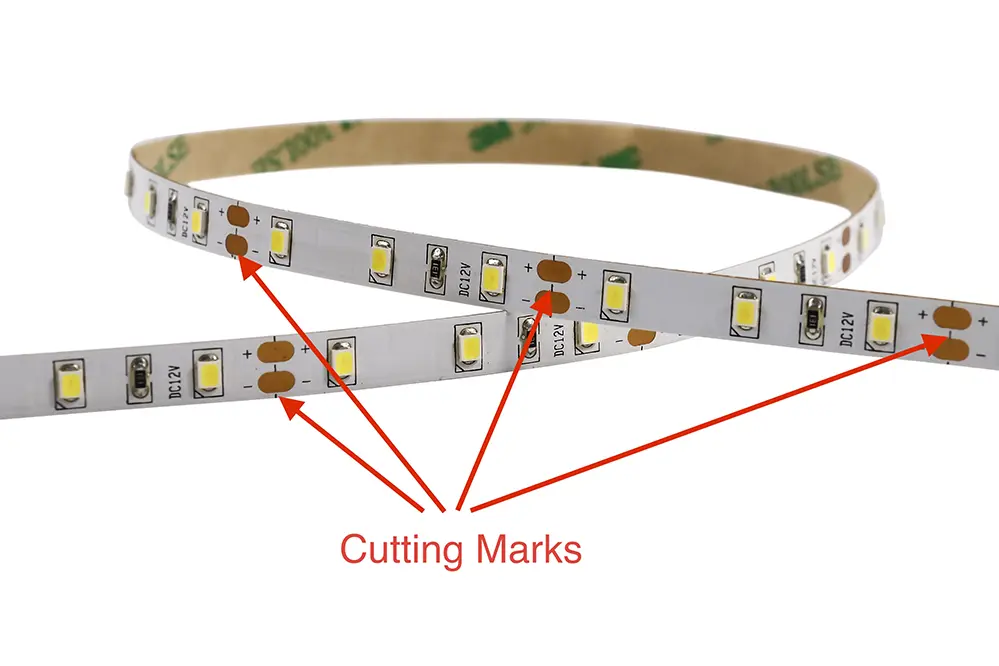
One of the most common mistakes is cutting LED light strips at the wrong spot. LED strips have designated cutting points, usually marked by a line or a pair of copper pads. Cutting outside these points can damage the circuit and render the strip unusable. Always ensure you cut at the marked points to maintain the integrity of the strip.
Techniques for Clean Cuts
Achieving clean cuts is essential for both aesthetics and functionality. Here are some techniques to ensure your cuts are precise:
- Measure Twice, Cut Once: Double-check your measurements before cutting to avoid mistakes.
- Use a Straight Edge: Align your scissors or knife with a straight edge to guide your cut.
- Apply Steady Pressure: Use consistent pressure to avoid jagged edges.
By following these techniques, you can achieve professional-looking cuts that enhance the overall appearance of your project.
Dealing with Electrical Connections
Properly handling electrical connections is vital for the safety and performance of your LED light strips. Here are some key considerations:
Identifying Positive and Negative Leads
LED light strips have positive and negative leads that must be correctly identified and connected. Mixing up these leads can cause the strip to malfunction or not light up at all. Most strips have markings indicating the positive (+) and negative (-) sides. Ensure you connect these leads correctly to avoid issues.
Soldering Techniques
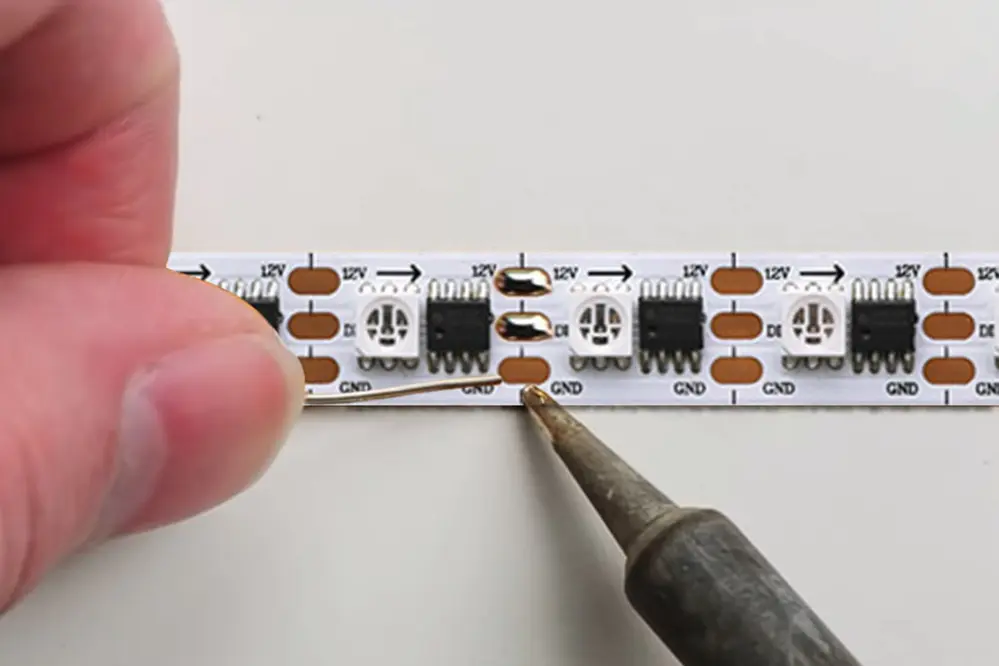
Soldering is often required when reconnecting cut strips. Here are some tips for effective soldering:
- Use a Clean Soldering Iron: A clean tip ensures better heat transfer and cleaner joints.
- Apply Solder to the Joint, Not the Iron: This technique helps create a stronger connection.
- Avoid Overheating: Excessive heat can damage the LEDs and the strip.
Mastering these soldering techniques will ensure your electrical connections are secure and reliable.
Avoiding Damage to LEDs
LEDs are delicate components that can be easily damaged by excessive force or heat. Here are some tips to avoid damaging your LEDs:
- Handle with Care: Avoid bending or twisting the strip excessively.
- Use Proper Heat Management: When soldering, apply heat for short periods to prevent overheating.
- Store Properly: Keep unused strips in a cool, dry place to prevent damage.
By treating your LEDs with care, you can extend their lifespan and maintain their performance.
Ensuring Waterproofing
If your LED light strips are intended for outdoor use or in areas exposed to moisture, ensuring proper waterproofing is essential. Here’s how to do it:
Sealing Cut Edges
Cutting waterproof LED strips can compromise their protective coating. To restore waterproofing, use silicone sealant or heat shrink tubing to cover the exposed edges. This will prevent water from seeping in and damaging the electrical components.
Maintaining Strip Functionality
Maintaining the functionality of your LED light strips involves more than just proper cutting. Here are some additional tips:
- Avoid Overloading: Ensure your power supply can handle the total wattage of your LED strips.
- Use Proper Connectors: Use connectors designed for LED strips to ensure secure connections.
- Regular Maintenance: Periodically check your strips for signs of wear or damage and address any issues promptly.
By following these tips, you can keep your LED strip lights functioning optimally for years to come.
Avoiding Short Circuits
Short circuits can pose serious safety hazards and damage your LED strips. Here’s how to avoid them:
- Insulate Exposed Wires: Use electrical tape or heat shrink tubing to cover exposed wires.
- Check Connections: Ensure all connections are secure and free from loose wires.
- Avoid Overlapping Strips: Overlapping strips can cause short circuits and should be avoided.
Taking these precautions will help you avoid short circuits and ensure the safety of your installation.
Handling Power Supply Issues
Power supply issues can affect the performance of your led strip lights. Here are some common problems and solutions:
- Voltage Drop: Long runs of LED strips can experience voltage drop, resulting in dimmer lights. Use a higher gauge wire or additional power supplies to mitigate this issue.
- Incompatible Power Supply: Ensure your power supply matches the voltage and current requirements of your LED strips.
- Overheating: Overloaded power supplies can overheat and fail. Use a power supply with adequate capacity to handle your strips.
By addressing these power supply issues, you can ensure consistent and reliable performance from your LED strips.
Testing After Cutting
After cutting and reconnecting your LED light strips, it’s essential to test them before final installation. Here’s how:
- Check for Continuity: Use a multimeter to check for continuity in the circuit.
- Power On: Connect the strips to the power supply and ensure all sections light up correctly.
- Inspect Connections: Verify that all solder joints and connectors are secure and free from shorts.
Testing your strips after cutting will help you identify and address any issues before they become problematic.
Tips for Reassembly
Reassembling cut LED light strips requires attention to detail. Here are some tips to ensure a seamless reassembly:
- Align Connectors Properly: Ensure connectors are aligned correctly to avoid misalignment and poor connections.
- Secure Connections: Use clips or adhesive to secure connections and prevent them from coming loose.
- Test Before Final Installation: Always test your reassembled strips before final installation to ensure everything is working correctly.
Following these tips will help you achieve a professional and reliable reassembly.
Common Mistakes to Avoid
To summarize, here are some common DIY mistakes to avoid when cutting LED light strips:
- Cutting at the Wrong Spot: Always cut at the designated points.
- Using the Wrong Tools: Invest in high-quality tools for clean cuts.
- Incorrect Electrical Connections: Ensure positive and negative leads are correctly identified and connected.
- Neglecting Waterproofing: Seal cut edges to maintain waterproofing.
- Overloading Power Supply: Use a power supply with adequate capacity.
Avoiding these mistakes will help you achieve a successful and professional-looking LED light strip installation.
Tips for a Perfect Cut Every Time
Achieving a perfect cut every time requires practice and attention to detail. Here are some tips to help you:
- Use a Cutting Guide: A cutting guide can help you make straight and precise cuts.
- Keep Tools Sharp: Sharp tools make cleaner cuts and reduce the risk of damaging the strip.
- Practice on Scrap Pieces: Practice cutting on scrap pieces to hone your skills before cutting your actual strips.
By following these tips, you can achieve perfect cuts every time and enhance the overall quality of your project.
Best Practices for Long-Term Use
To ensure the longevity and performance of your LED strip lights, follow these best practices:
- Regular Maintenance: Periodically inspect your strips for signs of wear or damage and address any issues promptly.
- Avoid Excessive Heat: Excessive heat can shorten the lifespan of your LEDs. Ensure proper ventilation and avoid placing strips near heat sources.
- Use Quality Components: Invest in high-quality LED strips, connectors, and power supplies for reliable performance.
By adhering to these best practices, you can enjoy the benefits of your LED light strips for years to come.
Case Studies and Examples
To illustrate the importance of proper cutting and installation techniques, let’s look at a few real-life examples:
Case Study 1: Home Theater Lighting
John wanted to enhance his home theater with LED light strips. He carefully measured the dimensions of his room and cut the strips at the designated points. Using high-quality connectors and a compatible power supply, he achieved a seamless installation. The result was a stunning, immersive lighting experience that transformed his home theater.
Case Study 2: Outdoor Patio Lighting
Sarah decided to install LED light strips on her outdoor patio. She chose waterproof strips and ensured proper sealing of the cut edges with silicone sealant. By following best practices for waterproofing and using a power supply with adequate capacity, she created a beautiful and durable lighting solution that withstood the elements.
Frequently Asked Questions (FAQs)
Can I cut LED light strips to any length?
No, LED light strips can only be cut at designated points, usually marked by a line or copper pads. Cutting outside these points can damage the circuit.
What should I do if my LED strip doesn’t light up after cutting?
Check the electrical connections and ensure the positive and negative leads are correctly identified and connected. Also, verify that the solder joints are secure and free from shorts.
How can I prevent voltage drop in long runs of LED strips?
Use a higher gauge wire or additional power supplies to mitigate voltage drop. Ensuring proper power distribution will help maintain consistent brightness.
Is it necessary to waterproof indoor LED strips?
While not necessary, waterproofing indoor LED strips can provide extra protection against accidental spills or humidity. It’s especially useful in areas like kitchens and bathrooms.
Can I use any power supply for my LED strips?
No, the power supply must match the voltage and current requirements of your LED strips. Using an incompatible power supply can cause malfunction or damage.
Advanced Techniques for Cutting and Installing LED Light Strips
For those looking to take their LED light strip projects to the next level, here are some advanced techniques:
Using Connectors for Seamless Connections
Connectors can provide a seamless and professional look without the need for soldering. They are especially useful for connecting multiple strips or creating corners.
Creating Custom Shapes and Designs
By carefully planning and cutting your LED strips, you can create custom shapes and designs. This is ideal for artistic installations or unique lighting effects.
Integrating LED Strips with Smart Home Systems
Modern LED strips can be integrated with smart home systems for enhanced control and automation. This allows you to adjust brightness, color, and patterns using voice commands or mobile apps.
Troubleshooting Common Issues
Even with careful planning and execution, issues can arise. Here’s a troubleshooting guide for common problems:
Dim or Flickering Lights
- Check Power Supply: Ensure the power supply is adequate and functioning correctly.
- Inspect Connections: Verify that all connections are secure and free from shorts.
- Address Voltage Drop: Use higher gauge wire or additional power supplies for long runs.
Sections Not Lighting Up
- Check for Continuity: Use a multimeter to check for continuity in the circuit.
- Inspect Solder Joints: Ensure solder joints are secure and free from shorts.
- Verify Cutting Points: Ensure cuts were made at designated points.
Conclusion
Cutting LED light strips may seem like a straightforward task, but it requires careful attention to detail and proper techniques to avoid common mistakes. By choosing the right tools, cutting at the designated points, handling electrical connections correctly, and ensuring waterproofing, you can achieve a professional and reliable installation. Remember to test your strips after cutting and follow best practices for long-term use to enjoy the full benefits of your LED light strips.
If you find yourself needing expert assistance or high-quality LED products, consider reaching out to Unitop, a professional Chinese manufacturer of LED strip lights and LED neon strips. With their expertise and top-notch products, you can illuminate your space with confidence and creativity.


