
When Cathy decided to redecorate her living room, she envisioned a modern, ambient glow that would transform her space. However, she was determined to avoid the mess and potential damage of adhesive tape. Understanding how to hang LED strip lights on walls without adhesive became her mission, and the results were nothing short of spectacular. This journey not only enhanced her home’s aesthetics but also preserved the integrity of her walls.
The importance of finding alternative methods to mount LED strip lights cannot be overstated. According to a recent survey, over 60% of homeowners are concerned about the potential damage adhesive products can cause to their walls. This statistic underscores the need for reliable, non-adhesive solutions that offer both functionality and style. By exploring these options, homeowners can enjoy the benefits of LED lighting without compromising their interior design.
As you delve into this article, you’ll discover practical and innovative ways to mount LED strip lights without adhesive tape. From mounting clips to cable ties, these methods provide sturdy and reliable alternatives. Continue reading to learn how you can achieve a stunning visual experience while preserving your walls and enhancing your home’s ambiance.
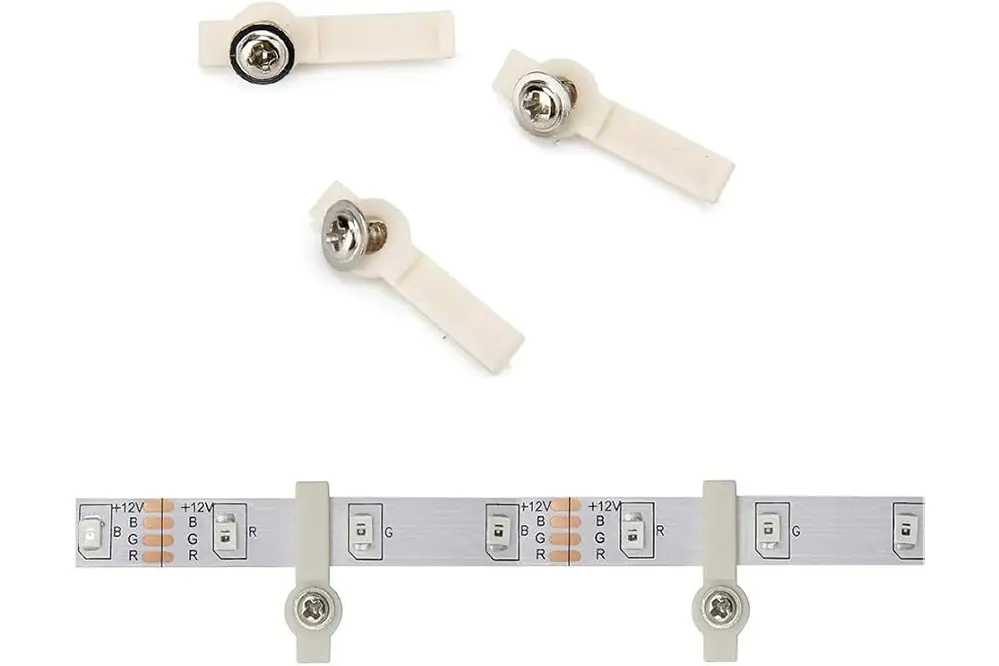
Using Mounting Clips for LED Strip Lights
When aiming for a seamless install, mounting clips serve as an excellent alternative to adhesive tape.
To begin with, these convenient clips are designed with a user-friendly setup and durable structure, making them perfect for those seeking a sturdy, long-lasting solution, especially when paired with a measuring tape for precise placement. Secure the clips along the desired path of your LED strip lights by using screws or nails, ensuring the clips match the width of your strips. This method guarantees a stable hold, significantly mitigating the risk of sagging.
Mounting clips present a strategic advantage for more permanent fixtures. They provide a robust grasp, which is especially beneficial for outdoor setups where weather conditions might challenge less secure options.
Additionally, the clips allow for easy adjustments and replacements of the LED strips without any damage to the walls. Whether you are arranging your lighting along a ceiling edge or accentuating a particular feature in your room, mounting clips ensure a reliable and versatile solution. Embrace this method for a polished look, transforming your spaces into luminous works of art.
Securing LED Strips with Screws
Using screws to secure LED strips offers an outstanding level of reliability and durability. This method is particularly beneficial when longevity and permanence are key.
Begin by measuring and marking where each hole needs drilling. Ensure that these anchors coincide with the intervals on your LED strip.
Next, utilize a drill to create small pilot holes. Insert small screws through the LED strip’s existing mounting holes or clips, fastening them securely into the wall.
This approach not only ensures a stable installation but also maintains the aesthetic integrity of your design. By opting for screws, your setup can endure various conditions and hold up remarkably well over time. This method is particularly useful for intricate setups, where precision and stability are paramount.
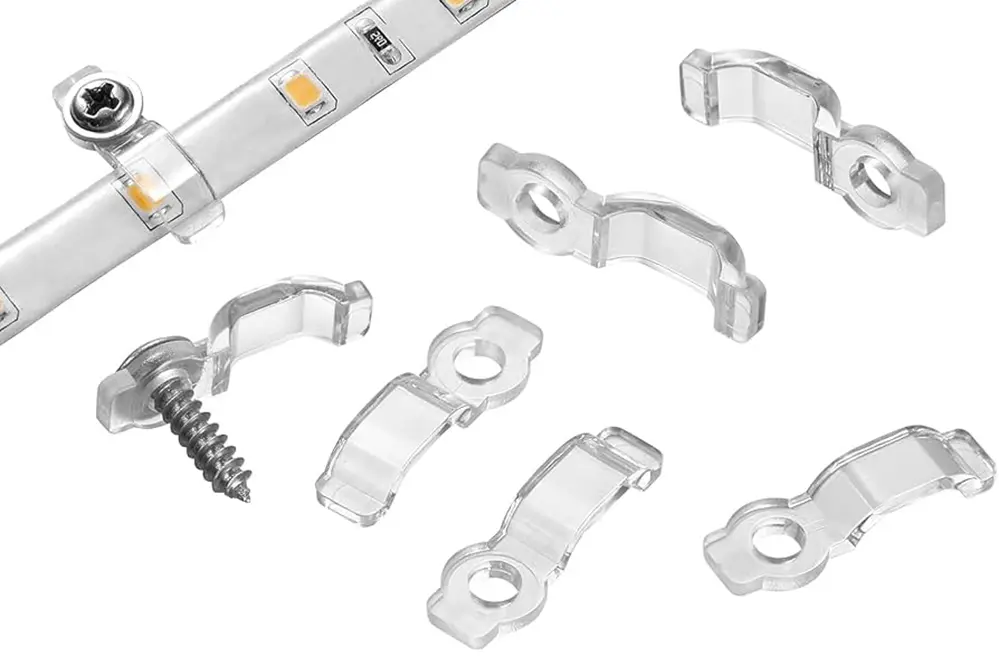
Utilizing Corner Mounts for LED Strips
Corner mounts, specially designed for right-angle surfaces, provide a sleek, robust, adhesive-free mounting method.
They are perfect for maintaining the seamless flow of LED strips (like our wall-to-ceiling transition). Simply clip the strip into place, ensuring that it follows your desired path along the corners effectively.
This method balances functionality and aesthetics, achieving a ‘clean installation’ look that’s both professional and visually pleasing.
Types of Corner Mounts
Corner mounts offer a dependable solution for mounting LED strips without adhesive—ideal for clean transitions around corners and room edges.
Corner mounts allow for a neat and secure installation, preserving the longevity and quality of your LED strips.
For right-angle surfaces, these mounts ensure a smooth, continuous flow of your lighting design. By using clips or brackets specifically designed for corner placement, you achieve a professional and polished look.
Furthermore, corner mounts come in various materials and styles. Whether you prefer discreet, low-profile mounts or robust, decorative brackets, these options offer flexibility and functionality for any lighting project.
Installation Tips for Corner Mounts
Mounting LED strip lights in corners without adhesive tape can be easily achieved with a few straightforward steps.
- Clean the Surface: Ensure that the corner surfaces are free of dust and debris to improve the grip of any mounting tools.
- Select Appropriate Clips: Use specialized LED strip clips designed for 90-degree corners.
- Drill Pilot Holes: Carefully drill small pilot holes to prevent splitting of walls or moldings.
- Screw in Clips: Securely fasten the clips using appropriate screws.
- Insert the LED Strips: Snap the LED strip lights into the clips, ensuring a snug and secure fit.
This method not only provides a stable installation but also enhances the aesthetic appeal of your lighting setup.
By following these steps, you ensure a polished and reliable installation for your LED strip lights, yielding brilliant illumination in every corner.
Hanging LED Strips with Cable Ties
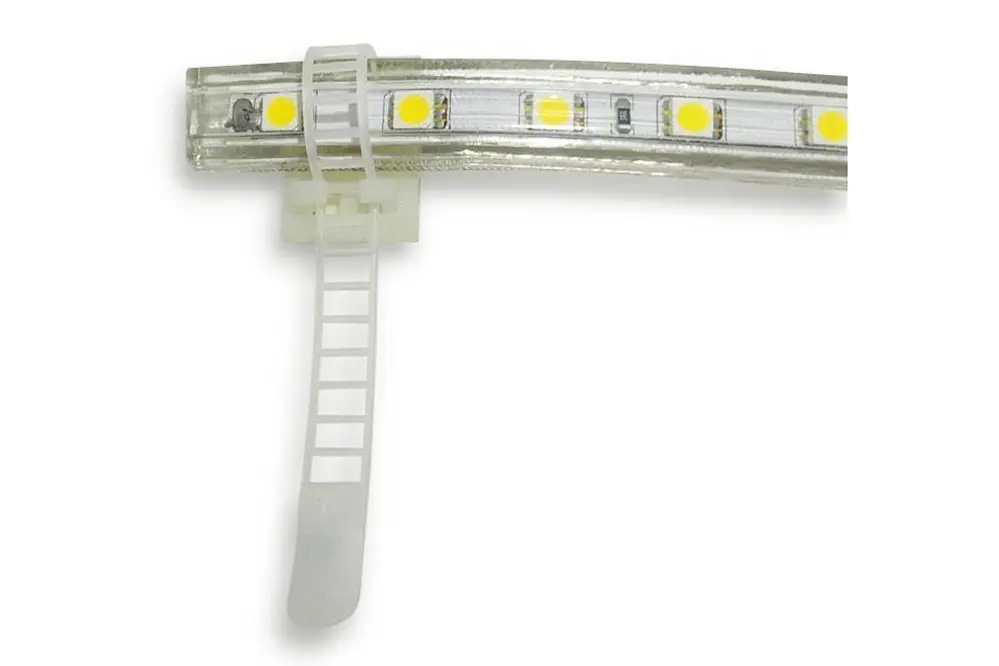
Utilizing cable ties to hang LED strip lights presents an economical yet robust solution, enhancing your lighting project’s versatility and adaptability.
To do so, begin by affixing small adhesive-backed cable tie mounts (also known as zip tie anchors) to your desired surfaces, ensuring they are evenly spaced for a uniform appearance. Once the mounts are in place, thread the cable ties through the anchors, and gently secure the LED strip lights with the ties, carefully avoiding any damage to the lights or circuitry.
The terms “repositionable” and “easy-to-remove” truly come to life with this method, offering you maximum flexibility.
Best Practices for Using Cable Ties
Harnessing the full potential of cable ties can make your LED strip lighting installation both seamless and efficient.
- Choose the Right Size and Type: Select cable ties that can accommodate the width and weight of your LED strips without causing strain.
- Plan Your Layout: Before installation, map out where each tie will go to ensure even spacing and a clean aesthetic.
- Use Releasable Cable Ties: Opt for ties that can be easily undone if adjustments are needed, ensuring flexibility throughout the project.
- Secure Minimize Twisting and Bending: Ensure the ties are firm but avoid overtightening, which can damage the strips.
- Maintain Accessibility for Connections: Ensure that vital connectors and ports remain accessible, providing easy maintenance and adjustments.
These best practices not only streamline the process but also ensure your LED strips are both secure and visually appealing, especially when using mounting channels.
Adopting these measures guarantees an installation process that’s both efficient and adaptable.
Employing Hooks and Nails for LED Strips
For those shying away from adhesive options, a method of remarkable simplicity, hooks and nails, shines forth with efficacy. Strategically positioning these tools along your desired layout, securing the LED strips in place with gentle precision, not only ensures a reliable hold but also affords the versatility to reposition as required. This approach exemplifies both durability and adaptability, perfect for frequent changes and adjustments.
Choosing the Right Hooks and Nails
When opting for hooks and nails, selecting the appropriate size and type is crucial for stable support.
Firstly, it’s vital to assess the weight of your LED strips since not all hooks and nails are created equal. This understanding will guide you to choose hooks that can bear the load without bending or breaking. Similarly, nails must be robust enough to ensure a lasting hold, particularly in areas subject to movement or vibration.
Additionally, consider using hooks with a weather-resistant finish if placing the LED strips in potentially humid or outdoor environments. Hooks and nails designed for such conditions will resist corrosion and maintain their integrity over time, ensuring your LED installation remains secure and functional.
Ultimately, the right choice in hooks and nails significantly enhances the durability and aesthetic of your LED setup. These hardware options provide an affordable and efficient alternative to adhesive solutions, allowing you to create a radiant and captivating environment with confidence and ease.
How to install Hooks and Nails effectively
Effective installation begins with proper planning.
Firstly, ensure you have the right tools on hand. A hammer, nails, velcro strips, and hooks appropriate to the weight of your LED strip lights will be necessary. Measure the distance along the wall where you want to hang your LED strips, making sure to mark where each hook, nail, or velcro strip should be placed. Additionally, be sure to use hooks designed to support the weight of the lights you intend to hang.
Mark drilling points carefully.
Next, gently tap the nails into the marked spots – not fully securing them until all are placed. This approach allows you to make any minor adjustments if necessary. For hooks, it’s advisable to pre-drill small pilot holes, which can help in maintaining the accuracy of larger hooks when screwing them into the wall.
Adjust the hooks as needed.
Once all hooks and nails are correctly positioned, you can begin hanging your LED strip lights. Ensure the lights are evenly distributed and that the hooks or nails are tightly secured. By taking the time to install these correctly, you’ll ensure a solid and lasting placement for your LED strips. Investing in quality hooks and nails further assures that your setup will withstand time and environmental factors, offering an enduring ambiance that enhances any space with splendor.
Leveraging Magnetic Mounts for LEDs
Utilizing magnetic mounts is a revolutionary approach, especially for those who wish to preserve immaculate wall surfaces. Magnetic mounts offer a versatile and convenient way to hang LED strip lights without compromising on aesthetic appeal, ensuring an elegant, damage-free setup.
To maximize the effectiveness of this mounting solution, ensure your LED strips are compatible with “magnetic backing”. This can be as simple as attaching a metallic surface to the back of your LED strips, allowing them to affix securely. By embracing this method, you not only protect your walls but also enable flexible repositioning of your lights to match evolving decor and functional needs without any hassle.
The Benefits of Magnetic Mounts
Magnetic mounts provide an exceptional solution, blending both versatility and ease when it comes to mounting LED strip lights.
Firstly, one significant advantage of using a magnetic mount is the preservation of your wall surfaces. Unlike adhesive tape, which often leaves residue or damages the surface upon removal, magnetic mounts keep walls pristine. This makes them an ideal choice for renters or those who frequently redecorate, amplifying the flexibility of your interior design without causing unsightly marks.
Additionally, magnetic mounts facilitate a straightforward installation process. By attaching a metallic backing to your LED strips, you can seamlessly secure the lights to any magnetic surface. This non-invasive method dramatically reduces the time and effort often associated with other mounting techniques while ensuring a firm placement.
Finally, the adaptability of magnetic mounts allows for effortless repositioning. Want to reposition your LED strips to better illuminate a different area or to change the mood of a room? No problem! With magnetic mounts, relocating your lights is as simple as detaching and reattaching them. This flexibility fosters a dynamic and innovative living space, inspiring creativity and continuous improvement in your home’s aesthetic.
Installing LED Strips with Velcro Straps
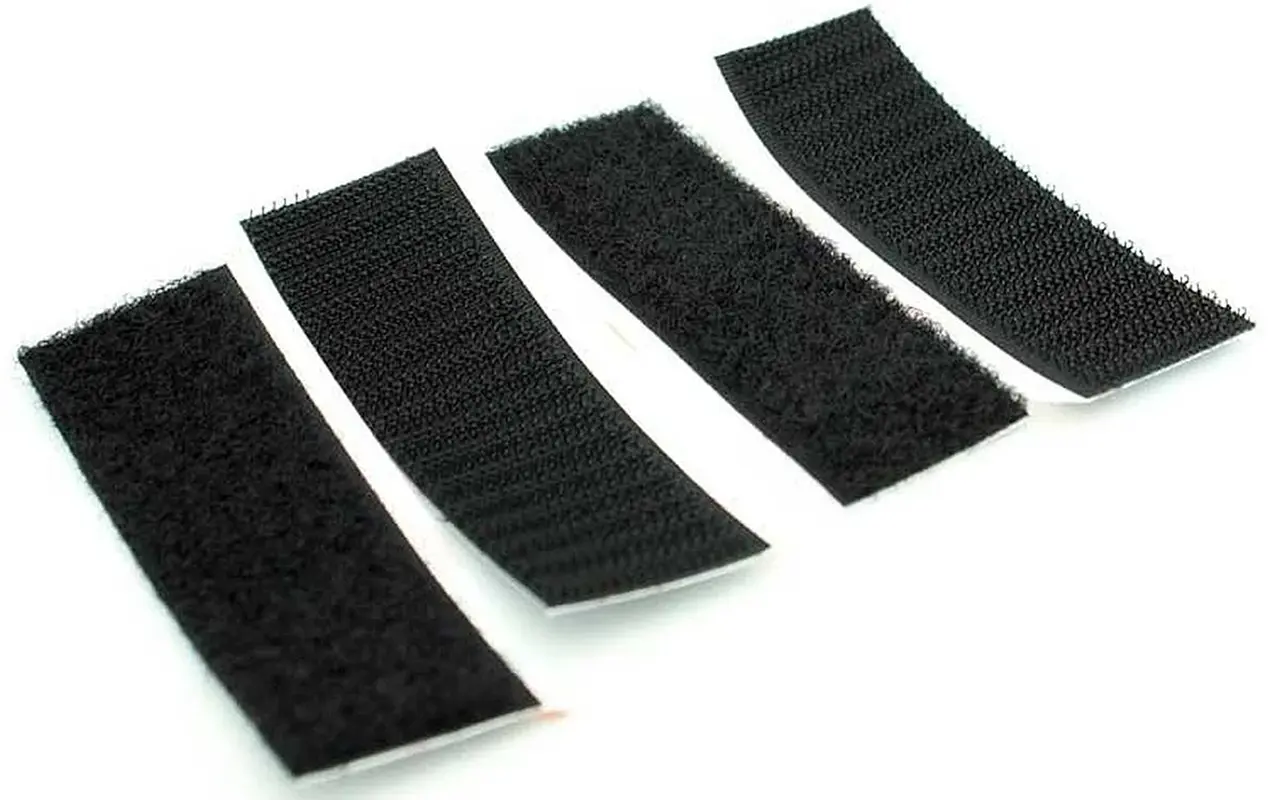
Mounting LED strips with Velcro straps offers a quasi-permanent solution for those hesitant to use adhesive. Velcro’s versatility and strength ensure a secure hold while allowing easy repositioning whenever desired.
To install, wrap Velcro straps around the LED strips at regular intervals (about every foot) and attach them to corresponding Velcro patches secured on your wall. This method provides a robust and reliable hold without compromising your wall’s integrity.
The terms “loop-and-hook” and “hook-and-loop” are often used interchangeably to describe this fastener technology.
How to Attach Velcro Straps
Attaching Velcro straps to mount LED strip lights is both efficient and effective, ensuring a secure installation without damaging surfaces.
- Step 1: Measure and cut Velcro straps to fit around the LED strip.
- Step 2: Wrap the Velcro strap around the LED strip at regular intervals, typically every foot.
- Step 3: Secure the opposing Velcro side to your wall or desired mounting surface.
- Step 4: Attach the wrapped LED strip to the Velcro on the wall, pressing firmly to ensure contact.
This method offers superb flexibility and allows for easy repositioning of the LED strips.
Using Velcro straps ensures a steadfast hold without the mess or damage of adhesive.
Using Wire Fasteners for LED Strips
Wire fasteners present an excellent solution for those seeking to hang LED strip lights on a wall without adhesives.
Firstly, to use wire fasteners, you need a robust backing like a wooden panel, plaster, or drywall. These fasteners come in various styles and sizes, enabling you to choose the perfect fit for your LED lights setup. For instance, “U” shaped wire fasteners, often used for coaxial cables, can be adapted to hold your LED strips securely on different surfaces.
Also, meticulously plan the placement of your LED strip lights before starting. By marking the spots where you want to mount the fasteners, you can ensure perfect alignment and prevent any uneven installations. Use a small nail or screw to secure each fastener, ensuring it is flush with the wall.
Moreover, wire fasteners are beneficial in terms of stability and longevity. These fasteners not only provide a tight grip for the LED strip lights but also maintain the integrity of both the lights and the wall. Their discreet design ensures a clean look, while their durability means your lighting setup will stand the test of time, inspiring confidence in your installation.
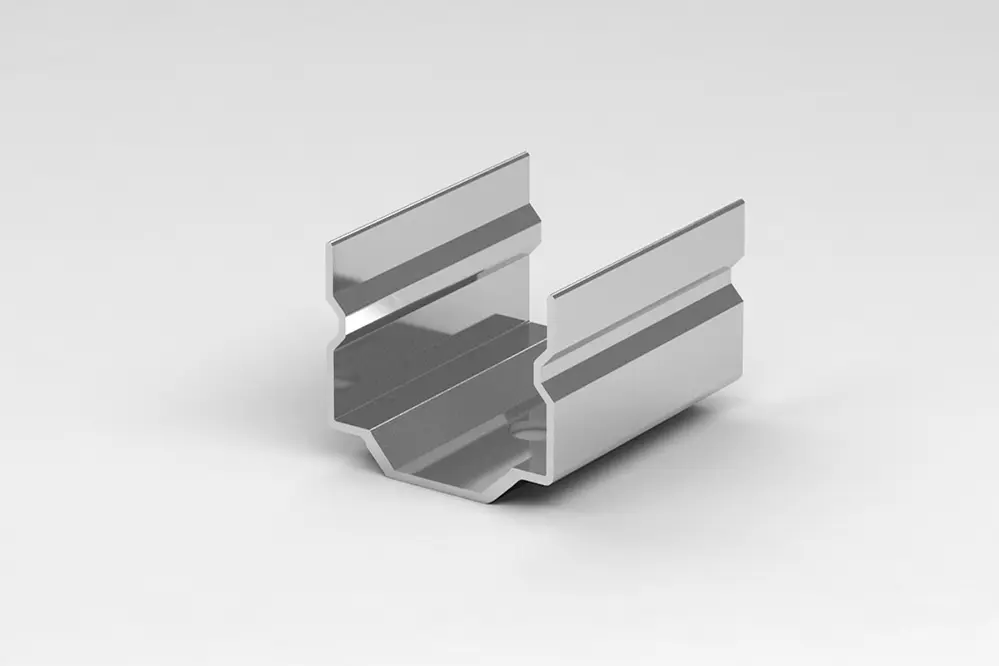
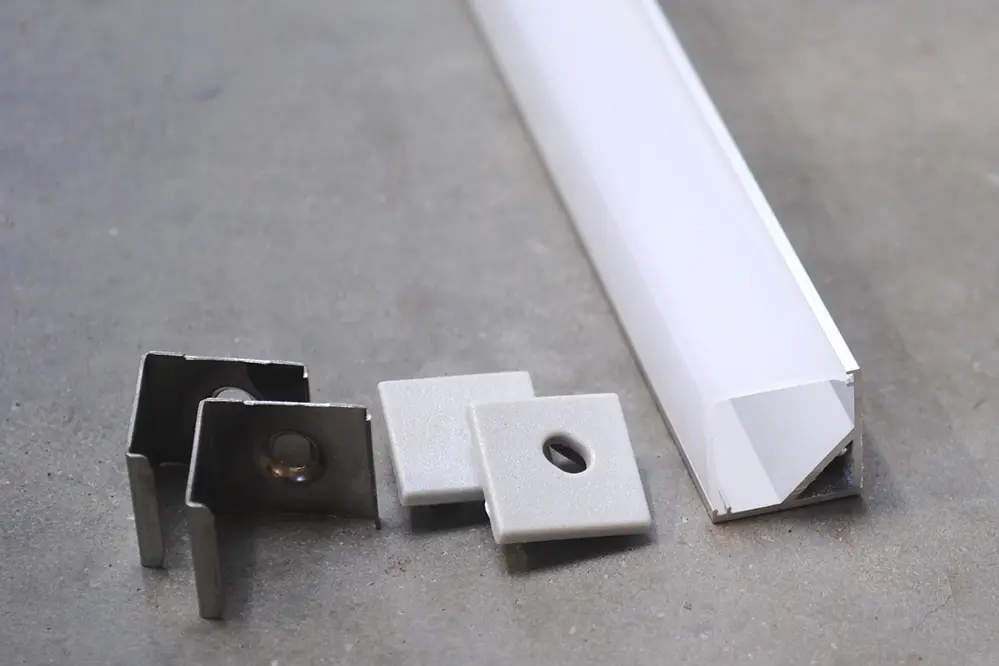
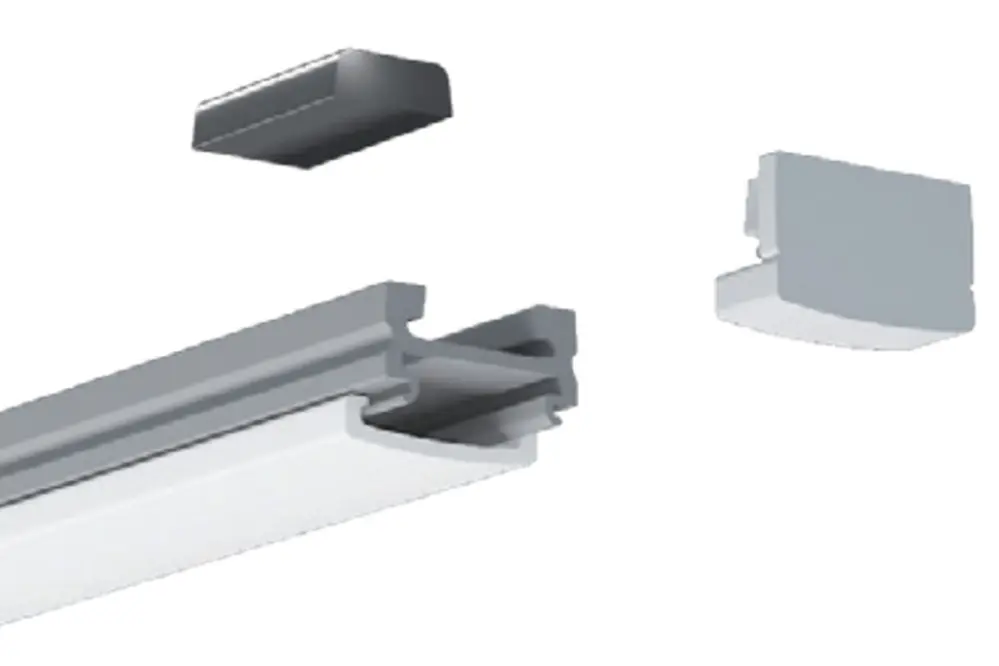
Custom Aluminum Channels for LED Strips
Custom aluminum channels offer a sophisticated solution to mounting LED strip lights. These channels, also known as extrusions, provide enhanced stability, heat dissipation, and a sleek appearance.
In addition, they are specifically designed to house LED strips securely without relying on adhesive backing. By inserting the LED strips into the channels, you achieve optimal alignment and a professional finish free of adhesive residue, which can compromise the cleanliness and longevity of your lighting setup.
Opt for “U-channel” or “V-channel” designs tailor-made to fit your installation’s demands.
Selecting the Right Aluminum Channels
Selecting the right aluminum channels is crucial when it comes to mounting LED strip lights effectively.
Firstly, you must consider the extrusions’ profile to ensure that they accommodate the width and type of the LED strip lights you have chosen. The market offers a variety of channels, including U-channel and V-channel designs, each catering to different mounting scenarios and aesthetic preferences. Aluminum channels not only offer a secure fit but also promote better heat dissipation, extending the LED lights’ lifespan.
Secondly, it is essential to assess the installation environment where the LED strips will be mounted. If the installation involves outdoor or high-humidity areas, selecting aluminum channels with protective covers and seals can prevent damage from environmental factors. These covers not only safeguard the LED strips from moisture and dust but also diffuse the light, producing a more even and appealing illumination.
Finally, consider any additional features that can enhance your lighting setup. Some aluminum channels come with integrated diffusers or adjustable angles, allowing you to fine-tune your light display. By carefully choosing the most suitable channels, you’ll achieve a sophisticated, durable, and professional-looking installation, inspiring confidence and satisfaction with your end result.
Mounting LED Strips on Wooden Slats
Mounting LED strip lights on wooden slats presents an opportunity for creativity and innovation, utilizing natural textures and settings to highlight your living space. Begin by measuring the desired length, and pre-drill small holes along the slats to accommodate mounting clips.
These mounting clips securely hold the LED strips in place without adhesive, ensuring a seamless and long-lasting installation. This method provides a secure, professional, and aesthetically pleasing finish.
Securing Wooden Slats to the Wall
Securing wooden slats to the wall is a straightforward task that requires careful measurement, precise drilling, and sturdy fasteners. This method ensures a stable foundation for mounting LED strips.
Begin by marking the desired positions on the wall. Ensure they are level.
Next, select appropriate fasteners for your wall type. Screws and wall anchors are typically ideal.
Use a level to confirm the alignment before drilling holes and inserting anchors if needed. This step is crucial for stability.
After drilling, position the slats and drive screws into the anchors or directly into the wall studs. Ensure each slat is tightly secured.
This method avoids the need for adhesive tape, providing a more durable and reliable installation. By anchoring the slats properly, you set the stage for a beautifully lit wall that remains steadfast over time.
Design Tips for Mounting LEDs Without Adhesive
When considering how to hang LED strip lights on wall without adhesive, let innovation and creativity be your guiding principles.
Firstly, utilize existing architectural features as a mounting base, such as crown molding or baseboards, which can easily accommodate LED strips and provide unobtrusive, indirect lighting. Strategically placing the lights within recesses or behind furniture can enhance the aesthetic appeal while maintaining functionality.
Alternatively, consider installing a dedicated track system to hold the LED strips. These can be affixed to walls or ceilings using screws or brackets, allowing for adjustments and future modifications without damaging your surfaces.
Lastly, employ magnetic mounting systems or clip-on mechanisms for a versatile and non-permanent solution. These methods offer flexibility, enabling you to reposition and remove the LED strips with ease, ensuring your lighting design evolves alongside your living space.
Avoiding Common Mistakes with LED Installations
When contemplating how to hang LED strip lights on walls without adhesive, it’s crucial to avoid common pitfalls.
Since 2016, homeowners and professional decorators alike have embraced innovative lighting solutions, yet mistakes can happen. Without due diligence, even minor errors may compromise the final aesthetic.
First and foremost, ensure the LED strips are compatible with your chosen mounting system. Mismatched products may lead to functional or visual problems, reducing the efficacy of your installation.
Moreover, neglecting to measure your space accurately can lead to insufficient coverage or unsightly gaps. Always double-check dimensions and layout plans before making permanent alterations.
By conscientiously preparing and avoiding these mistakes, you can achieve a professional, visually stunning installation without the need for adhesive.
Conclusion
Mastering the art of how to hang LED strip lights on walls without adhesive can significantly elevate your living space. By exploring flexible and innovative methods such as mounting clips and cable ties, you can achieve a sleek and modern look without compromising the integrity of your walls. These techniques not only enhance the overall aesthetics but also ensure a sturdy and reliable installation, providing a win-win scenario for both style and functionality.
Moreover, employing proper installation methods guarantees the longevity and efficiency of your lighting setup, resulting in a sustainable and cost-effective solution. Investing in high-quality materials and making informed decisions will undoubtedly lead to a stunning visual experience that transforms your environment. With the right approach, you can create any desired ambiance, illuminating your home with confidence and creativity.
For those seeking professional assistance and high-quality products, consider reaching out to Unitop, a renowned Chinese manufacturer of LED strip lights and LED neon strips. With their expertise and commitment to excellence, Unitop can provide tailored solutions that meet your specific needs. By partnering with a trusted manufacturer, you can ensure that your lighting setup is both innovative and reliable, transforming your space with ease. Contact Unitop today to explore their extensive range of products and discover how they can help you achieve the perfect illumination for your home.


