
Many people struggle with the inconvenience of limited power outlets when trying to enhance their living spaces with ambient lighting. Learning how to use LED strip lights without plug can solve this common problem, offering a flexible and creative solution. Imagine being able to illuminate any area, regardless of the availability of traditional power sources.
Addressing this issue is essential for maximizing the potential of LED strip lights. These lights are not only energy-efficient but also incredibly versatile, making them ideal for a variety of applications. By understanding how to power them without a plug, you can unlock new possibilities for both functional and decorative lighting.
There are several methods to achieve this, including using battery packs, USB connections, and even solar power. Each of these solutions offers unique benefits and can be tailored to suit different needs and preferences. This article will delve into these options, providing you with a comprehensive guide to using LED strip lights without a plug.
Stay tuned to discover practical tips, installation advice, and creative ideas that will help you transform any space with ease. Whether you’re looking to add a touch of elegance to your home or create a cozy outdoor retreat, the possibilities are endless.
Do LED Strip Lights Need to Be Plugged In?
Traditionally, LED strip lights have required a plug, making them synonymous with plugged-in lighting.
However, technological advancements have unshackled these lights from the confines of power outlets, opening new possibilities. These advancements now allow power options such as batteries, USB ports, and solar chargers, broadening the use of LED strip lights in locations previously deemed impractical. This flexibility caters to a variety of demanding settings, including outdoor events, mobile setups, and inaccessible areas.
Subsequently, one can operate LED strip lights without relying on a fixed power source. By incorporating these innovative power solutions, it is possible to achieve the same quality and brightness in LED lighting without the traditional plug, enhancing versatility and convenience.
Thus, while LED strip lights have historically been associated with plugging into electrical outlets, contemporary alternatives have emerged, enabling their use in a wider array of applications. These groundbreaking options inspire creative deployment, affirming that the future of LED strip lighting is unbounded and prosperous.
10 Easy Ways to Use LED Strip Lights Without Plugs
Curious about how to use LED strip lights without a plug and still light up your space brightly?
Advancements in portable power solutions have made it feasible for users to achieve great illumination without being tethered to wall outlets.
Firstly, a battery pack is a great option. Many LED strip lights are designed to be compatible with battery packs, offering a portable and rechargeable power source.
Alternatively, consider USB power banks. These compact and ubiquitous devices are now powerful enough to handle LED strip lights, making them perfect for on-the-go lighting needs.
Solar-powered LED strips are an eco-friendly choice, harnessing solar energy to keep the lights on. They’re especially beneficial in remote outdoor locations.
Power LED Lights with Batteries
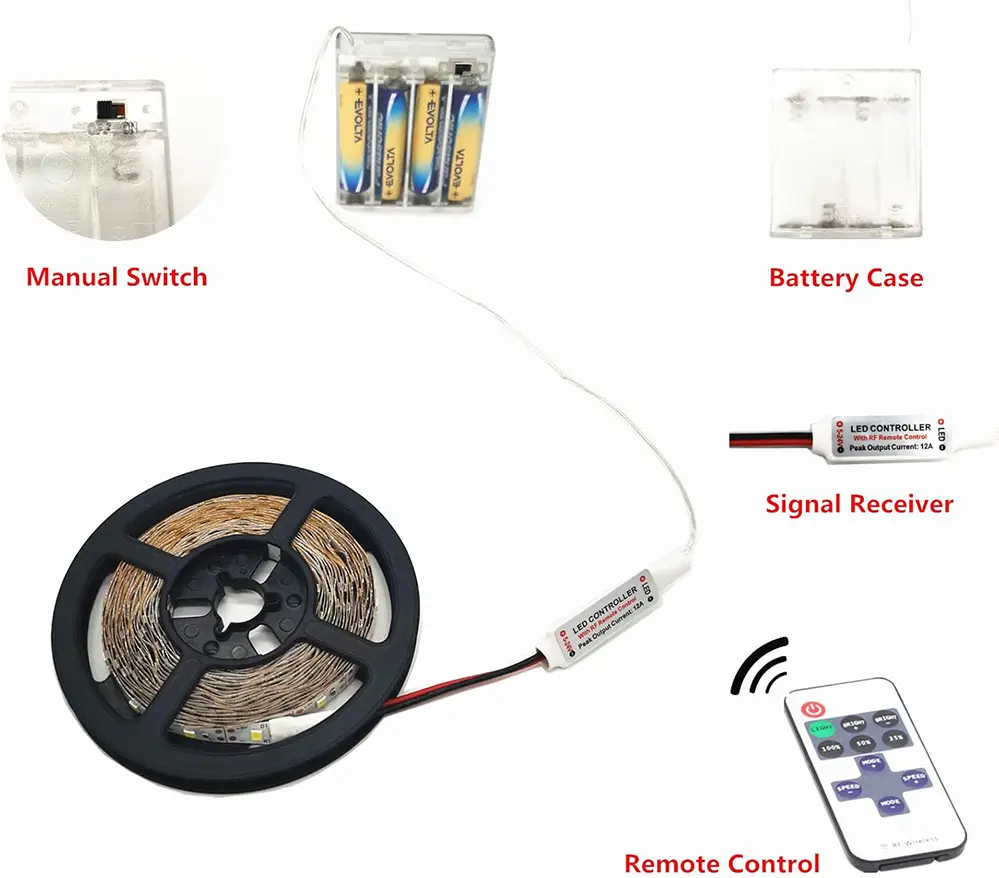
To power LED lights with batteries, identify battery-compatible strip lights, ensuring they meet voltage requirements for optimal performance.
Not all LED strips feature universal compatibility; thus, verifying specifications critically impacts the longevity and effectiveness of the setup. Choose batteries wisely.
Opt for “non-rechargeable” or “rechargeable” packs, depending on how frequently one plans to use the lights.
Choosing the Right Battery Type
Selecting the ideal battery involves understanding power needs, battery lifespan, and compatibility. Ensuring the battery matches the LED strip light’s voltage requirements is vital for optimal functionality.
Rechargeable batteries, such as those of the “lithium-ion” variety, work well due to their high energy density. An advantage is longer usage intervals without frequent replacements, enhancing user convenience.
Lithium-ion batteries offer superior energy efficiency and longer life compared to other battery types.
Non-rechargeable batteries, like alkaline, are cost-effective for infrequent use. They provide stable performance but require periodic replacement. Ultimately, choosing the right battery type depends on the specific lighting scenario, balancing cost, convenience, and environment impact.
Installing Battery Packs
Installing battery packs for LED strip lights is a straightforward and efficient method, ensuring mobility and versatility without the need for direct plugging.
- Determine the Power Requirements: Verify the voltage and current requirements of the LED strip light to ensure compatibility with the battery pack.
- Choose an Appropriate Battery Pack: Select a rechargeable or non-rechargeable battery pack based on usage frequency and convenience.
- Connect the Battery Pack: Attach the battery pack to the LED strip light, ensuring proper polarity alignment and secure connections.
- Secure the Battery Pack: Use adhesive or mounting brackets to firmly secure the battery pack in place, avoiding any movement or disconnection.
- Test the Setup: Turn on the LED strip light to confirm the battery pack installation is successful and functioning correctly.
Selecting the right battery pack is vital to achieving desired performance and longevity for LED strip lights. Each step ensures a reliable, portable lighting solution.
By following these guided steps, one can enjoy the flexibility of LED strip lights without the constraints of traditional power sources.
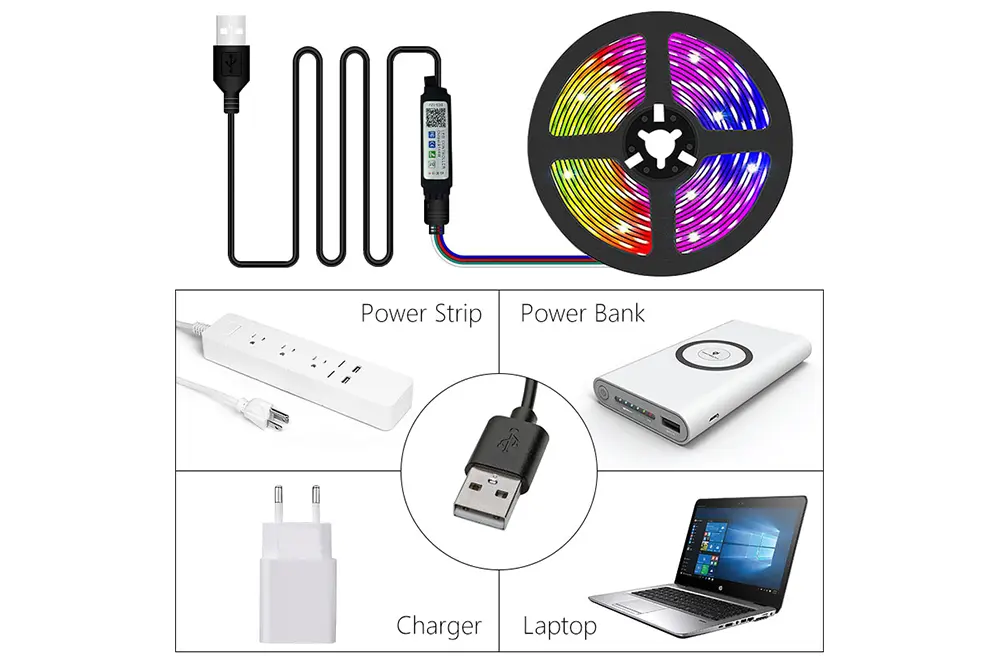
Use LED Strips with USB

Utilizing LED strips with USB connections offers a versatile and convenient solution, making them accessible for various applications. These LED strips can be powered by any device featuring a USB port, including laptops, power banks, and even car chargers. This flexibility not only enhances portability but also provides an energy-efficient lighting option, adaptable to myriad settings. Whether illuminating a workspace or adding ambiance to a room, USB-powered LED strips present an innovative approach to modern lighting needs without relying on conventional plugs.
Connecting to USB Devices
LED strip lights can easily connect to USB devices, providing a versatile and user-friendly lighting solution.
Simply identify the USB port on the device.
Once plugged in, these lights come to life, transforming any USB-equipped gadget into a source of illumination. This method is particularly beneficial for those on-the-go, who may need quick and efficient lighting options.
Moreover, the compatibility of LED strip lights with USB devices means they can be universally employed across a range of scenarios such as traveling, working remotely, or setting up an impromptu workspace. Enhancing the user experience further, countless USB devices include power banks, laptops, or even vehicle interfaces, enabling a seamless integration of lighting wherever it is needed.
Voltage Considerations for USB Power
Understanding voltage is crucial when using LED strip lights.
Many USB ports provide a standard output of 5 volts. This voltage limitation is ideal for powering low-consumption devices, including most LED strip lights, which are typically designed to operate at this voltage level. However, ensuring the LED strips are compatible with this voltage can prevent any potential damage or inefficiency in their operation.
The wattage of the LED strips should also be matched.
Lower wattage strips ensure a longer lifespan and more stable performance when connected to USB power sources. Upgrading to higher wattage strips without accounting for their voltage requirements may lead to overheating and reduced durability.
By paying attention to voltage specifications, users can maximize the efficiency and longevity of their LED lighting setups, all while enjoying the modern convenience USB-powered solutions offer. Whether illuminating a workspace at night or adding a soft glow to a cozy corner, knowledge about voltage considerations empowers users to make informed decisions and achieve the best results.
Powered with a Power Bank
LED strip lights can efficiently run on battery-operated power banks, offering portability and versatility. Opting for a power bank with sufficient capacity ensures sustained operation of the LED strips, making them an excellent choice for on-the-go illumination needs or temporary setups.
To do this successfully, users should select a power bank with an output of 5V (standard for USB devices) and a capacity that matches the energy consumption of the LED strips, enabling them to enjoy hours of uninterrupted lighting without the constraints of fixed power sources.
The terms “portable” and “wireless” have become synonymous with freedom in the realm of lighting innovation.
Benefits of Using Power Banks
Using power banks for LED strip lights offers significant advantages in both functionality and convenience. Their portability means users are no longer tethered to fixed power sources, enabling greater flexibility in lighting application.
Portability and versatility make power banks a popular choice among LED enthusiasts.
By selecting a power bank with adequate capacity, users can enjoy extended runtime for their LED strip lights and achieve remarkable illumination for various settings, ranging from outdoor events to emergency lighting scenarios.
Moreover, power banks are designed to deliver consistent power output, safeguarding the integrity and performance of the LED strip lights. This consistent power flow ensures the lights maintain their brightness and longevity without the risks associated with fluctuating power sources. This reliability empowers users to be creative and confident in their lighting designs anywhere they go.
Setup Guide for Power Banks
When considering how to use LED strip lights without plug sockets, a power bank is a viable option.
Power banks, a prevalent portable charging solution, have emerged as essential companions. They swiftly became integral due to their sheer convenience, especially for those seeking mobility without sacrificing power.
Thus, it’s no wonder why these devices continue to stand as a go-to for powering various gadgets, including the beloved LED strip lights. Their easy-to-use nature and compact design make them ideal for lighting installations.
To prepare, ensure the power bank is fully charged, verifying that it meets the voltage and capacity requirements of the LED strip lights. Usually, a 5V power bank will suffice for most strips; however, always refer to the manufacturer’s specifications.
Equipping oneself with a reliable power bank, users can illuminate any space—unburdened by the constraints of traditional power outlets. This convenience paves the way for creativity.
Powered with a DC Power Adapter
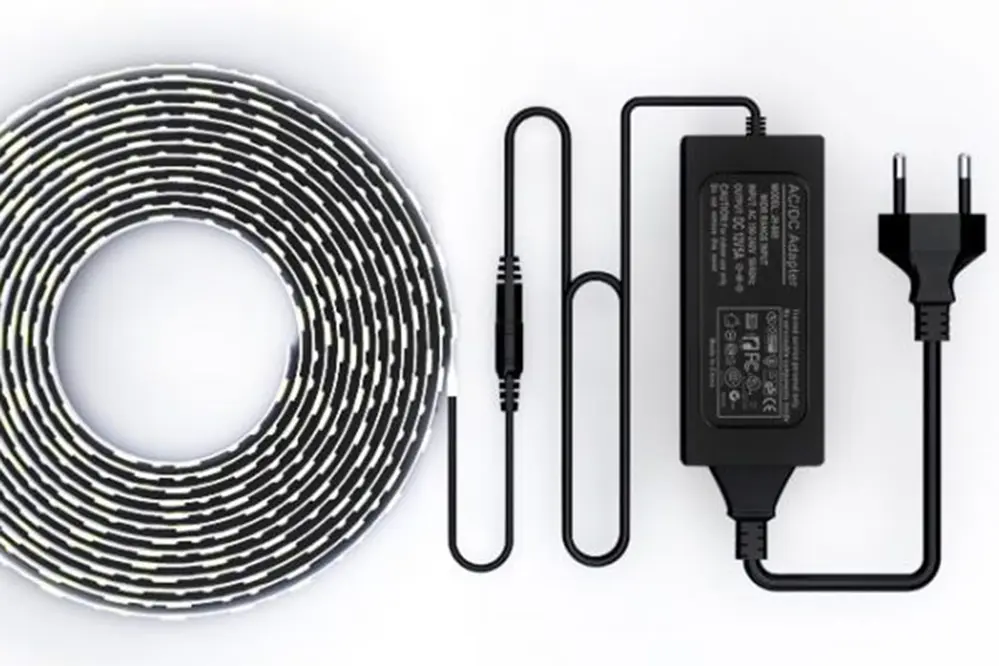
Another powerful alternative for utilizing LED strip lights involves a DC power adapter. Selecting a suitable adapter that matches the required specifications ensures optimal performance. By integrating this versatile solution, the user can efficiently power their LED strip lights, allowing for seamless lighting arrangements without the need for traditional outlets. DC power adapters offer a reliable and steady power source, enhancing the usability and reach of LED installations beyond conventional boundaries.
Selecting the Right DC Adapter
When selecting a DC adapter, understanding the voltage and current requirements of the LED strip lights is crucial. How does one go about this?
Technological advancements have significantly impacted LED lighting solutions, making them more efficient and versatile than ever. However, these enhancements also necessitate careful selection of compatible DC adapters.
To do so, it’s vital to check the manufacturer’s specifications to ascertain the voltage and current ratings of the LED strip. This ensures the safety and longevity of the installation while preventing potential malfunctions.
Frequently, the voltage requirement will be 12V or 24V, and the current rating is usually specified in amps. Once these parameters are known, seeking an adapter that matches these ratings precisely is imperative.
In addition, consider the quality of the DC adapter. Opting for a reputable brand ensures durability and reliability, thereby supporting consistent and trouble-free operation of the LED strip lights.
Proper Installation Tips
First and foremost, cleanliness is paramount, ensuring a smooth working surface free from dust and debris.
When installing, it’s crucial to measure accurately to avoid unnecessary cuts and wastage. Utilize a reliable measuring tape and mark the points where each strip starts and ends. Moreover, ensure the strips are aligned properly to maintain a cohesive and polished appearance.
Meticulously clean the surface using isopropyl alcohol to promote better adhesion. A clean and dry surface provides a stronger bond, helping the strips to stay in place longer. Avoid oily or textured surfaces as these can interfere with the adhesive quality of the LED strip lights.
Additionally, use the proper mounting hardware or clips if the adhesive alone isn’t sufficient. This precaution secures the light strips, especially in environments subject to varying temperatures or humidity levels. Implementing these installation tips not only enhances the aesthetic appeal but also maximizes the longevity and functionality of the LED strip lights.
Power LED Light Strips with Solar
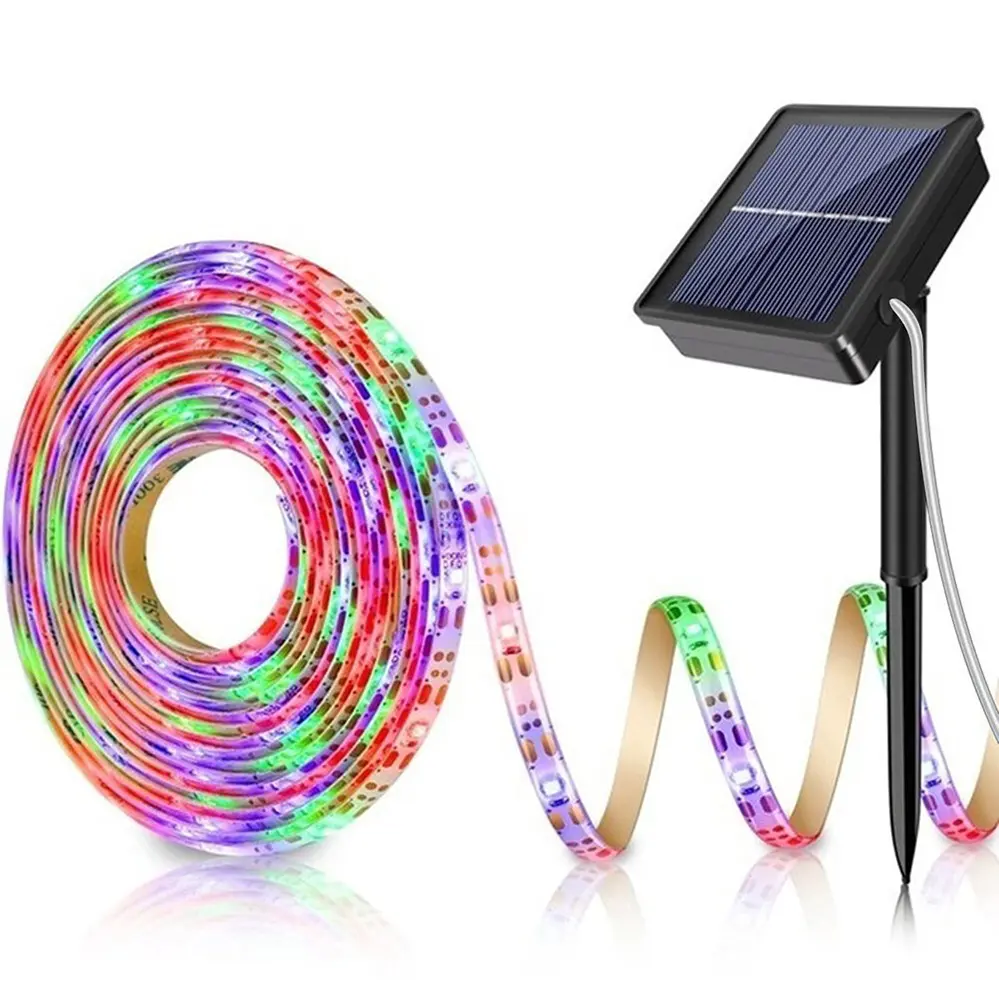
Harnessing solar energy to power LED strip lights not only brings an element of sustainability to your lighting setup but also reduces reliance on traditional power sources. Solar panels convert sunlight into electricity, which is then stored in rechargeable batteries, allowing the LED strips to illuminate spaces even after the sun has set.
This approach provides both environmental and economic benefits, delivering efficient and cost-effective lighting solutions while minimizing carbon footprint.
Benefits of Solar-Powered LEDs
Why choose solar-powered LED strip lights over conventional electric options for your lighting needs?
Solar-powered LEDs, a modern energy-efficient lighting solution, have steadily risen in popularity due to their eco-friendly attributes. They significantly reduce electricity bills and decrease the carbon footprint, which benefits both individuals and the planet.
In fact, it’s not just about cost savings and environmental impact—solar-powered LED strip lights offer a versatility that is unmatched. From garden paths to outdoor events, these lights can illuminate without the constraints of conventional power sources.
Adding to their appeal is the simplicity of the setup. With minimal need for wiring, solar-powered LEDs are not only easy to install but also ideal for locations where traditional electric access is limited or nonexistent.
In conclusion, solar-powered LEDs provide a bright, reliable, and environmentally friendly lighting solution that meets both personal and professional needs.
Setting Up Solar Panels
Choosing to set up solar panels may seem daunting at first. However, the process is both rewarding and manageable.
Installing solar panels allows one to harness the sun’s energy to power their LED strip lights, an eco-friendly and cost-effective solution. By doing so, they will not only save on electricity bills but also contribute to a greener environment.
To begin, they should select a sunny location for the solar panels. Proper placement is crucial to capture maximum sunlight, ensuring that the panels generate sufficient energy to power the LED strip lights efficiently.
Next, they should secure the solar panels using appropriate mounting equipment. Ensuring the panels are fixed at an optimal angle can significantly enhance their energy absorption capabilities, providing continuous illumination for their LED strip lights.
In summary, setting up solar panels is a strategic move towards sustainable living. It transforms the way they power their LED strip lights, promoting both environmental sustainability and financial savings.
Ensuring Proper Voltage Compatibility
Selecting the correct power source for LED strip lights is crucial to avoid damage and ensure longevity.
- Check Voltage Ratings: Consult the LED strip light’s manufacturer for recommended voltage.
- Use Voltage Regulators: These can help maintain a consistent voltage level.
- Consider Power Converters: If the power source voltage doesn’t match, converters can adjust it.
- Monitor Output: Regularly check the power output to prevent surges.
Proper voltage compatibility optimizes performance and prevents premature failure of the LED components.
It is important to meticulously follow these guidelines to safeguard the investment in LED strip lights.
Run with Inverters
Running LED strip lights with inverters offers flexibility and portability, supporting their unique lighting needs.
Inverters convert direct current (DC) from batteries into alternating current (AC), providing the necessary power to run LED strip lights without traditional plugs. This approach is especially useful for locations with limited access to standard outlets.
Consider “pure-sine” and “modified-sine” inverters for optimal performance and efficiency.
Using Inverters Effectively
Inverters are transformative tools that enable LED strip lights to operate smoothly without traditional plugs.
- Choose the Right Inverter: Select an inverter compatible with the wattage and voltage requirements of your LED strip lights.
- Pure Sine vs. Modified Sine: Understand the difference; pure sine inverters offer cleaner power but are more expensive.
- Monitor Battery Levels: Ensure the battery connected to the inverter is sufficiently charged to avoid interruptions.
- Safety Measures: Follow safety protocols to prevent overheating or electrical hazards.
Choosing and managing inverters carefully will ensure a reliable power source for your LED strip lights.
Regardless of the inverter type, always verify connections and compatibility.
Adhering to these practices guarantees their LED lighting setup remains functional and safe.
Minimizing Energy Loss with Inverters
Inverters play a critical role in ensuring energy-efficient operation, significantly impacting the overall performance of LED strip lights running without plugs.
Minimizing energy loss with inverters is essential for optimal functionality.
Using high-quality inverters can markedly reduce unnecessary energy dissipation.
Quality inverters often come with advanced features and better efficiency ratings, ensuring lesser wastage.
Additionally, choosing pure sine wave inverters can further improve energy efficiency, albeit at a higher initial cost.
Ultimately, the small investment in a superior inverter can result in substantial long-term energy savings.
Hardwire to a Fused Connection
To hardwire LED strip lights, a professionally-installed fuse box offers enhanced safety and reliability.
It is crucial to select an appropriate fuse rating (amps) to match the lighting setup, which helps in preventing overcurrent damage and ensuring long-term durability.
Proper labeling of “in-line” and “off-line” fuses significantly decreases the risk of electrical mishaps.
Steps for Safe Hardwiring
Hardwiring LED strip lights requires meticulous attention to safety and electrical standards.
- Turn off Power: Before starting, ensure the main power supply is switched off.
- Choose Correct Wire Gauge: Select wiring that matches the power requirements of the LED strips.
- Use a Fuse: Incorporate an in-line fuse to guard against overcurrent situations.
- Test Connections: Check all connections for proper attachment and security before finalizing.
- Professional Inspection: If uncertain, have a licensed electrician inspect the work.
Proper preparation and adherence to safety protocols are vital when hardwiring.
Following these steps can significantly reduce risks and ensure a secure installation.
With these measures, users can confidently hardwire their LED strip lights, enjoying both efficiency and safety.
Advantages of a Fused Connection
A fused connection provides an unparalleled advantage when securing an electrical system from inadvertent surges or faults.
Electrical engineers, by implementing advanced protection mechanisms, have continuously emphasized how sonic safety can be maintained with a fused connection, ingeniously enhancing both security and functionality.
So, it’s not just about keeping the system’s integrity intact; adopting a fused connection ensures immediate interruption of the circuit, should any overcurrent situation arise, thereby preventing potential hazards and equipment damage.
Another key benefit is the ease of maintenance and reliability it offers. When replacing the fuse, which in most cases is a simple task, the system continues to operate without long interruptions, translating into higher productivity and minimized downtime.
The reassurance that comes with knowing those systems remain protected brings peace of mind to users and professionals alike.
Use an Extension Cord
Using an extension cord, a versatile and instantaneous solution, allows the effortless connection of LED strip lights. Extension cords grant the flexibility needed to position LED strips exactly where desired, regardless of proximity to traditional outlets. This approach not only enhances the aesthetic appeal of a space but also maximizes the functional use of LED lighting options.
Choosing the Right Extension Cord
Selecting the perfect extension cord is vital to ensure safety, durability, and the effective operation of LED strip lights. An extension cord serves as a lifeline between the power source and your enchanting lighting setup.
First, consider the cord’s length and gauge. Prioritize extension cords with appropriate thickness to manage the requisite power load.
Additionally, opt for cords with adequate insulation. Proper insulation safeguards against potential electrical hazards and prolongs the cord’s life.
Next, pay attention to the cord’s rating. Choose ones specifically rated for the power requirements of LED strip lights.
For environments prone to moisture or outdoor usage, select extension cords designed for such conditions. Water-resistant and UV-protected cords bolster safety and performance.
Ultimately, the right extension cord isn’t merely an accessory; it ensures the seamless and safe illumination of any space. Choose confidently, for it transforms visions into vibrant realities.
Safety Tips for Using Extension Cords
When using extension cords, one must prioritize safety, security, and ensure connections are robust, delivering a seamless experience without any hazards. Always carefully select cords tailored to the specific environment and usage requirements.
Only use extension cords with the appropriate voltage rating for your LED strip lights. Overloading can lead to overheating and potentially dangerous situations.
Always inspect cords for any signs of damage or wear before use, including fraying or exposed wires. Promptly replace any compromised cords to maintain a safe setup.
Avoid running extension cords under carpets or through high-traffic areas where they could be damaged or cause trips and falls. Proper placement ensures longevity and safety.
Consider using heavy-duty extension cords for more demanding setups, particularly when operating multiple LED strips. These cords offer greater durability and reliability, crucial for preventing overloads.
Finally, never daisy-chain extension cords. This practice poses significant risks, increasing the likelihood of electrical failure. Follow these guidelines to ensure a safe, efficient, and glowing LED strip light experience.
Wire a Ribbon Cable
Wiring a ribbon cable involves carefully matching pin-to-pin connections based on their designated functions.
To do so effectively, first identify the corresponding header pins on both ends of the cable, ensuring an accurate fit to avoid wiring mishaps. One must follow the color coding of wires as per the standardized wiring scheme to maintain consistency.
Label each connection to prevent confusion and enhance the overall wiring process.
Proper Wiring Techniques
Proper wiring techniques are fundamental to the successful use of LED strip lights without a plug.
Ensuring adept handling of wires prevents future malfunctions.
Begin by cutting the LED strip light to the desired length, carefully exposing the copper contacts. Use connectors designed for LED strips, typically clip-on types, to attach the power source efficiently.
Secure the connections by soldering, if necessary, to reinforce the bond, thereby reducing the risk of disconnections. To protect the wiring setup, employ heat shrink tubing or electrical tape around the joints and ensure the connections are well-insulated. This attention to detail guarantees a long-lasting and reliable light display.
Ensuring Voltage and Current Compatibility
Ensuring voltage and current compatibility is essential for the safe and effective operation of LED strip lights without a plug.
- Identify Voltage Requirements: Determine the voltage rating of your LED strip lights, typically 5V, 12V, or 24V.
- Choose a Compatible Power Source: Select a battery or USB power source that matches the voltage requirement of your LED strip.
- Check Current Ratings: Verify the current (amperage) required by the LED strip and ensure the power source can supply it.
- Use Voltage Regulators When Needed: If the power source does not match the LED strip’s voltage, use a voltage regulator to adjust it appropriately.
- Calculate Total Power Consumption: Multiply the current draw per meter by the total length of the strip to determine the total power needed.
This compatibility ensures that your setup will operate efficiently and safely.
Neglecting these factors could lead to overheating or damaging the LED strip lights, affecting performance and longevity.
Powered with Jumper Wires and Breadboards
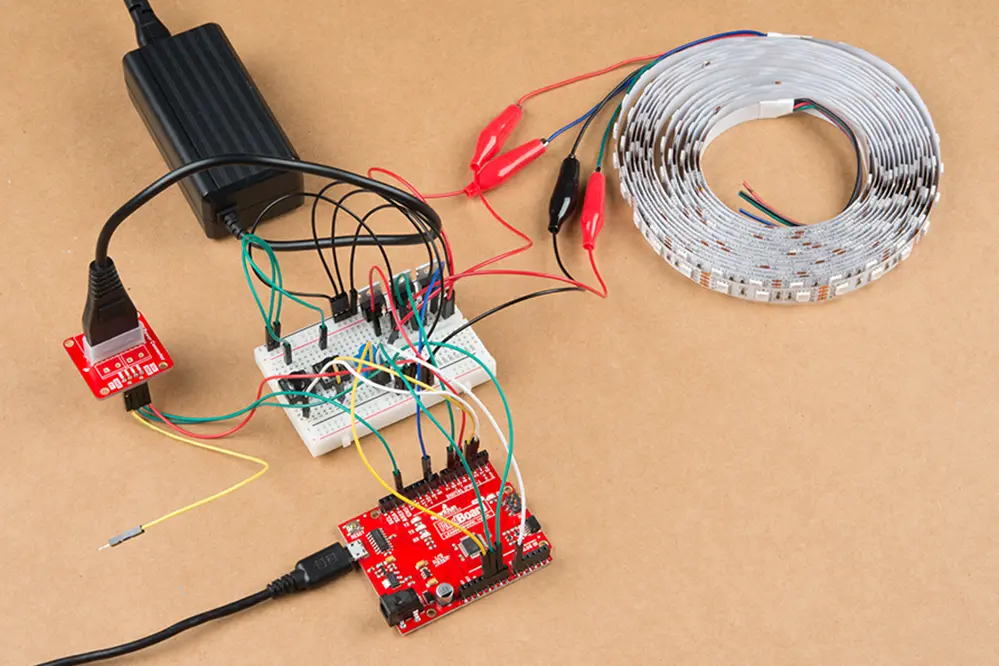
For those who relish experimenting with electronics, a flexible and customizable approach awaits. By utilizing jumper wires and breadboards, they can seamlessly integrate LED strip lights into a myriad of projects, all without the need for traditional plugs.
In essence, jumper wires act as “bridging cables.” These allow for a direct connection from the power source to the LED strip, offering unparalleled adaptability. Furthermore, breadboards provide a stable platform to connect multiple components. This method not only fosters creativity but also ensures that the LED strip lights operate safely and efficiently within the experimental setup.
How to Use Jumper Wires
Harnessing the power of jumper wires.
These versatile connectors are crucial for DIY electronics. A jumper wire functions by forming a direct electrical pathway between two points or terminals, enabling the transfer of power or signals in an intuitive manner. Consequently, their ability to offer adaptability makes them an essential tool for prototyping and small electronics projects.
Proper usage includes secure connections.
It’s paramount to ensure the ends of the jumper wires are firmly connected to avoid loose interactions. On breadboards, they can be inserted into specific holes designated for power and data connections. This setup simplifies the process of connecting LED strip lights without the need for a bulky plug.
Color-coded wires aid in organization.
Jumper wires typically come in different colors, allowing users to easily distinguish between various connections. Utilizing this feature can reduce confusion and enhance the precision of electronic projects.
Incorporating jumper wires offers flexibility and control, which is especially valuable for tailored LED strip light installations. By integrating these components, one can create an efficient and dynamic lighting system that meets specific project requirements.
Breadboard Setup Guide
Setting up a breadboard is an essential skill for electronic enthusiasts and professionals alike.
- Gather Materials: Obtain a breadboard, jumper wires, power supply, and the necessary electronic components, including an LED strip.
- Power Lines: Connect the positive and negative lines of the breadboard to the respective terminals of your power supply.
- Component Placement: Insert your electronic components, ensuring their legs or leads are correctly positioned within the breadboard’s grid.
- Jumper Wires: Use jumper wires to link components and establish effective circuits.
- Test Circuits: Gradually connect the power source and test your circuit to ensure everything functions as expected.
Ensuring all connections are secure and correctly oriented is crucial for a successful setup.
Adhering to a clear plan will streamline the assembly process and help identify potential issues quickly.
Common Mistakes When Powering LED Strips
Many overlook proper voltage requirements, a mistake that compromises performance and longevity. Selecting incorrect power supplies, failing to consider wattage and amperage, and neglecting heat dissipation can adversely affect LED strips, leading to subpar illumination and potential damage.
Reverse Polarity Issues
Using LED strip lights without a plug can present unique challenges, among which reverse polarity is a significant concern.
Typically, reverse polarity occurs when the positive and negative connections are incorrectly applied.
In LED strips, such errors can result in malfunction or complete failure of the lights.
This issue primarily arises in setups powered by batteries or USB connections.
To prevent reverse polarity, always ensure accurate identification of positive and negative terminals before connecting power sources.
Consequently, adherence to these precautions will not only safeguard the LEDs but also extend their operational lifespan.
Ensuring Strong Connections
Strong connections are essential to maximize the efficiency and safety of your LED strip setup, particularly when eschewing traditional plugs for alternative power sources.
Battery packs and USB connections often come with their own sets of challenges.
For instance, consistent voltage fluctuations can compromise the stability of your LED strips. A stable connection minimizes disruptions and enhances the longevity of the system.
To secure robust connections, ensure all wire joints are properly soldered or use reliable connectors recommended by professionals. By minimizing the risk of loose connections, one can maintain consistent brightness and prevent potential short circuits. This proactive approach enables users to fully harness the versatility and reliability of their LED strip lights.
Voltage Mismatches
Voltage mismatches can cause significant issues when using LED strip lights without plugs. Differences in voltage can damage the LEDs over time.
Therefore, compatible power sources that match the voltage needs of LED strips are crucial. Misaligned voltage supplies can result in flickering.
When exploring how to use LED strip lights without plug, ensuring the voltage from the alternative power source aligns with the strip’s requirements is paramount. This alignment is necessary to maintain performance, reliability, and longevity.
Proper voltage conversion tools should be employed if there are discrepancies between the power source and the LED’s voltage. By utilizing tools such as “step-down” or “step-up” converters, one can mitigate the risk of damage and ensure the LED strip lights operate optimally. This thoughtful approach not only preserves the functionality of the lights but also enhances their efficiency.
Avoiding Wire Overload
Preventing wire overload is essential to ensure the safety and efficiency of LED strip lights.
- Use Appropriate Wire Gauges: Selecting wires with the correct gauge prevents overheating and reduces resistance.
- Distribute Power Evenly: Avoid connecting too many LED strips to a single power source.
- Divide into Sections: If using a large setup, create multiple sections, each with its own power source.
- Check Power Ratings: Ensure that all components match the power requirements of the LED strips.
Taking these precautions guarantees that the wiring does not become a weak point in their lighting setup.
Proper wire management will not only enhance safety but will also maintain optimal LED performance.
By adhering to these practices, one can confidently enjoy their LED strip lights without the risk of wire overload.
Managing Heat Dissipation
Heat dissipation is crucial when using LED strip lights without a plug.
Each method, be it battery-operated units or USB-powered solutions, should be chosen with attention to heat management. Most LED strips generate some heat during operation, and providing adequate heat dissipation will ensure their longevity and consistent performance.
Accordingly, users should invest in a proper heat sink. By attaching LED strips to materials like aluminum profiles or heat-dissipating surfaces, the generated heat can be effectively managed, ensuring maximal durability.
Moreover, regular monitoring and ensuring ventilation around the LED strips will significantly contribute to maintaining safe temperatures. Overheating can lead to reduced efficiency and possible damage, so proactive steps in heat management are both a preventative and performance-enhancing measure.
Measuring Installation Area Correctly
Accurate measurement of the installation area is crucial for seamless LED strip light application.
- Measure Length and Width: Obtain precise dimensions of the area where the strips will be installed.
- Consider Obstacles: Identify any potential obstructions such as corners, fixtures, or furniture.
- Plan Power Source Location: Determine where the power source will be to ensure enough length and connectivity.
- Account for Heat Dissipation: Ensure that there is space for proper heat management to maintain performance and longevity.
Proper preparation will ensure that the LED strip lights fit perfectly and function optimally.
This careful planning will not only enhance aesthetic appeal but also improve operational efficiency.
Take time to thoroughly measure and account for all aspects to achieve the best results.
Tips for Connecting LED Strip Lights Without Plugs
Utilize battery packs, ensuring high-capacity options for seamless integration. They provide mobility and flexibility for any setting.
For USB-powered alternatives, choose those with universal compatibility. This can easily be connected to power banks, laptops, and other USB ports.
These portable “no-plug” solutions make LED strip lights accessible and versatile for various environments.
Using Solderless Connectors
Solderless connectors provide a straightforward way to connect LED strip lights without the need for soldering, making it accessible for everyone.
These innovative connectors eliminate the complexity, allowing most users to achieve professional results.
Simply align the LED strip’s contact points with the designated slots inside the connector, ensuring a secure fit. Snap the connector shut, and the lights will illuminate brightly, showcasing their full potential with ease.
This approach simplifies the process for individuals who may not be comfortable with traditional soldering, yet seek a high-quality finish. By leveraging solderless connectors, one can easily carry out efficient installations, ideal for battery-operated or USB-powered LED strip lights. This ensures the flexibility and convenience needed for modern lighting solutions.
Choosing a DC Power Supply
Selecting the right DC power supply for LED strip lights is crucial for optimal performance and safety.
- Voltage Compatibility: Ensure the power supply matches the LED strip’s voltage requirements (usually 12V or 24V).
- Current Capacity: The power supply should provide sufficient current (amperage) to power the entire strip without overheating.
- Quality and Safety: Look for power supplies with proper certifications and built-in protections against short circuits and overload.
- Efficiency: Opt for a high-efficiency power supply to reduce energy consumption and heat generation.
Considerations like voltage compatibility and current capacity are vital for avoiding damage and ensuring longevity.
A high-quality power supply will enhance performance and reduce the risk of potential hazards.
By thoughtfully selecting a DC power supply, one can achieve a seamless and secure lighting setup.
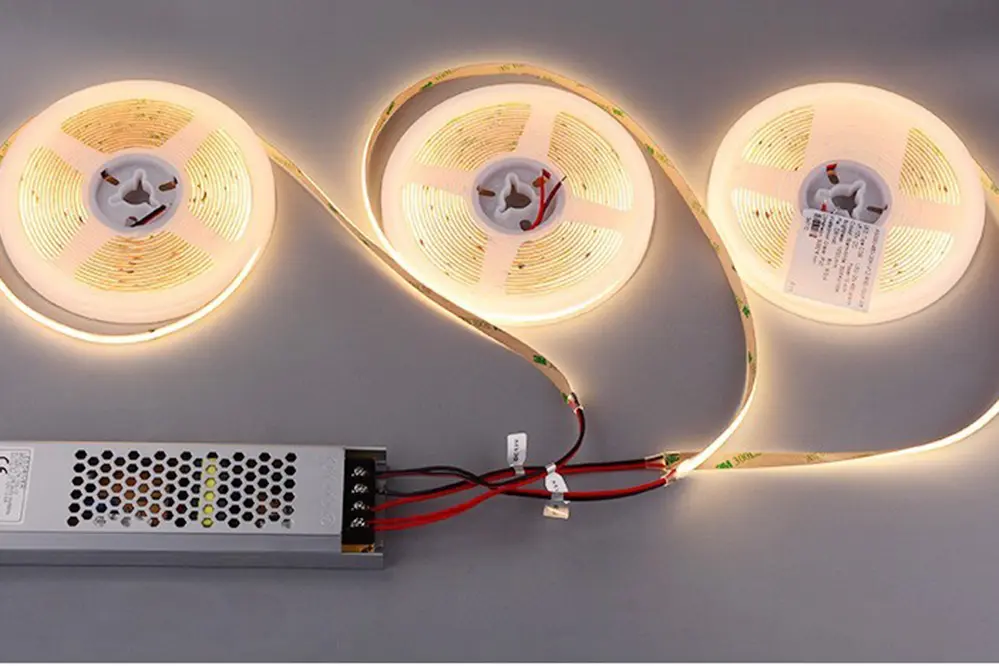
Distributing Power Evenly
Balancing power is key in any lighting project.
Ensuring that power is distributed evenly across the LED strip lights prevents dim spots and overheating. This is particularly crucial when connecting multiple strips or creating intricate lighting designs. Additionally, it ensures that all LEDs receive uniform voltage, which prolongs their lifespan. Utilizing a power distribution block or multiple power injection points can greatly assist in achieving consistent illumination throughout the entire setup.
One must account for voltage drops.
Using higher gauge wires can mitigate this issue – the thinner the wire, the greater the resistance, leading to power loss. It’s also prudent to calculate the total wattage of the LED strips to determine the optimal placement of power injection points.
Proper planning and execution in distributing power will result in a professional, high-quality lighting installation that not only looks impressive but functions efficiently. This investment of time and resources enhances the overall ambiance, creating a captivating visual effect while maintaining the technical integrity of the lighting system.
Waterproofing Connections
Ensuring connections are waterproof is imperative.
Properly waterproofing LED strip light connections protects against potential moisture damage. This action prevents short circuits and prolongs the longevity of the lighting setup, which is crucial, especially in outdoor or humid environments. Fortunately, achieving this can be done with a combination of waterproof connectors, silicone sealant, and heat-shrink tubing.
Materials play a pivotal role here.
Using silicone sealant as an extra layer of protection over and inside the connectors enhances the waterproofing. Additionally, the utilization of heat-shrink tubing improves the security of the connections, creating a tight seal that keeps water and dust out.
These methods work remarkably well. A sealant’s waterproofing capabilities ensure the LED strip lights continue to function flawlessly, regardless of weather conditions. Combining these techniques guarantees the longevity and reliability of the lighting setup, bringing peace of mind and sustained illumination.
Testing Before Installation
Before setting up LED strip lights, ensuring they work correctly is crucial. This step can save time and prevent future issues.
- Inspect the LED Strip: Look for any visible damage, such as cuts or kinks.
- Check Polarity: Ensure the positive and negative connections align correctly.
- Test with a Power Source: Use a compatible power source for a quick functionality test.
- Adjust Settings: Verify you can adjust brightness and color without glitches.
- Segment Testing: Test each section if the strip is divided into segments.
Performing these checks can identify any defects early. This way, users won’t face unexpected disruptions later.
Preparation and testing help in achieving a flawless and hassle-free installation.
Conclusion
Learning how to use LED strip lights without a plug unlocks numerous possibilities. With advancements in wireless technology, battery packs and USB power banks have made these lights more versatile and accessible. This convenience allows for creative lighting in areas previously limited by power constraints, enabling vibrant and dynamic spaces to flourish. Whether for home decor, outdoor events, or professional settings, the potential for creative illumination is now greater than ever.
As technology progresses, even more efficient, portable, and longer-lasting lighting solutions are expected, promising a bright future for innovative lighting. Embrace this change and transform spaces with ease, enjoying the newfound freedom and flexibility that modern lighting solutions offer. The future of lighting appears bright, with endless potential to enhance and illuminate spaces in ways previously unimaginable.


