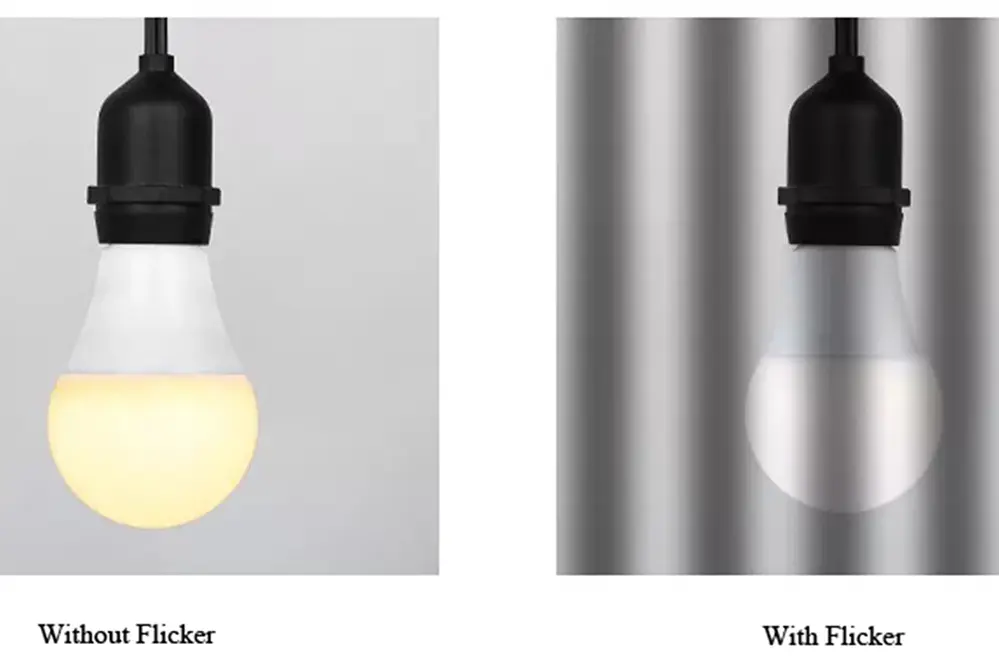
Why do LED lights flicker on a video camera? Imagine you’re capturing a once-in-a-lifetime event, the lighting is perfect, and the scene is set. Yet, when you review the footage, you notice an unsettling flicker disrupting the visual harmony. This common issue can turn a cherished moment into a technical frustration, highlighting the need to understand why LED lights flicker on a video camera.
The importance of this topic extends beyond mere inconvenience. Flickering can significantly impact the quality of your videos, affecting both amateur and professional videographers. Surprisingly, studies show that flicker can cause viewer discomfort and even headaches, emphasizing the need to address this issue. By understanding the underlying causes, you can enhance your video quality and viewer experience.
As we delve into this topic, you’ll discover practical insights and solutions to prevent LED flickering in your videos. Whether you’re a seasoned professional or an enthusiastic amateur, this guide will equip you with the knowledge to elevate your video production. Join us as we explore the fascinating world of LED lighting and video technology.
What Causes LED Light Flicker on Video Cameras?

The flickering of LED lights in video footage arises from the interaction between the camera’s settings and the LED’s electrical characteristics.
LEDs operate using pulse width modulation (PWM) to control brightness, switching rapidly between on and off states. When video cameras record, their frame rate may coincide with this PWM frequency, capturing moments when the LEDs are off.
However, it’s not an insurmountable issue. Adjusting the camera’s shutter speed or frame rate can often mitigate the flicker by aligning it with the LED’s PWM cycle or offsetting it entirely.
Moreover, the design of higher quality LEDs, which incorporate better drivers, can reduce the flickering by increasing the PWM frequency beyond the video camera’s frame detection capability. Foster a creative mindset, and these challenges become mere stepping stones to dazzling and flicker-free video clarity.
In embracing this knowledge, we not only solve a technical challenge but also enrich our storytelling potential.
Understanding LED Technology
Advancements in lighting use LED technology.
The marvel of LED lighting starts with its solid-state build. This design allows LEDs to convert electrical energy into light efficiently, leading to an impressive lifespan compared to older technologies. Remarkably, they can emit light in specific colors without needing filters, which results in higher energy conservation.
LEDs have revolutionized how we illuminate.
Their efficiency lies in the utilization of materials like gallium nitride. This semiconductor material facilitates the production of light when electricity is applied. Moreover, LEDs can be manufactured to produce different colors and intensities by precisely adjusting the semiconductor composition.
Today’s LEDs are engineered to illuminate creatively, combining long-lasting durability, design flexibility, and energy savings. As they evolve, LEDs symbolize our transition into more sustainable and inventive lighting solutions. Understanding these facets of LED technology enhances our capacity to harness its potential, paving the way for a brighter, more luminous future.
The Role of Refresh Rates

The interplay between refresh rates and lighting systems is pivotal to understanding why LED lights flicker on video cameras. Essentially, when the frequency at which a camera captures images does not align with the refresh rate of LED lights, an intriguing phenomenon occurs—LED flickering becomes perceptible in the captured image. This misalignment, although invisible to the naked eye, results in the characteristic flicker seen in video footage.
Capturing smoother, flicker-free footage involves synchronizing the camera’s frame rate with the LED light’s refresh frequency. Proper alignment eliminates the visual disturbances caused by these mismatched frequencies.
How Refresh Rates Affect LED Flickering
Refresh rates and lighting synergy play a crucial role in video quality, particularly concerning LED flickering. Synchronization between camera frame rates and LED refresh rates is essential for flicker-free footage.
When there is a disparity in the refresh rate of an LED and the shutter speed of a camera, the lights appear to flicker—this is known as the “stroboscopic effect.” A harmonious match between the two ensures that each frame captures a consistent light state.
Video cameras capturing synchronized light frames create a seamless visual experience, enhancing the overall quality of recorded footage.
To master the challenge of LED flickering, one must adjust either the camera’s shutter speed or the LED’s refresh rate. Advanced lighting solutions often offer adjustable settings to mitigate this issue, allowing content creators to capture flawless footage. By understanding and manipulating these factors, you can elevate your videography, ensuring each shot is as brilliant as intended.
Frame Rate and Flickering

At the heart of every flickering issue lies the interplay between the video camera’s frame rate and the LED’s refresh rate. The frame rate determines how many frames are captured in a second, while the LED’s refresh rate controls how often the light pulses imperceptibly.
To minimize the flickering of a video, one needs to achieve a “synchronous balance.” This is where the frame rate matches the LED’s refresh frequency, avoiding visual inconsistencies. For example, if the camera’s frame rate is set to a multiple of the LED’s refresh rate, the probability of encountering flickering reduces significantly, resulting in smooth and professional-quality footage.
Matching Frame Rates to Reduce Flicker
Aligning the frame rate of your video camera with the LED’s refresh rate is vital for reducing flicker.
- Determine the LED’s Refresh Rate: Identify the frequency at which your LED lights operate.
- Adjust Camera Frame Rate: Set your camera’s frame rate to match or a multiple of the LED refresh rate.
- Utilize Adjustable Settings: Modern cameras often have settings to fine-tune frame rates for optimal results.
- Use Professional Tools: Consider software or hardware that can adapt to varied lighting conditions.
Bravely harnessing technological adjustments can diminish flicker and strobing effect, creating clarity and visual harmony.
Remember, mastering these settings elevates not just your video quality but also enriches your storytelling capacity.
Power Supply and Flicker Issues
Exploring the depths of power supply intricacies reveals the dynamic relationship between electromagnetic waves and their resultant flickering influences. Variations in current, often manifesting through pulse-width modulation, can cause LEDs to pulse based on the frequencies that might clash with camera settings.
Adaptation through consistent power sources and enhanced circuitry can dispel the mystique surrounding flicker issues and empower innovators to embrace their creative visions.
Voltage Fluctuations and Their Effects
Voltage fluctuations occur when there are changes in electrical current flow, sparking significant challenges that lead to flickering LED lights.
These fluctuations, often instigated due to a varying power supply or inconsistent electrical signals, disrupt the steady current, causing the LED lights to flicker on video footage. It’s akin to the unsettling ripple effect from a pebble tossed into a pond; even minor inconsistencies in voltage can amplify the visual disturbances seen through the camera lens.
Understandably, LEDs thrive on a consistent voltage to maintain their luminous stability. In practical applications, managing these fluctuations assures not just the visual smoothness but also enhances the reliability of LED fixtures, fostering a resilient environment where creativity can flourish.
By implementing sophisticated electrical designs and voltage stabilization techniques, professionals can mitigate the consequences of voltage variations, transforming potential hurdles into stepping stones for innovation. This proactive approach not only overcomes technical limitations but also emboldens videographers to achieve unblemished visual narrations, contributing to the overall integrity and excellence of their craft.
Incompatibility with Camera Sensors

LED lights can sometimes appear to flicker due to incompatibilities with video camera sensors. While LEDs emit light continuously, video camera sensors capture images in a series of frames per second, potentially leading to misalignment and flickering. When the LED’s light pulse does not sync with the camera’s frame rate, you perceive disruptions.
This is where the terms “in-phase” and “out-of-phase” describe sensor synchronization with the lights’ frequency and intensity.
Sensor Technology and Flickering
One might wonder why technologically advanced video cameras still encounter issues like LED flickering and rolling shutter. The answer often lies within sensor technology, a cornerstone of camera design.
In the evolving world of digital cinematography, understanding sensor technology is crucial. Sensors determine how a camera captures light, influencing the final image quality and consistency. When sensors and LED lights operate asynchronously, flickering ensues.
This phenomenon occurs chiefly because LEDs flicker at a rate aligned with their power source’s frequency. If a camera sensor’s frame rate doesn’t match this frequency, a visual discrepancy emerges. An in-depth sensor knowledge helps tailor solutions to this flickering puzzle.
Advancements in camera technology have led to sensors with higher frame rates and more sophisticated synchronization capabilities. By leveraging these innovations, filmmakers can align camera settings with the unique characteristics of LED lighting. Such alignment ensures flawless footage without the distraction of flickering.
Ultimately, sensor technology holds promise for synchronized, seamless videography, minimizing flickering and improving LED light capture.
Addressing Flickering with Settings Adjustments
Tackling LED flicker effectively requires a combination of technical proficiency, perceptive observation, and, above all, a positive mindset. Through precise camera settings adjustments, professionals can harmonize the camera’s shutter speed and the LED’s flicker rate by incorporating dimming techniques, thus ensuring smoother, flicker-free recordings.
In experimenting with adjustments, consider using a “shutter angle” approach. This method allows for a more fluid and granular shutter speed alteration, enabling improved synchronization. To put this into practice, try varying the shutter speed until the visual flickering diminishes, taking note of how each adjustment influences the overall footage.
Camera Settings for Minimizing Flicker
Optimizing camera settings to minimize LED flicker in video captures is a blend of art and science, requiring meticulous adjustments.
- Adjust the Shutter Speed: Synchronize it to match the LED’s frequency, often a multiple of 50 or 60 Hz to reduce flicker.
- Utilize Flicker Reduction Mode: If available, this setting automatically detects and mitigates flicker for a smoother visual result.
- Modify the Frame Rate: Experiment with different rates to find the most compatible setting that aligns with the LED output.
- Use Manual Exposure: Avoid auto settings to maintain consistent light exposure without sudden shifts that can exacerbate flicker.
- Employ ND Filters: To better control light intake, resulting in potentially reduced exposure flicker.
These adjustments not only enhance the visual clarity of your footage but also heighten your understanding of video capture nuances.
In embracing these strategies, videographers can confidently unlock the fullest potential of their equipment, overcoming flicker challenges with precision and skill.
Using Flicker-Free LEDs

Investing in flicker-free LEDs can significantly enhance the quality of your video projects by reducing the strobe effect and flickering that occurs when filming. These advanced LEDs are engineered to maintain constant illumination, offering the added benefit of reducing eye strain and enhancing the visual experience of your audience, which ultimately brings your creative vision to life with greater authenticity.
This thoughtful investment in lighting not only improves video quality but also elevates your professional toolkit by ensuring seamless integration with various filming conditions.
What Are Flicker-Free LED Lights?
Flicker-free LED lights represent a remarkable innovation that addresses the common flickering issue observed in traditional lighting systems.
In essence, these extraordinary lights use a superior circuitry design that stabilizes the electrical current, minimizing the on-screen flicker which can disrupt visual experiences and diminish the clarity of captured media. By maintaining consistent light output, flicker-free LEDs enable videographers to craft content without the worry of unwanted disruptions, thus empowering professionals to achieve precision in capturing high-quality footage seamlessly.
Interestingly, these lights operate on a direct current, meaning they bypass the rapid on-off cycles that standard bulbs experience. For video creators, this translates into an immersive environment where every frame is sharp and every color remains true, facilitating a flawless representation of reality that aligns with the discerning standards of modern media production.
Utilizing flicker-free LED technology exemplifies a commitment to excellence in videography, ensuring that technical challenges related to lighting are effectively managed. For professionals seeking to refine their work, this lighting solution not only mitigates potential flicker challenges but also propels your creative endeavors into a realm where innovation meets reliability, driving the evolution of visual storytelling.
Stabilizing Power Supply for LEDs
A stable power supply is paramount to mitigating flickering in LEDs, fostering consistency in lighting output. By maintaining a continuous and balanced voltage supply, LED drivers play an instrumental role in converting AC to DC power, which is essential for achieving a steady light output absent of fluctuations. This ensures that videographers can capture pristine images without the interference of flickering effects, crucial for both technical precision and artistic expression.
The terms “constant-current” and “constant-voltage” are often distinguished to refer to the ‘steady power supply’.
Solutions for Voltage Stability
Harnessing the power of voltage stability, professionals can significantly reduce or eliminate flickering that occurs due to power inconsistencies.
For starters, by adopting voltage stabilizers as a preliminary solution, fluctuations can be managed, ensuring the electrical flow remains constant over time. These stabilizers are pivotal in maintaining equilibrium across the electrical inputs, delivering consistent performance and safeguarding LED operations. Moreover, integrating surge protectors can add an additional layer of defense, particularly in environments with unpredictable voltage spikes.
Furthermore, the proper selection of an LED driver can vastly influence voltage stability. By focusing on robust and highly efficient drivers, videographers can enhance their equipment, maintaining a consistent power output that minimizes flicker. This approach not only improves video quality but also extends the lifespan of LED lights through efficient power management.
Ultimately, professional-grade power supplies provide the foundation on which effective lighting relies, allowing creatives to navigate voltage challenges with confidence and precision. By prioritizing stabilization solutions, one can fully leverage the capabilities of LED technology, ensuring that every visual story is illuminated with clarity and consistency, truly epitomizing the art of modern videography.
Testing Before Shooting
Before embarking on any shoot, a series of meticulous preparations, such as test shots, become vital. Testing enables you to identify potential flickering issues, ensuring each LED interacts harmoniously with the camera frame rate, thus guaranteeing top-tier visual output.
How to Test for LED Flicker
Testing LED flicker can be straightforward yet essential.
Start by recording your LED setup with your video camera. Pay close attention to various frame rates and shutter speeds you might be using during actual shooting sessions, as these can influence the necessity of further adjustments. Additionally, reviewing the footage on an external monitor may provide additional insights into potential flicker issues.
Take note of flickering patterns.
If flicker is apparent, consider adjusting camera settings such as frame rate or shutter speed. This adjustment often proves beneficial in synchronizing the LED’s frequency with that of the camera, minimizing visible flicker.
Empowering yourself with knowledge on LED flicker testing techniques enhances your ability to harness creativity in filmmaking, ensuring quality illumination in your projects. With advanced tools at your disposal, you have the means to transform any environment into your canvas, unleashing your artistic vision without compromise.
Post-Production Solutions
Even if flicker persists during filming, a variety of post-production techniques exist that can help. Software tools offer sophisticated filters and adjustments designed to tackle these issues, improving the overall video quality and creating a polished final product.
In post-production, tools like Adobe Premiere Pro or Final Cut Pro come with “flicker removal” features. This is often in the form of a plugin or a video effect, specifically designed for flicker mitigation. By using these, the consistency of the visual output can be enhanced, making your footage smoother and more appealing, an indispensable asset for any filmmaker determined to deliver work that shines.
Editing Techniques to Correct Flicker
When faced with flickering LED lights in videos, post-production editing becomes an essential toolkit to restore visual clarity and consistency.
Among these tools, consider using a sophisticated timeline editing approach to manually identify and correct each flicker, frame by frame. This meticulous method allows you to precisely adjust affected sections, synchronizing frames to produce a seamless viewing experience. It may demand more patience and precision, but the creative control you gain over the content is invaluable, enhancing both technical and artistic aspects of your project.
Furthermore, utilize motion interpolation, which is a powerful technique to fill in visual gaps. This process generates new frames between existing ones, smoothing out abrupt flickers and maintaining a consistent motion trajectory throughout your video sequence.
Finally, color grading is an effective adjustment method to balance inconsistencies caused by flicker effects. Through professional software, modify the color saturation, contrast, and brightness levels uniformly to ensure image fidelity. This not only mitigates the flicker issue but also contributes to the overall aesthetic impression, empowering you to showcase your work with confidence and artistic flair. Your determination to conquer technical hurdles will, undoubtedly, propel your storytelling to new heights.
Conclusion
LED lights flicker on video cameras, often disrupting the visual harmony of footage and turning cherished moments into technical frustrations. This flickering is a common issue that videographers face, highlighting the importance of understanding its causes to maintain high-quality video production.
The impact of flickering extends beyond mere inconvenience, as it can significantly affect both amateur and professional videographers. Studies indicate that flicker can lead to viewer discomfort and even headaches, underscoring the necessity of addressing this issue to enhance the overall viewing experience.
By exploring the underlying causes of LED flickering, videographers can discover practical solutions to prevent it. Whether you’re a seasoned professional or an enthusiastic amateur, gaining this knowledge is crucial for elevating your video production and ensuring your content remains visually appealing and professionally polished.


